JAVA
新学四问
WHY【与前代优化了什么,弥补了什么空白】筑基,越深越稳
WHAT【框架,思维导图,主题框架】容器、并发、IO、NET、JVM、其他
HOW【如何记忆,学习资源】:https://github.com/CyC2018、博客完善、书籍深入、ANKI稳固、熟悉基础数据结构
LEVEL【不是每个都学精】精通
TODO
- [ ]
学习记录
综合问题
增强for和普通for区别?
需要循环数组结构的数据时,建议使用普通for循环,因为for循环采用下标访问,对于数组结构的数据来说,采用下标访问比较好。需要循环链表结构的数据时,一定不要使用普通for循环,这种做法很糟糕,数据量大的时候有可能会导致系统崩溃。for循环是随机读取,增强for的底层是迭代器,属于顺序读取。ArrayList实现了RandomAccess标记性接口,可以显著提升随机读取的效率;而linkedlist没有实现RandomAccess接口,随机读取会很慢
数据结构
哈希
**核心理论:**Hash也称散列、哈希,对应的英文都是Hash。基本原理就是把任意长度的输入,通过Hash算法变成固定长度的输出。这个映射的规则就是对应的Hash算法,而原始数据映射后的二进制串就是哈希值。
Hash的特点:
1.hash值不可以反向推导出原始的数据
2.输入数据的微小变化会得到完全不同的hash值,相同的数据会得到相同的值
3.哈希算法的执行效率要高效,长的文本也能快速地计算出哈希值
4.hash算法的冲突概率要小
由于hash的原理是将输入空间的值映射成hash空间内,而hash值的空间远小于输入的空间。根据抽屉原理,一定会存在不同的输入被映射成相同输出的情况。抽屉原理:桌上有十个苹果,要把这十个苹果放到九个抽屉里,无论怎样放,我们会发现至少会有一个抽屉里面放不少于两个苹果,这一现象就是我们所说的抽屉原理。
红黑树
R-B Tree,全称是Red-Black Tree,又称为“红黑树”,它一种特殊的二叉查找树。红黑树的每个节点上都有存储位表示节点的颜色,可以是红(Red)或黑(Black)。
红黑树的特性:
(1)每个节点或者是黑色,或者是红色。
(2)根节点是黑色。
(3)每个叶子节点(NIL)是黑色。 [注意:这里叶子节点,是指为空(NIL或NULL)的叶子节点!]
(4)如果一个节点是红色的,则它的子节点必须是黑色的。
(5)从一个节点到该节点的子孙节点的所有路径上包含相同数目的黑节点。
注意:
(01) 特性(3)中的叶子节点,是只为空(NIL或null)的节点。
(02) 特性(5),确保没有一条路径会比其他路径长出俩倍。因而,红黑树是相对是接近平衡的二叉树。
红黑树示意图如下:

如何阅读源码?
方法:
1.实践断点
2.顺序:接口$\longrightarrow$实现类((方法【属性--》判断】)构造器方法$\longrightarrow$常用方法$\longrightarrow$其他方法)
3.工具:IDEA 的 Diagram 图标化查看继承结构,所有类的所有结构,双击跳转对应类.左下角Structure查看类结构。ctrl+H查看继承树。

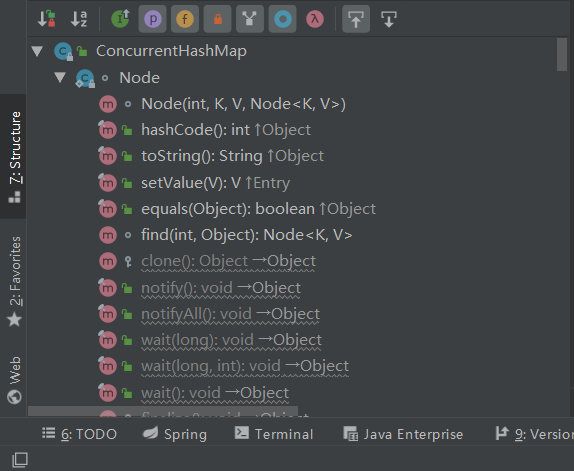
4.注释:查看注释
5.快捷键:
6.根据已知看未知:比如已知底层看源码,线程安全看原理
项目
JDK
常用包:【java.io java.lang java.util】
【java.lang.reflect java.net javax.net.* java.nio.* java.util.concurrent.】
框架
容器
学习流程
进度:
collection$\longrightarrow$list$\longrightarrow$set$\longrightarrow$map$\longrightarrow$queue
方法:
总结特点$\longrightarrow$根据特点查看源码 $\longrightarrow$笔记
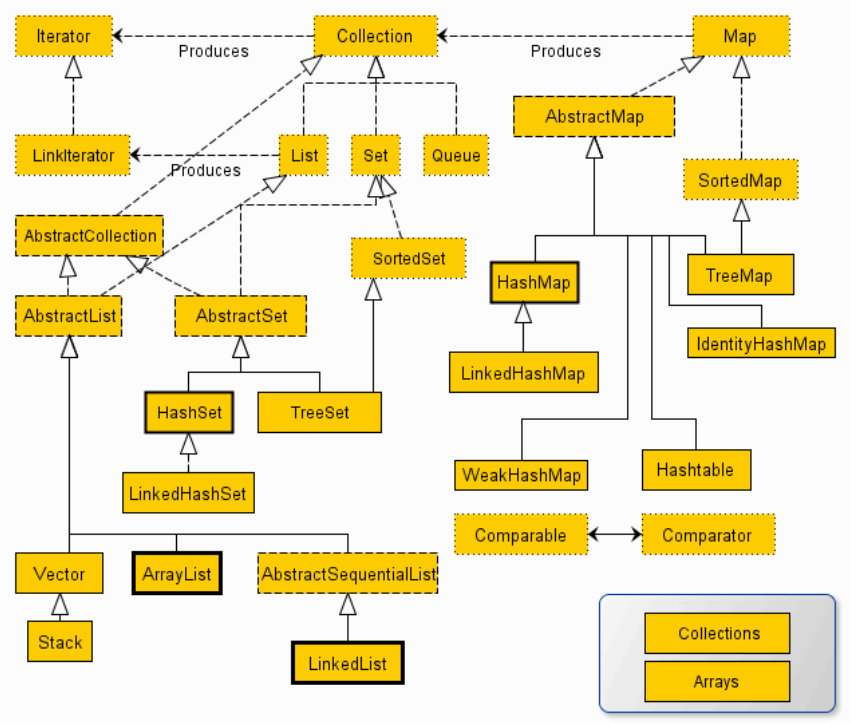
总结
总关系图
表格总结
| 集合名称 | 结构 | 是否可重复 | 是否线程安全 | 是否可为空 | 是否有序 | 扩容倍数 | 增 | 删 | 改 | 查 |
|---|---|---|---|---|---|---|---|---|---|---|
| List | ||||||||||
| Vector | 动态数组【Object [ ] 】 | 可重 | 安 | 多空共存 | 有序 | 2 | ||||
| ArrayList | 动态数组【Object [ ] 】 | 可重 | 不安 | 多空共存 | 有序 | 1.5 | 尾💚 | 尾💚 | 💚 | |
| LinkedList | 双向循环链表 | 可重 | 不安 | 多空共存 | 有序 | 链表无 | 💚 | 💚 | ||
| Set | ||||||||||
| TreeSet | 红黑树【red-black tree】 | 不重 | 不安 | 默认非空,自定义实现Comparator接口可存储null | 有序 | 红黑树无 | O(logN) | |||
| HashSet | 哈希表【HashMap】 | 不重 | 不安 | 多空单存 | 无序 | 2 | 💚 | O(1)💚 | ||
| LinkedHashSet | 双向链表【LinkedHashMap】 | 不重 | 不安 | 多空单存 | 有序 | 2 | ||||
| Map | ||||||||||
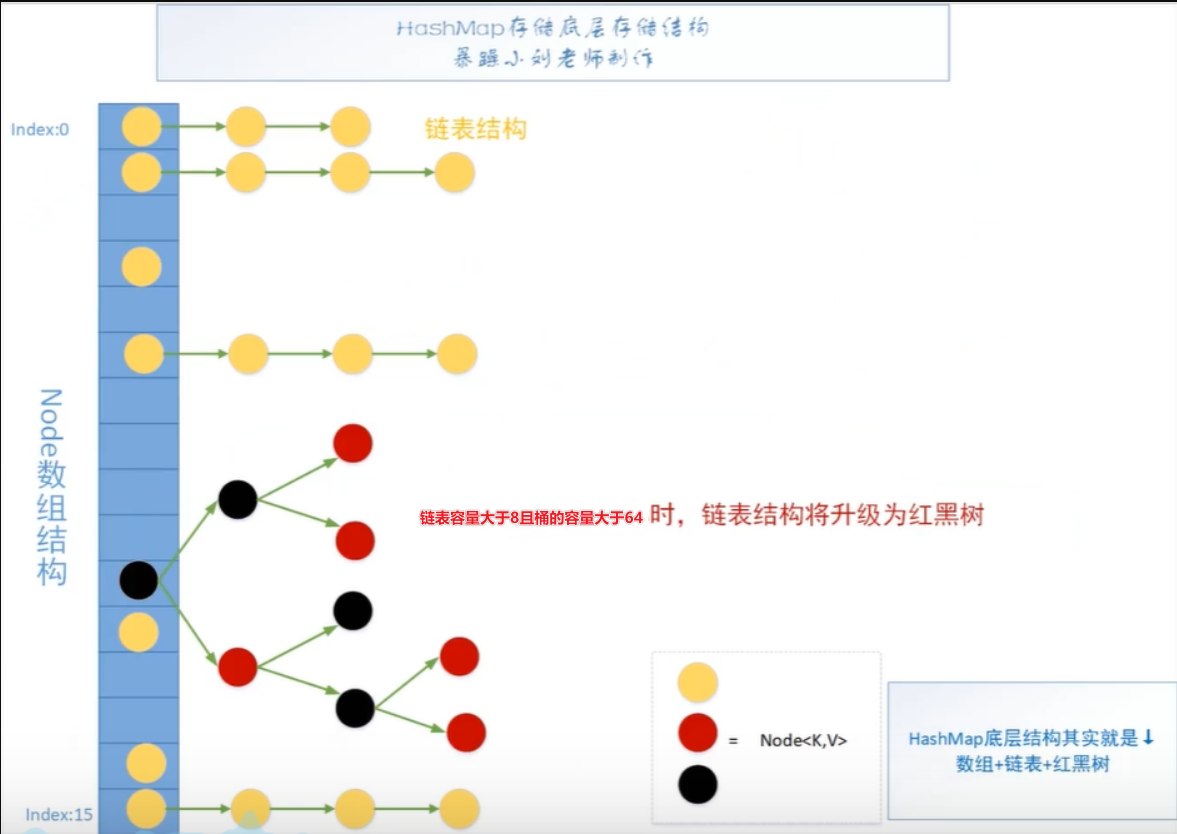
| HashMap | 数组+链表(1.8之后链表长度大于默认8且数组长度大于64转换为红黑树),散列(哈希)表 | 值可重 | 不安 | 多空键值或单空键或值 | 无序 | 2 | ||||
| TreeMap | 红黑树(自平衡的排序二叉树) | 值可重 | 不安 | 可值空共存 | 有序 | 红黑树无 | ||||
| LinkedHashMap | 底层哈希表+双向链表,HashMap子类 | 值可重 | 不安 | 多空键值或单空键或值 | 有序 | 2 | ||||
| ConcurrentHashMap | 1.8之后 数组、链表/红黑树 适合多线程 | 值可重 | 安 | 非空 | 2 | |||||
| 【保留】Hashtable | 安 | |||||||||
| Queue | ||||||||||
| PriorityQueue | 二叉小顶堆,每次取出权值最小元素,先进先出 | 安 | 非 | |||||||
Collection
集合根接口,定义子类基础操作
遍历方式
foreach
Iterator
listiterator:区别:List专用、遍历时可添加元素、可逆向遍历、可定位当前索引位置、可修改遍历对象。
Collection\<Person> persons = new ArrayList\<Person>();
Iterator iterator = persons.iterator();
while (iterator.hasNext()) {
    System.out.println(iterator.next);
}
aggregate operations
Collection\<Person> persons = new ArrayList\<Person>();
persons
    .stream()
    .forEach(new Consumer\<Person>() {
        @Override
        public void accept(Person person) {
            System.out.println(person.name);
        }
});
//在 JDK 8 以后,推荐使用聚合操作对一个集合进行操作。聚合操作通常和 lambda 表达式结合使用,让代码看起来更简洁(因此可能更难理解)。下面举几个简单的栗子:
//1.使用流来遍历一个 ShapesCollection,然后输出红色的元素:
myShapesCollection.stream()
.filter(e -> e.getColor() == Color.RED)
.forEach(e -> System.out.println(e.getName()));
//你还可以获取一个并行流(parallelStream),当集合元素很多时使用并发可以提高效率:
myShapesCollection.parallelStream()
.filter(e -> e.getColor() == Color.RED)
.forEach(e -> System.out.println(e.getName()));
//聚合操作还有很多操作集合的方法,比如说你想把 Collection 中的元素都转成 String 对象,然后把它们 连起来:
String joined = elements.stream()
.map(Object::toString)
.collect(Collectors.joining(", "));
//Thanks:https://blog.csdn.net/u011240877/article/details/52773577List
插入有序可重可多空
Vector
底层数组,同步,同步让其比AL慢,内存不够默认扩100%
| 特点 | 原因(源码) | |
|---|---|---|
| 与 ArrayList 相似 | ||
| 线程安全 | 方法中有synchronized,所以性能不如ArrayList | |
| 动态扩容为原来的2倍 | int newCapacity = oldCapacity + ((capacityIncrement > 0) ? capacityIncrement : oldCapacity); | |
可排序扩容为原来两倍
    private void grow(int minCapacity) {
        // overflow-conscious code
        int oldCapacity = elementData.length;
        //扩容为原来两倍
        int newCapacity = oldCapacity + ((capacityIncrement > 0) ?
                                         capacityIncrement : oldCapacity);
        if (newCapacity - minCapacity \< 0)
            newCapacity = minCapacity;
        if (newCapacity - MAX_ARRAY_SIZE > 0)
            newCapacity = hugeCapacity(minCapacity);
        elementData = Arrays.copyOf(elementData, newCapacity);
    }
ArrayList
| 特点 | 原因(源码) | |
|---|---|---|
| 底层数组 | new Object[initialCapacity]; | |
| 查优,尾增删快,其他地方增删慢 | 底层数组 | |
| 动态扩容原来的1.5倍 | int newCapacity = oldCapacity + (oldCapacity >> 1); | |
| 线程不安全 | 方法中没有synchronized<br />/**This class is roughly equivalent to<br/> * <tt>Vector</tt>, except that it is unsynchronized.*/ | |
| 支持快速随机访问 | RandomAccess | |
动态扩容
/**
     * Increases the capacity to ensure that it can hold at least the
     * number of elements specified by the minimum capacity argument.
     *
     * @param minCapacity the desired minimum capacity
     */
    private void grow(int minCapacity) {
        // overflow-conscious code
        int oldCapacity = elementData.length;
        //====== 动态扩容:位运算 >>:右移运算符  oldCapacity >> 1   ---》   M >> n  = M / 2^n  即扩容50%======
        int newCapacity = oldCapacity + (oldCapacity >> 1);
        if (newCapacity - minCapacity \< 0)
            newCapacity = minCapacity;
        if (newCapacity - MAX_ARRAY_SIZE > 0)
            newCapacity = hugeCapacity(minCapacity);
        // minCapacity is usually close to size, so this is a win:
        elementData = Arrays.copyOf(elementData, newCapacity);
}参考:位运算:M >> n = M / 2^n
总结
LinkedList
| 特点 | 原因(源码) | |
|---|---|---|
| 底层双向链表,增删优,可操作头尾,用作栈、(双向)队列 | 底层双向链表 | |
| 可插入空 | 底层双向链表 | |
| 查询慢 | 底层双向链表,会遍历整个链表 | |
| 线程不安全 | 方法中没有synchronized | |
底层双向链表
    /**
     * Returns the (non-null) Node at the specified element index.
     */
    Node\<E> node(int index) {
        // assert isElementIndex(index);

        if (index \< (size >> 1)) {
            Node\<E> x = first;
            for (int i = 0; i \< index; i++)
                x = x.next;
            return x;
        } else {
            Node\<E> x = last;
            for (int i = size - 1; i > index; i--)
                x = x.prev;
            return x;
        }
    }

/**
     * Inserts all of the elements in the specified collection into this
     * list, starting at the specified position.  Shifts the element
     * currently at that position (if any) and any subsequent elements to
     * the right (increases their indices).  The new elements will appear
     * in the list in the order that they are returned by the
     * specified collection's iterator.
     *
     * @param index index at which to insert the first element
     *              from the specified collection
     * @param c collection containing elements to be added to this list
     * @return {@code true} if this list changed as a result of the call
     * @throws IndexOutOfBoundsException {@inheritDoc}
     * @throws NullPointerException if the specified collection is null
     */
    public boolean addAll(int index, Collection\<? extends E> c) {
        checkPositionIndex(index);

        Object[] a = c.toArray();
        int numNew = a.length;
        if (numNew == 0)
            return false;

        Node\<E> pred, succ;
        if (index == size) {
            succ = null;
            pred = last;
        } else {
            succ = node(index);
            pred = succ.prev;
        }

        for (Object o : a) {
            @SuppressWarnings("unchecked") E e = (E) o;
            Node\<E> newNode = new Node\<>(pred, e, null);
            if (pred == null)
                first = newNode;
            else
                pred.next = newNode;
            pred = newNode;
        }

        if (succ == null) {
            last = pred;
        } else {
            pred.next = succ;
            succ.prev = pred;
        }

        size += numNew;
        modCount++;
        return true;
    }
总结
Stack
后进先出的堆栈
Set
无序不重单空,常用于去重
TreeSet
| 特点 | 原因(源码) | |
|---|---|---|
| 底层TreeMap | 底层、可排序 | |
| 可排序【自然排序,定制排序】 | 底层、可排序 | |
| 线程不安全 | 方法中没有synchronized | |
| 默认非空,自定义实现Comparator接口可存储null | ||
底层、可排序底层、可排序
public interface NavigableSet\<E> extends SortedSet\<E> {}

public class TreeSet\<E> extends AbstractSet\<E>
    implements NavigableSet\<E>, Cloneable, java.io.Serializable
{}
// Integer能排序(有默认顺序), String能排序(有默认顺序),可以对对象元素进行排序,但是自定义类需要实现comparable接口,重写comparaTo() 方法,否则:{@code ClassCastException}报ClassCastException异常。所有元素必须可以相互比较(相同类型),否则将会报类型转换异常ClassCastExection

    /**
     * Constructs a new, empty tree set, sorted according to the
     * natural ordering of its elements.  All elements inserted into
     * the set must implement the {@link Comparable} interface.
     * Furthermore, all such elements must be \<i>mutually
     * comparable\</i>: {@code e1.compareTo(e2)} must not throw a
     * {@code ClassCastException} for any elements {@code e1} and
     * {@code e2} in the set.  If the user attempts to add an element
     * to the set that violates this constraint (for example, the user
     * attempts to add a string element to a set whose elements are
     * integers), the {@code add} call will throw a
     * {@code ClassCastException}.
     */
    public TreeSet() {
        this(new TreeMap\<E,Object>());
    }
TreeSet的排列顺序与重写的compareTo()方法的返回值有关。
return 0:元素每次进行比较,都认为是相同的元素,这是就不再向TreeSet里面插入除第一个元素以外的元素,所以TreeSet中就只插入了一个元素。
return 1:元素每次进行比较,都认为新插入的元素比上一个元素大,于是二叉树存储时,会储存在根的右侧,读取时就是正序排列,先进先出。
return -1:元素每次进行比较,都认为新插入的元素比上一个元素小,于是二叉树存储时,会储存在根的左侧,读取时就是倒序排列,先进后出。
HashSet
学习前最好先学习 HashMap
| 特点 | 原因(源码) | |
|---|---|---|
| 底层HashMap | 底层HashMap | |
| 可单空 | Map的key唯一 | |
| 善存取 | 散列表定位 | |
| 无序 | 没继承SortedSet | |
| 不安 | 方法中没有synchronized | |
| 不重复 | 不重复 | |
| 2倍扩容 | 同hashmap |
底层HashMap
    private transient HashMap\<E,Object> map;

    // Dummy value to associate with an Object in the backing Map
    private static final Object PRESENT = new Object();


/**
 * Constructs a new set containing the elements in the specified
 * collection.  The \<tt>HashMap\</tt> is created with default load factor
 * (0.75) and an initial capacity sufficient to contain the elements in
 * the specified collection.
 *
 * @param c the collection whose elements are to be placed into this set
 * @throws NullPointerException if the specified collection is null
 */
public HashSet(Collection\<? extends E> c) {
    //初始16,加载因子0.75
    map = new HashMap\<>(Math.max((int) (c.size()/.75f) + 1, 16));
    addAll(c);
}
//HashSet中的元素都存放在HashMap的key上面,而value中的值都是统一的一个固定对象private static final Object PRESENT = new Object();
不重复
/**
* Adds the specified element to this set if it is not already present.
* More formally, adds the specified element \<tt>e\</tt> to this set if
* this set contains no element \<tt>e2\</tt> such that
* \<tt>(e==null ? e2==null : e.equals(e2))\</tt>.
* If this set already contains the element, the call leaves the set
* unchanged and returns \<tt>false\</tt>.
*
* @param e element to be added to this set
* @return \<tt>true\</tt> if this set did not already contain the specified
* element
*/
public boolean add(E e) {
return map.put(e, PRESENT)==null;
}
/**
* Associates the specified value with the specified key in this map.
* If the map previously contained a mapping for the key, the old
* value is replaced.
*
* @param key key with which the specified value is to be associated
* @param value value to be associated with the specified key
* @return the previous value associated with \<tt>key\</tt>, or
* \<tt>null\</tt> if there was no mapping for \<tt>key\</tt>.
* (A \<tt>null\</tt> return can also indicate that the map
* previously associated \<tt>null\</tt> with \<tt>key\</tt>.)
*/
public V put(K key, V value) {
return putVal(hash(key), key, value, false, true);
}
/**
* Implements Map.put and related methods
*
* @param hash hash for key
* @param key the key
* @param value the value to put
* @param onlyIfAbsent if true, don't change existing value
* @param evict if false, the table is in creation mode.
* @return previous value, or null if none
*/
final V putVal(int hash, K key, V value, boolean onlyIfAbsent,
boolean evict) {
Node\<K,V>[] tab; Node\<K,V> p; int n, i;
if ((tab = table) == null || (n = tab.length) == 0)
n = (tab = resize()).length;
if ((p = tab[i = (n - 1) & hash]) == null)
tab[i] = newNode(hash, key, value, null);
else {
Node\<K,V> e; K k;
if (p.hash == hash &&
((k = p.key) == key || (key != null && key.equals(k))))
e = p;
else if (p instanceof TreeNode)
e = ((TreeNode\<K,V>)p).putTreeVal(this, tab, hash, key, value);
else {
for (int binCount = 0; ; ++binCount) {
if ((e = p.next) == null) {
p.next = newNode(hash, key, value, null);
if (binCount >= TREEIFY_THRESHOLD - 1) // -1 for 1st
treeifyBin(tab, hash);
break;
}
if (e.hash == hash &&
((k = e.key) == key || (key != null && key.equals(k))))
break;
p = e;
}
}
if (e != null) { // existing mapping for key
V oldValue = e.value;
if (!onlyIfAbsent || oldValue == null)
e.value = value;
afterNodeAccess(e);
return oldValue;
}
}
++modCount;
if (++size > threshold)
resize();
afterNodeInsertion(evict);
return null;
}LinkedHashSet
| 特点 | 原因(源码) | |
|---|---|---|
| 底层链表【LinkedHashMap】 | 底层 | |
| 不安 | 方法中没有synchronized | |
| 插入有序 | LinkedHashSet在遍历时获得的迭代器是LinkedHashSet所实现的LinkedKeyIterator,它的遍历是从双向链表头开始顺序遍历,实现了有序输出。 | |
| 不重复 | 类似不重复 | |
底层
   /**
     * Constructs a new linked hash set with the same elements as the
     * specified collection.  The linked hash set is created with an initial
     * capacity sufficient to hold the elements in the specified collection
     * and the default load factor (0.75).
     *
     * @param c  the collection whose elements are to be placed into
     *           this set
     * @throws NullPointerException if the specified collection is null
     */
    public LinkedHashSet(Collection\<? extends E> c) {
        super(Math.max(2*c.size(), 11), .75f, true);
        addAll(c);
    }

    public class LinkedHashSet\<E>
    extends HashSet\<E>
    implements Set\<E>, Cloneable, java.io.Serializable {}

    /**
     * Constructs a new, empty linked hash set.  (This package private
     * constructor is only used by LinkedHashSet.) The backing
     * HashMap instance is a LinkedHashMap with the specified initial
     * capacity and the specified load factor.
     *
     * @param      initialCapacity   the initial capacity of the hash map
     * @param      loadFactor        the load factor of the hash map
     * @param      dummy             ignored (distinguishes this
     *             constructor from other int, float constructor.)
     * @throws     IllegalArgumentException if the initial capacity is less
     *             than zero, or if the load factor is nonpositive
     */
    HashSet(int initialCapacity, float loadFactor, boolean dummy) {
        map = new LinkedHashMap\<>(initialCapacity, loadFactor);
    }
Map
键值对,键不重
HashMap
推荐资源:博客1
| 特点 | 原因(源码) | |
|---|---|---|
| 底层为数组称之为哈希桶,每个桶里面放的是链表,链表中的每个节点,就是哈希表中的每个元素。<br/>JDK8后,链表容量大于8且桶的容量大于64,转化成红黑树 | 底层 | |
| 线程不安全 | 方法中没有synchronized | |
| 默认长度16 | 初始容量 | |
| 扩容为原来的两倍 | 扩容 | |
| 无序 | 无序,可空 | |
| 多空键值或单空键或值 | 无序,可空 |
底层
     /** Node 单向链表
     * Basic hash bin node, used for most entries.  (See below for
     * TreeNode subclass, and in LinkedHashMap for its Entry subclass.)
     */
    static class Node\<K,V> implements Map.Entry\<K,V> {
        final int hash;
        final K key;
        V value;
        //碰撞之后形成链表
        Node\<K,V> next;

        Node(int hash, K key, V value, Node\<K,V> next) {
            this.hash = hash;
            this.key = key;
            this.value = value;
            this.next = next;
        }

        public final K getKey()        { return key; }
        public final V getValue()      { return value; }
        public final String toString() { return key + "=" + value; }

        public final int hashCode() {
            return Objects.hashCode(key) ^ Objects.hashCode(value);
        }

        public final V setValue(V newValue) {
            V oldValue = value;
            value = newValue;
            return oldValue;
        }

        public final boolean equals(Object o) {
            if (o == this)
                return true;
            if (o instanceof Map.Entry) {
                Map.Entry\<?,?> e = (Map.Entry\<?,?>)o;
                if (Objects.equals(key, e.getKey()) &&
                    Objects.equals(value, e.getValue()))
                    return true;
            }
            return false;
        }
    }


    /**红黑树
     * Entry for Tree bins. Extends LinkedHashMap.Entry (which in turn
     * extends Node) so can be used as extension of either regular or
     * linked node.
     */
    static final class TreeNode\<K,V> extends LinkedHashMap.Entry\<K,V> {
        TreeNode\<K,V> parent;  // red-black tree links
        TreeNode\<K,V> left;
        TreeNode\<K,V> right;
        TreeNode\<K,V> prev;    // needed to unlink next upon deletion
        boolean red;
        TreeNode(int hash, K key, V val, Node\<K,V> next) {
            super(hash, key, val, next);
        }

        /**
         * Returns root of tree containing this node.
         */
        final TreeNode\<K,V> root() {
            for (TreeNode\<K,V> r = this, p;;) {
                if ((p = r.parent) == null)
                    return r;
                r = p;
            }
        }

      ......
    }
扩容
   /** 为什么需要扩容:哈希冲突导致的链化影像查找效率,数组以空间换时间
   由power-of-two expansion  newCap = oldCap \<\< 1 可知扩容为原来的两倍
		1010      十进制:10     原始数         number
		10100      十进制:20     左移一位       number = number \<\< 1;
	     1010      十进制:10     右移一位       number = number >> 1;
   		即	oldCap \<\< 1 即二进制向左移动两位:oldCap \<\< 1=oldCap*2
   			同理oldCap >> 1=oldCap/2
   			补充>>>:无符号右移,忽略符号位,空位都以0补齐
     * Initializes or doubles table size.  If null, allocates in
     * accord with initial capacity target held in field threshold.
     * Otherwise, because we are using power-of-two expansion, the
     * elements from each bin must either stay at same index, or move
     * with a power of two offset in the new table.
     *
     * @return the table
     */
    final Node\<K,V>[] resize() {
        //oldTab扩容前哈希表
        Node\<K,V>[] oldTab = table;
        //扩容之前数组长度
        int oldCap = (oldTab == null) ? 0 : oldTab.length;
        //扩容之前的阈值,触发本次扩容的阈值
        int oldThr = threshold;
        //扩容之后的数组大小
        //下次触发扩容的条件
        int newCap, newThr = 0;
        //散列表已初始化,这是一次正常的扩容
        if (oldCap > 0) {
            //扩容之前数组大小达到最大阈值,则不扩容且设扩容条件为int最大值
            if (oldCap >= MAXIMUM_CAPACITY) {
                threshold = Integer.MAX_VALUE;
                return oldTab;
            }
            //oldCap左移一位实现数值翻倍,并且复制给newCap,newCap小于最大限制且扩容之前的数组长度 >= 16
            else if ((newCap = oldCap \<\< 1) \< MAXIMUM_CAPACITY &&
                     oldCap >= DEFAULT_INITIAL_CAPACITY)
                newThr = oldThr \<\< 1; // double threshold
        }
        //oldCap==0,说明HashMap中的散列表是null
        //1.new HashMap(initCap,loadFactor);
        //2.new HashMap(initCap);
         //3.new HashMap(map);且map有数据
        else if (oldThr > 0) // initial capacity was placed in threshold
            newCap = oldThr;
        //oldCap==0,oldThr==0
        //new HashMap(map);
        else {               // zero initial threshold signifies using defaults
            newCap = DEFAULT_INITIAL_CAPACITY;//16
            newThr = (int)(DEFAULT_LOAD_FACTOR * DEFAULT_INITIAL_CAPACITY);//12
        }

        //newThr为0时,通过newCap和loadFactor计算出一个newThr
        if (newThr == 0) {
            float ft = (float)newCap * loadFactor;
            newThr = (newCap \< MAXIMUM_CAPACITY && ft \< (float)MAXIMUM_CAPACITY ?
                      (int)ft : Integer.MAX_VALUE);
        }
        threshold = newThr;

        //第一次或创建一个更大的数组
        @SuppressWarnings({"rawtypes","unchecked"})
            Node\<K,V>[] newTab = (Node\<K,V>[])new Node[newCap];
        table = newTab;
        //扩容前数组不为空
        if (oldTab != null) {
            for (int j = 0; j \< oldCap; ++j) {
                //当前node节点
                Node\<K,V> e;
                //当前桶位中有数据,但是数据具体是单个数据或链表或红黑树还不明确
                if ((e = oldTab[j]) != null) {
                    //方便JVM GC回收
                    oldTab[j] = null;
                    //当前节点为单数据
                    if (e.next == null)
                        newTab[e.hash & (newCap - 1)] = e;
                    //当前节点已经树化
                    else if (e instanceof TreeNode)
                        ((TreeNode\<K,V>)e).split(this, newTab, j, oldCap);
                    //当前节点为链表
                    else { // preserve order
                        //loHead低位链表,存放在扩容之后的数组的下标位置,与当前数组的下标位置一致。
                        //hiHead高位链表,存放在扩容之后的数组的下标位置为当前数组的下标位置+扩容之前的长度。
                        Node\<K,V> loHead = null, loTail = null;
                        Node\<K,V> hiHead = null, hiTail = null;
                        Node\<K,V> next;
                        do {
                            next = e.next;
                            if ((e.hash & oldCap) == 0) {
                                if (loTail == null)
                                    loHead = e;
                                else
                                    loTail.next = e;
                                loTail = e;
                            }
                            else {
                                if (hiTail == null)
                                    hiHead = e;
                                else
                                    hiTail.next = e;
                                hiTail = e;
                            }
                        } while ((e = next) != null);

                        //低位链表有数据
                        if (loTail != null) {
                            loTail.next = null;
                            newTab[j] = loHead;
                        }
                        if (hiTail != null) {
                            hiTail.next = null;
                            newTab[j + oldCap] = hiHead;
                        }
                    }
                }
            }
        }
        return newTab;
    }
初始容量
/**默认(缺省)数组长度
     * The default initial capacity - MUST be a power of two.
     */
    static final int DEFAULT_INITIAL_CAPACITY = 1 \<\< 4; // aka 16

    /**最大数组长度
     * The maximum capacity, used if a higher value is implicitly specified
     * by either of the constructors with arguments.
     * MUST be a power of two \<= 1\<\<30.
     */
    static final int MAXIMUM_CAPACITY = 1 \<\< 30;

    /**缺省负载因子大小
     * The load factor used when none specified in constructor.
     */
    static final float DEFAULT_LOAD_FACTOR = 0.75f;

    /**转换为红黑树的单个链表元素阈值
                        if (binCount >= TREEIFY_THRESHOLD - 1)
                    treeifyBin(tab, hash);看下面方法
            }
     * The bin count threshold for using a tree rather than list for a
     * bin.  Bins are converted to trees when adding an element to a
     * bin with at least this many nodes. The value must be greater
     * than 2 and should be at least 8 to mesh with assumptions in
     * tree removal about conversion back to plain bins upon
     * shrinkage.
     */
    static final int TREEIFY_THRESHOLD = 8;

/**
     * Replaces all linked nodes in bin at index for given hash unless
     * table is too small, in which case resizes instead.
     */
    final void treeifyBin(Node\<K,V>[] tab, int hash) {
        int n, index; Node\<K,V> e;
        if (tab == null || (n = tab.length) \< MIN_TREEIFY_CAPACITY)
            resize();
        else if ((e = tab[index = (n - 1) & hash]) != null) {
            TreeNode\<K,V> hd = null, tl = null;
            do {
                TreeNode\<K,V> p = replacementTreeNode(e, null);
                if (tl == null)
                    hd = p;
                else {
                    p.prev = tl;
                    tl.next = p;
                }
                tl = p;
            } while ((e = e.next) != null);
            if ((tab[index] = hd) != null)
                hd.treeify(tab);
        }
    }

    /**从红黑树降为链表的阈值
     * The bin count threshold for untreeifying a (split) bin during a
     * resize operation. Should be less than TREEIFY_THRESHOLD, and at
     * most 6 to mesh with shrinkage detection under removal.
     */
    static final int UNTREEIFY_THRESHOLD = 6;

    /**转换为红黑树的数组阈值
     * The smallest table capacity for which bins may be treeified.
     * (Otherwise the table is resized if too many nodes in a bin.)
     * Should be at least 4 * TREEIFY_THRESHOLD to avoid conflicts
     * between resizing and treeification thresholds.
     */
    static final int MIN_TREEIFY_CAPACITY = 64;


    /** 哈系桶(表)
     * The table, initialized on first use, and resized as
     * necessary. When allocated, length is always a power of two.
     * (We also tolerate length zero in some operations to allow
     * bootstrapping mechanics that are currently not needed.)
     */
    transient Node\<K,V>[] table;

    /**
     * Holds cached entrySet(). Note that AbstractMap fields are used
     * for keySet() and values().
     */
    transient Set\<Map.Entry\<K,V>> entrySet;

    /**当前哈希表元素个数
     * The number of key-value mappings contained in this map.
     */
    transient int size;

    /**修改次数,不包含替换
     * The number of times this HashMap has been structurally modified
     * Structural modifications are those that change the number of mappings in
     * the HashMap or otherwise modify its internal structure (e.g.,
     * rehash).  This field is used to make iterators on Collection-views of
     * the HashMap fail-fast.  (See ConcurrentModificationException).
     */
    transient int modCount;

    /**扩容阈值,当哈希表元素超过阈值时触发扩容,
     * The next size value at which to resize (capacity * load factor).
     *
     * @serial
     */
    // (The javadoc description is true upon serialization.
    // Additionally, if the table array has not been allocated, this
    // field holds the initial array capacity, or zero signifying
    // DEFAULT_INITIAL_CAPACITY.)
    int threshold;

    /**负载因子,threshold = capacity * loadFactor
     * The load factor for the hash table.
     *
     * @serial
     */
    final float loadFactor;
无序,可空
未解决问题:为什么有时候看起来有序? 答:
/**
     * Associates the specified value with the specified key in this map.
     * If the map previously contained a mapping for the key, the old
     * value is replaced.
     *
     * @param key key with which the specified value is to be associated
     * @param value value to be associated with the specified key
     * @return the previous value associated with \<tt>key\</tt>, or
     *         \<tt>null\</tt> if there was no mapping for \<tt>key\</tt>.
     *         (A \<tt>null\</tt> return can also indicate that the map
     *         previously associated \<tt>null\</tt> with \<tt>key\</tt>.)
     */
    public V put(K key, V value) {
        return putVal(hash(key), key, value, false, true);
    }
//====Key为null情况

//假设 putVal(hash(null), null, value, false, true);
//即 putVal(0, 0, value, false, true);
//由 if ((p = tab[i = (n - 1) & hash]) == null)
// tab[i] = newNode(hash, key, value, null);
//得tab[0]==null --> tab[0] = newNode(hash, key, value, null);
//key为null放在tab[0]

    /**
     * Computes key.hashCode() and spreads (XORs) higher bits of hash
     * to lower.  Because the table uses power-of-two masking, sets of
     * hashes that vary only in bits above the current mask will
     * always collide. (Among known examples are sets of Float keys
     * holding consecutive whole numbers in small tables.)  So we
     * apply a transform that spreads the impact of higher bits
     * downward. There is a tradeoff between speed, utility, and
     * quality of bit-spreading. Because many common sets of hashes
     * are already reasonably distributed (so don't benefit from
     * spreading), and because we use trees to handle large sets of
     * collisions in bins, we just XOR some shifted bits in the
     * cheapest possible way to reduce systematic lossage, as well as
     * to incorporate impact of the highest bits that would otherwise
     * never be used in index calculations because of table bounds.
     */
//作用:在table长度不长的情况下,能让key的hash值的高16位也参与路由运算,
//异或:同0异1
//h=0b 0010 0101 1010 1100 0011 1111 0010 1110
//  0b 0010 0101 1010 1100 0011 1111 0010 1110
//          ^
//  0b 0000 0000 0000 0000 0010 0101 1010 1100
//=>   0010 0101 1010 1100 0001 1010 1000 0010
    static final int hash(Object key) {
        int h;
        return (key == null) ? 0 : (h = key.hashCode()) ^ (h >>> 16);
    }


/**
     * Implements Map.put and related methods
     *
     * @param hash hash for key
     * @param key the key
     * @param value the value to put
     * onlyIfAbsent  true==》key存在,不插入
     * @param onlyIfAbsent if true, don't change existing value
     * @param evict if false, the table is in creation mode.
     * @return previous value, or null if none
     */
    final V putVal(int hash, K key, V value, boolean onlyIfAbsent,
                   boolean evict) {
        //tab 当前散列表
        //p 当前散列表元素
        //n 当前散列表数组长度
        //i 路由寻址结果
        Node\<K,V>[] tab; Node\<K,V> p; int n, i;
        //延迟初始化,第一次调用putVal时会初始化hashMap对象中最消耗内存的散列表
        if ((tab = table) == null || (n = tab.length) == 0)
            n = (tab = resize()).length;
        //最简单情况,寻址找到的桶位为null,直接放入数据
        if ((p = tab[i = (n - 1) & hash]) == null)
            tab[i] = newNode(hash, key, value, null);
        else {
            //e 不为null 找到了一个与当前要插入的key-value一致的 key元素
            Node\<K,V> e; K k;
            //表示桶位中的该元素与当前插入元素key完全一致,后续将替换
            if (p.hash == hash &&
                ((k = p.key) == key || (key != null && key.equals(k))))
                e = p;
            //该元素已经树化时
            else if (p instanceof TreeNode)
                e = ((TreeNode\<K,V>)p).putTreeVal(this, tab, hash, key, value);
            //链表时且不等于头元素,元素依次比较
            else {
                for (int binCount = 0; ; ++binCount) {
                    //最后一个元素还找不到同插入key相同的node
                    if ((e = p.next) == null) {
                        //插入最后
                        p.next = newNode(hash, key, value, null);
                        //链表元素数量大于8,树化
                        if (binCount >= TREEIFY_THRESHOLD - 1) // -1 for 1st
                            treeifyBin(tab, hash);
                        break;
                    }
                    //链表中找到同插入key的node,替换
                    if (e.hash == hash &&
                        ((k = e.key) == key || (key != null && key.equals(k))))
                        break;
                    p = e;
                }
            }
            //上面的e存在替换值
            if (e != null) { // existing mapping for key
                V oldValue = e.value;
                if (!onlyIfAbsent || oldValue == null)
                    e.value = value;
                afterNodeAccess(e);
                return oldValue;
            }
        }
        //记录修改次数,替换不算
        ++modCount;
        //插入后容量大于扩容阈值则扩容
        if (++size > threshold)
            resize();
        afterNodeInsertion(evict);
        return null;
    }
GET()
    /**
     * Returns the value to which the specified key is mapped,
     * or {@code null} if this map contains no mapping for the key.
     *
     * \<p>More formally, if this map contains a mapping from a key
     * {@code k} to a value {@code v} such that {@code (key==null ? k==null :
     * key.equals(k))}, then this method returns {@code v}; otherwise
     * it returns {@code null}.  (There can be at most one such mapping.)
     *
     * \<p>A return value of {@code null} does not \<i>necessarily\</i>
     * indicate that the map contains no mapping for the key; it's also
     * possible that the map explicitly maps the key to {@code null}.
     * The {@link #containsKey containsKey} operation may be used to
     * distinguish these two cases.
     *
     * @see #put(Object, Object)
     */
    public V get(Object key) {
        Node\<K,V> e;
        return (e = getNode(hash(key), key)) == null ? null : e.value;
    }


    /**
     * Implements Map.get and related methods.
     *
     * @param hash hash for key
     * @param key the key
     * @return the node, or null if none
     */
    final Node\<K,V> getNode(int hash, Object key) {
        //tab:引用当前 hashmap的散列表
        //first:桶位中的头元素
        //e:临时node元素
        //n: table数组长度
        Node\<K,V>[] tab; Node\<K,V> first, e; int n; K k;
        if ((tab = table) != null && (n = tab.length) > 0 &&
            (first = tab[(n - 1) & hash]) != null) {
            //第一种情况:定位出来的桶位元素即为咱们要get的数据
            if (first.hash == hash && // always check first node
                ((k = first.key) == key || (key != null && key.equals(k))))
                return first;
            //说明当前桶位不止一个元素,可能是链表也可能是红黑树
            if ((e = first.next) != null) {
                //第二种情况,桶升级成了红黑树
                if (first instanceof TreeNode)
                    return ((TreeNode\<K,V>)first).getTreeNode(hash, key);
                //桶形成了链表
                do {
                    if (e.hash == hash &&
                        ((k = e.key) == key || (key != null && key.equals(k))))
                        return e;
                } while ((e = e.next) != null);
            }
        }
        return null;
    }
Remove()
    /**
     * Implements Map.remove and related methods.
     *
     * @param hash hash for key
     * @param key the key
     * @param value the value to match if matchValue, else ignored
     * @param matchValue if true only remove if value is equal
     * @param movable if false do not move other nodes while removing
     * @return the node, or null if none
     */
    final Node\<K,V> removeNode(int hash, Object key, Object value,
                               boolean matchValue, boolean movable) {
        //tab:引用当前 hashmap中的散列表
        //p:当前node元素
        //n:表示散列表数组长度
        //index:表示寻址结果
        Node\<K,V>[] tab; Node\<K,V> p; int n, index;
        if ((tab = table) != null && (n = tab.length) > 0 &&
            (p = tab[index = (n - 1) & hash]) != null) {
            //说明路由的桶位是有数据的,需要进行查找操作,并且删除
            //node:查找到的结果
            //e:当前Node的下一个元素
            Node\<K,V> node = null, e; K k; V v;
            if (p.hash == hash &&
                ((k = p.key) == key || (key != null && key.equals(k))))
                node = p;
            else if ((e = p.next) != null) {
                //说明,当前桶位要么是链表要么是红黑树
                if (p instanceof TreeNode)//判断当前桶位是否升级为红黑树了
                    //第二种情况:红黑树查找
                    node = ((TreeNode\<K,V>)p).getTreeNode(hash, key);
                else {
                    //第三种链表
                    do {
                        if (e.hash == hash &&
                            ((k = e.key) == key ||
                             (key != null && key.equals(k)))) {
                            node = e;
                            break;
                        }
                        p = e;
                    } while ((e = e.next) != null);
                }
            }
            //判断node不为空的话,说明按照key査找到需要删除的数据了
            if (node != null && (!matchValue || (v = node.value) == value ||
                                 (value != null && value.equals(v)))) {
                //第一种情況:node是树节点,说明需要进行树节点移除操作
                if (node instanceof TreeNode)
                    ((TreeNode\<K,V>)node).removeTreeNode(this, tab, movable);
                //第二种情況:桶位元素即为査找结果,则将该元素的下一个元素放至桶位中
                else if (node == p)
                    tab[index] = node.next;
                else
                    //第三种情況:将当前元素p的下一个元素设置成要删除元素的下一个元素
                    p.next = node.next;
                ++modCount;
                --size;
                afterNodeRemoval(node);
                return node;
            }
        }
        return null;
    }
构造方法
:>>>无符号右移,忽略符号位,空位都以0补齐
/* ---------------- Public operations -------------- */
/**
* Constructs an empty \<tt>HashMap\</tt> with the specified initial
* capacity and load factor.
*
* @param initialCapacity the initial capacity
* @param loadFactor the load factor
* @throws IllegalArgumentException if the initial capacity is negative
* or the load factor is nonpositive
*/
public HashMap(int initialCapacity, float loadFactor) {
//限制数组与loadFactor 0\<initialCapacity\<MAXIMUM_CAPACITY
// loadFactor>0
if (initialCapacity \< 0)
throw new IllegalArgumentException("Illegal initial capacity: " +
initialCapacity);
if (initialCapacity > MAXIMUM_CAPACITY)
initialCapacity = MAXIMUM_CAPACITY;
if (loadFactor \<= 0 || Float.isNaN(loadFactor))
throw new IllegalArgumentException("Illegal load factor: " +
loadFactor);
this.loadFactor = loadFactor;
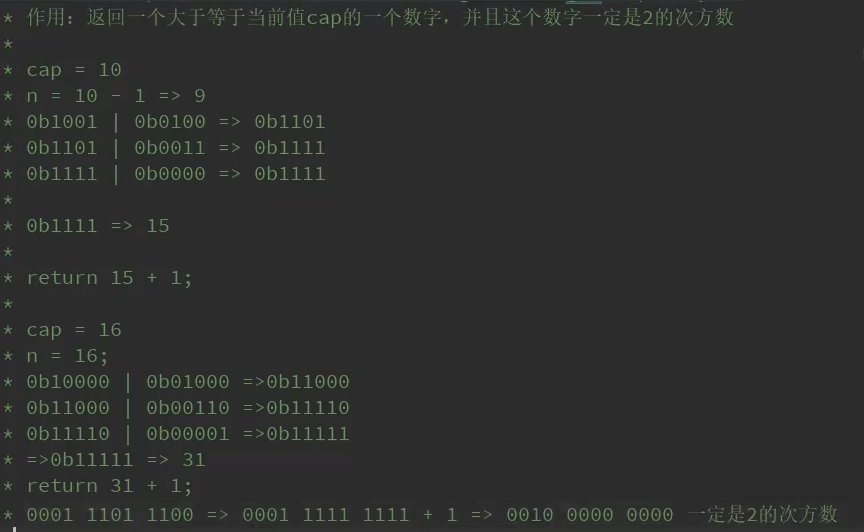
//tableSizeFor 返回一个大于等于当前cap的一个数字,并且这个数字一定是2的次方数,源码如下:
this.threshold = tableSizeFor(initialCapacity);
}
/**返回一个大于等于当前cap的一个数字,并且这个数字一定是2的次方数:
* >>>:无符号右移,忽略符号位,空位都以0补齐
* Returns a power of two size for the given target capacity.
*/
static final int tableSizeFor(int cap) {
int n = cap - 1;
n |= n >>> 1;
n |= n >>> 2;
n |= n >>> 4;
n |= n >>> 8;
n |= n >>> 16;
return (n \< 0) ? 1 : (n >= MAXIMUM_CAPACITY) ? MAXIMUM_CAPACITY : n + 1;
}
/**
* Constructs an empty \<tt>HashMap\</tt> with the specified initial
* capacity and the default load factor (0.75).
*
* @param initialCapacity the initial capacity.
* @throws IllegalArgumentException if the initial capacity is negative.
*/
public HashMap(int initialCapacity) {
this(initialCapacity, DEFAULT_LOAD_FACTOR);
}
/**
* Constructs an empty \<tt>HashMap\</tt> with the default initial capacity
* (16) and the default load factor (0.75).
*/
public HashMap() {
this.loadFactor = DEFAULT_LOAD_FACTOR; // all other fields defaulted
}
/**
* Constructs a new \<tt>HashMap\</tt> with the same mappings as the
* specified \<tt>Map\</tt>. The \<tt>HashMap\</tt> is created with
* default load factor (0.75) and an initial capacity sufficient to
* hold the mappings in the specified \<tt>Map\</tt>.
*
* @param m the map whose mappings are to be placed in this map
* @throws NullPointerException if the specified map is null
*/
public HashMap(Map\<? extends K, ? extends V> m) {
this.loadFactor = DEFAULT_LOAD_FACTOR;
putMapEntries(m, false);
}LinkedHashMap
| 特点 | 原因(源码) | |
|---|---|---|
| 底层哈希表+双向链表,HashMap子类 | 底层 | |
| 线程不安全 | 方法中没有synchronized | |
| 有序 | 有序 | |
| 多空键值或单空键或值 | 同HashMap | |
| 扩容两倍 | 同hashmap |
底层
put、resize扩容均使用HashMap的方法,拥有HashMap所有特性。
public class LinkedHashMap\<K,V>
    extends HashMap\<K,V>
    implements Map\<K,V>
{}

    /**
     * HashMap.Node subclass for normal LinkedHashMap entries.
     */
    static class Entry\<K,V> extends HashMap.Node\<K,V> {
        Entry\<K,V> before, after;
        Entry(int hash, K key, V value, Node\<K,V> next) {
            super(hash, key, value, next);
        }
    }
    /**双向链表头
     * The head (eldest) of the doubly linked list.
     */
    transient LinkedHashMap.Entry\<K,V> head;

    /**双向链表尾
     * The tail (youngest) of the doubly linked list.
     */
    transient LinkedHashMap.Entry\<K,V> tail;

    /**
     * The iteration ordering method for this linked hash map: \<tt>true\</tt>
     * for access-order, \<tt>false\</tt> for insertion-order.
     *
     * @serial
     */
    final boolean accessOrder;
/**
     * Constructs an empty insertion-ordered \<tt>LinkedHashMap\</tt> instance
     * with the specified initial capacity and a default load factor (0.75).
     *
     * @param  initialCapacity the initial capacity
     * @throws IllegalArgumentException if the initial capacity is negative
     */
    public LinkedHashMap(int initialCapacity) {
        super(initialCapacity);
        accessOrder = false;
    }

    /**
     * Constructs an empty insertion-ordered \<tt>LinkedHashMap\</tt> instance
     * with the default initial capacity (16) and load factor (0.75).
     */
    public LinkedHashMap() {
        super();
        accessOrder = false;
    }

    /**
     * Constructs an insertion-ordered \<tt>LinkedHashMap\</tt> instance with
     * the same mappings as the specified map.  The \<tt>LinkedHashMap\</tt>
     * instance is created with a default load factor (0.75) and an initial
     * capacity sufficient to hold the mappings in the specified map.
     *
     * @param  m the map whose mappings are to be placed in this map
     * @throws NullPointerException if the specified map is null
     */
    public LinkedHashMap(Map\<? extends K, ? extends V> m) {
        super();
        accessOrder = false;
        putMapEntries(m, false);
    }

    /**
     * Constructs an empty \<tt>LinkedHashMap\</tt> instance with the
     * specified initial capacity, load factor and ordering mode.
     *
     * @param  initialCapacity the initial capacity
     * @param  loadFactor      the load factor
     *=====此构造方法accessOrder为true时实现了按访问顺序存储元素======
     *@param  accessOrder     the ordering mode - \<tt>true\</tt> for access-order, \<tt>false\</tt> for insertion-order
     * @throws IllegalArgumentException if the initial capacity is negative
     *         or the load factor is nonpositive
     */
    public LinkedHashMap(int initialCapacity,
                         float loadFactor,
                         boolean accessOrder) {
        super(initialCapacity, loadFactor);
        this.accessOrder = accessOrder;
    }
有序
     /**
     * HashMap.Node subclass for normal LinkedHashMap entries.
     */
    static class Entry\<K,V> extends HashMap.Node\<K,V> {
        //记录相邻两个key-value对象
        Entry\<K,V> before, after;
        Entry(int hash, K key, V value, Node\<K,V> next) {
            super(hash, key, value, next);
        }
    }
    /**双向链表头
     * The head (eldest) of the doubly linked list.
     */
    transient LinkedHashMap.Entry\<K,V> head;

    /**双向链表尾
     * The tail (youngest) of the doubly linked list.
     */
    transient LinkedHashMap.Entry\<K,V> tail;
/**====false则按插入顺序存储元素,如果是true则按访问顺序存储元素
     * The iteration ordering method for this linked hash map: \<tt>true\</tt>
     * for access-order, \<tt>false\</tt> for insertion-order.
     *
     * @serial
     */
    final boolean accessOrder;

    Node\<K,V> newNode(int hash, K key, V value, Node\<K,V> e) {
        LinkedHashMap.Entry\<K,V> p =
            new LinkedHashMap.Entry\<K,V>(hash, key, value, e);
        linkNodeLast(p);
        return p;
    }

    /**
     * The iteration ordering method for this linked hash map: \<tt>true\</tt>
     * for access-order, \<tt>false\</tt> for insertion-order.
     *
     * @serial
     */
    final boolean accessOrder;

    // internal utilities
//实现有序的方法
//举例:放入1,2,3
//1进:head=tail=1  last=null
//    3进:tail=last=1--》tail=3  3.before=1 --》 1.after=3
 //   	2进:tail=last=3--》tail=2  2.before=3 --》 3.after=2
    // link at the end of list
    private void linkNodeLast(LinkedHashMap.Entry\<K,V> p) {
        LinkedHashMap.Entry\<K,V> last = tail;
        tail = p;
        if (last == null)
            head = p;
        else {
            p.before = last;
            last.after = p;
        }
    }

//HashMap的Node===============

/**
     * Basic hash bin node, used for most entries.  (See below for
     * TreeNode subclass, and in LinkedHashMap for its Entry subclass.)
     */
    static class Node\<K,V> implements Map.Entry\<K,V> {
        final int hash;
        final K key;
        V value;
        Node\<K,V> next;

        Node(int hash, K key, V value, Node\<K,V> next) {
            this.hash = hash;
            this.key = key;
            this.value = value;
            this.next = next;
        }

        public final K getKey()        { return key; }
        public final V getValue()      { return value; }
        public final String toString() { return key + "=" + value; }

        public final int hashCode() {
            return Objects.hashCode(key) ^ Objects.hashCode(value);
        }

        public final V setValue(V newValue) {
            V oldValue = value;
            value = newValue;
            return oldValue;
        }

        public final boolean equals(Object o) {
            if (o == this)
                return true;
            if (o instanceof Map.Entry) {
                Map.Entry\<?,?> e = (Map.Entry\<?,?>)o;
                if (Objects.equals(key, e.getKey()) &&
                    Objects.equals(value, e.getValue()))
                    return true;
            }
            return false;
        }
    }
TreeMap
| 特点 | 原因(源码) | |
|---|---|---|
| 底层二叉树【红黑树】 | 底层红黑树 | |
| 线程不安全 | 方法中没有synchronized | |
| 有序,比较通过key | 底层红黑树 | |
| 多值可空 | ||
底层红黑树
//NavigableMap接口提供针对Key的有序访问,
public class TreeMap\<K,V>
    extends AbstractMap\<K,V>
    implements NavigableMap\<K,V>, Cloneable, java.io.Serializable
{
    /**
     * The comparator used to maintain order in this tree map, or
     * null if it uses the natural ordering of its keys.
     *
     * @serial
     */
    private final Comparator\<? super K> comparator;

    private transient Entry\<K,V> root;

    /**
     * The number of entries in the tree
     */
    private transient int size = 0;

    /**
     * The number of structural modifications to the tree.
     */
    private transient int modCount = 0;

 /**
     * Node in the Tree.  Doubles as a means to pass key-value pairs back to
     * user (see Map.Entry).
     */

    static final class Entry\<K,V> implements Map.Entry\<K,V> {
        K key;
        V value;
        Entry\<K,V> left;
        Entry\<K,V> right;
        Entry\<K,V> parent;
        boolean color = BLACK;

        /**
         * Make a new cell with given key, value, and parent, and with
         * {@code null} child links, and BLACK color.
         */
        Entry(K key, V value, Entry\<K,V> parent) {
            this.key = key;
            this.value = value;
            this.parent = parent;
        }

        /**
         * Returns the key.
         *
         * @return the key
         */
        public K getKey() {
            return key;
        }

        /**
         * Returns the value associated with the key.
         *
         * @return the value associated with the key
         */
        public V getValue() {
            return value;
        }

        /**
         * Replaces the value currently associated with the key with the given
         * value.
         *
         * @return the value associated with the key before this method was
         *         called
         */
        public V setValue(V value) {
            V oldValue = this.value;
            this.value = value;
            return oldValue;
        }

        public boolean equals(Object o) {
            if (!(o instanceof Map.Entry))
                return false;
            Map.Entry\<?,?> e = (Map.Entry\<?,?>)o;

            return valEquals(key,e.getKey()) && valEquals(value,e.getValue());
        }

        public int hashCode() {
            int keyHash = (key==null ? 0 : key.hashCode());
            int valueHash = (value==null ? 0 : value.hashCode());
            return keyHash ^ valueHash;
        }

        public String toString() {
            return key + "=" + value;
        }
    }}
HashTable
线程安全,内部的方法基本都经过 synchronized,保留类不建议使用
ConcurrentHashMap
| 特点 | 原因(源码) | |
|---|---|---|
| 底层数组、链表、红黑树 | 底层 | |
| 线程安全 | 线程安全 | |
| 动态扩容为原来的2倍 | int newCapacity = oldCapacity + ((capacityIncrement > 0) ? capacityIncrement : oldCapacity); | |
| 都安全但是ConcurrentHashMap 比 HashTable 效率要高 | ConcurrentHashMap 锁粒度更细 | |
| 非空 |
JDK1.7 : 【数组(Segment) + 数组(HashEntry) + 链表(HashEntry节点)】
ConcurrentHashMap(分段锁) 对整个桶数组进行了分割分段(Segment),每一把锁只锁容器其中一部分数据,多线程访问容器里不同数据段的数据,就不会存在锁竞争,提高并发访问率。Segment是一种可重入锁ReentrantLock,在ConcurrentHashMap里扮演锁的角色,HashEntry则用于存储键值对数据。
JDK1.8 : Node数组+链表 / 红黑树
利用CAS+Synchronized来保证并发更新的安全,底层依然采用数组+链表+红黑树的存储结构。
底层
/**
     * The array of bins. Lazily initialized upon first insertion.
     * Size is always a power of two. Accessed directly by iterators.
     */
    transient volatile Node\<K,V>[] table;

    /**
     * The next table to use; non-null only while resizing.
     */
    private transient volatile Node\<K,V>[] nextTable;

    /**
     * Base counter value, used mainly when there is no contention,
     * but also as a fallback during table initialization
     * races. Updated via CAS.
     */
    private transient volatile long baseCount;

    /**
     * hash表初始化或扩容时的一个控制位标识量。
     * 负数代表正在进行初始化或扩容操作
     * -1代表正在初始化
     * -N 表示有N-1个线程正在进行扩容操作
     * 正数或0代表hash表还没有被初始化,这个数值表示初始化或下一次进行扩容的大小
     * Table initialization and resizing control.  When negative, the
     * table is being initialized or resized: -1 for initialization,
     * else -(1 + the number of active resizing threads).  Otherwise,
     * when table is null, holds the initial table size to use upon
     * creation, or 0 for default. After initialization, holds the
     * next element count value upon which to resize the table.
     */
    private transient volatile int sizeCtl;

    /**
     * The next table index (plus one) to split while resizing.
     */
    private transient volatile int transferIndex;

    /**
     * Spinlock (locked via CAS) used when resizing and/or creating CounterCells.
     */
    private transient volatile int cellsBusy;

    /**
     * Table of counter cells. When non-null, size is a power of 2.
     */
    private transient volatile CounterCell[] counterCells;
Queue
先进先出
PriorityQueue
| 特点 | 原因(源码) | |
|---|---|---|
| 底层二叉小顶堆 | ||
| 保证每次取出的元素是队列中权值最小的 | 方法中有synchronized,所以性能不如ArrayList | |
| 非null | int newCapacity = oldCapacity + ((capacityIncrement > 0) ? capacityIncrement : oldCapacity); | |
工具类
Collections
确保内容不被修改
- unmodifiableMap
- unmodifiableList
- unmodifiableSet
Arrays
Comparable和Comparator
Comparable是排序接口;若一个类实现了Comparable接口,就意味着“该类支持排序”。而Comparator是比较器;我们若需要控制某个类的次序,可以建立一个“该类的比较器”来进行排序。Comparable相当于“内部比较器”,而Comparator相当于“外部比较器”。
容器综合问题
JUC
问题:什么时候该用多线程?
在Java中,线程部分是一个重点,本篇文章说的JUC也是关于线程的。JUC就是java.util .concurrent工具包的简称。这是一个处理线程的工具包,JDK 1.5开始出现的。
多线程基础
进程(Process)
把一个任务称为一个进程
- 进程内部还需要同时执行多个子任务称为线程
进程和线程的关系就是:一个进程可以包含一个或多个线程(Thread),但至少会有一个线程。
多进程模式(每个进程只有一个线程)
多线程模式(一个进程有多个线程)
多进程+多线程模式(复杂度最高)
和多线程相比,
多进程缺点在于:创建进程比创建线程开销大,尤其是在Windows系统上;进程间通信比线程间通信要慢,因为线程间通信就是读写同一个变量,速度很快。
多进程的优点在于:多进程稳定性比多线程高,因为在多进程的情况下,一个进程崩溃不会影响其他进程,而在多线程的情况下,任何一个线程崩溃会直接导致整个进程崩溃。多线程
- Java语言内置了多线程支持:一个Java程序实际上是一个JVM进程,JVM进程用一个主线程来执行main()方法,在main()方法内部,我们又可以启动多个线程。此外,JVM还有负责垃圾回收的其他工作线程等。
因此,对于大多数Java程序来说,我们说多任务,实际上是说如何使用多线程实现多任务。
和单线程相比,多线程编程的特点在于:多线程经常需要读写共享数据,并且需要同步。例如,播放电影时,就必须由一个线程播放视频,另一个线程播放音频,两个线程需要协调运行,否则画面和声音就不同步。因此,多线程编程的复杂度高,调试更困难。
Java多线程编程的特点又在于:多线程模型是Java程序最基本的并发模型;后续读写网络、数据库、Web开发等都依赖Java多线程模型。
管程
管程(monitor)是保证了同一时刻只有一个进程在管程内活动,即管程内定义的操作在同一时刻只被一个进程调用(由编译器实现).但是这样并不能保证进程以设计的顺序执行。JVM中同步是基于进入和退出管程(monitor)对象实现的,每个对象都会有一个管程(monitor)对象,管程(monitor)会随着java对象一同创建和销毁。执行线程首先要持有管程对象,然后才能执行方法,当方法完成之后会释放管程,方法在执行时候会持有管程,其他线程无法再获取同一个管程
显式创建新线程
- 继承Thread类,实例化一个Thread实例并重写run(),然后调用它的start()方法:
希望新线程能执行指定的代码
- 方法一:从Thread派生一个自定义类,然后覆写run()方法:
- 方法二:创建Thread实例时,传入一个Runnable实例:
- 线程的优先级
可以对线程设定优先级,设定优先级的方法是:
Thread.setPriority(int n) // 1~10, 默认值5
- 实现Runnable接口
- 与Callable不同
- 无返回值
- 无返回异常
- 实现run()
- 实现Callable接口(jdk1.5)
- 实现 Callable接口
1.实现 Callable接口,需要返回值类型
2.重写call方法,需要抛出异常
3.创建目标对象
4.创建执行服务: Executorservice ser= Executors. newfixed Threadpool(1)
5.提交执行: Future< Boolean> result1=ser. submit(t1);
6.获取结果: boolean r1= result1.get()
7.关闭服务:ser. shutdownNow()
- 实现 Callable接口
总结:Thread为基,另外两个通过Thread 实例实现,通过接口避免单继承局限性,灵活方便同一个对象被多个线程使用,区别在Callable 有返回值,返回值通过FutureTask封装再给Thread实例,而Runnable实例直接给Thread 实例实现。
package pers.lxl.mylearnproject.javase.thread;

import java.util.concurrent.Callable;
import java.util.concurrent.ExecutionException;
import java.util.concurrent.FutureTask;

/**
 * 快速交替执行看起来像是同时执行
 * 进程和线程的关系:一个进程可以包含一个或多个线程,但至少会有一个线程
 * 多进程模式(每个进程只有一个线程)
 * 多线程模式(一个进程有多个线程)
 * 多进程+多线程模式(复杂度最高)
 * 和多线程相比,多进程的缺点在于:
 * 创建进程比创建线程开销大,尤其是在Windows系统上;
 * 进程间通信比线程间通信要慢,因为线程间通信就是读写同一个变量,速度很快。
 * 多进程的优点在于:
 * 多进程稳定性比多线程高,因为在多进程的情况下,一个进程崩溃不会影响其他进程,而在多线程的情况下,任何一个线程崩溃会直接导致整个进程崩溃。
 * Java语言内置了多线程支持:一个Java程序实际上是一个JVM进程,JVM进程用一个主线程来执行main()方法,在main()方法内部,我们又可以启动多个线程。此外,JVM还有负责垃圾回收的其他工作线程等。
 * 因此,对于大多数Java程序来说,我们说多任务,实际上是说如何使用多线程实现多任务。
 * 和单线程相比,多线程编程的特点在于:多线程经常需要读写共享数据,并且需要同步。例如,播放电影时,就必须由一个线程播放视频,另一个线程播放音频,两个线程需要协调运行,否则画面和声音就不同步。因此,多线程编程的复杂度高,调试更困难。
 * Java多线程编程的特点又在于:
 * 多线程模型是Java程序最基本的并发模型;
 * 后续读写网络、数据库、Web开发等都依赖Java多线程模型。
 *
 * @author lxl
 **/
public class HelloClass {

    //希望新线程能执行指定的代码,有以下几种方法:

    /**
     * 方法一:从Thread派生一个自定义类,然后覆写run()方法,启动:子类对象.start(),为避免OOP单继承局限性,不建议使用
     */
    static class MyThread extends Thread {
        @Override
        public void run() {
            System.out.println("start new thread!extends Thread");
        }
    }

    /**
     * 方法二:创建Thread实例时,传入一个Runnable实例:启动:传入目标对象+Thread对象.start(),建议使用:避免单继承局限性,灵活方便同一个对象被多个线程使用
     */
    static class MyRunnable implements Runnable {

        @Override
        public void run() {
            System.out.println("start new thread!implements Runnable");

            try {
                Thread.sleep(10);
            } catch (InterruptedException e) {
            }
            System.out.println("thread end.");
        }
    }

    /**
     * 方法三:实现Callable接口,与Runnable相比,Callable可以有返回值,返回值通过FutureTask【未来任务】进行封装
     */
    static class MyCallable implements Callable\<Integer> {
        @Override
        public Integer call() {
            return 123;
        }
    }
//相比之下,接口可以实现多个,而Thread只能单继承,
// 继承整个Threa类开销过大,所以实现接口方式更好一些


    /**
     * 当Java程序启动的时候,实际上是启动了一个JVM进程,然后,JVM启动主线程来执行main()方法。在main()方法中,我们又可以启动其他线程。
     */
    public static void main(String[] args) throws ExecutionException, InterruptedException {
        //创建新线程
        System.out.println("main start...");
        //Thread thread = new Thread();//不能执行指定代码


//extends Thread==============
        // Thread thread = new MyThread();

//implements Callable=============
        MyCallable mc = new MyCallable();
        FutureTask\<Integer> ft = new FutureTask\<>(mc);
        Thread thread1 = new Thread(ft);
        thread1.start();
        System.out.println(ft.get());
//lambda Callbale
        FutureTask\<Integer> futureTask2 = new FutureTask\<>(()->{
             System.out.println(Thread.currentThread().getName()+"come in callbale");
            return 111;
        });

        new thread(futureTask2,"hahha").start();//hahha come in callbale

        while(!futuretask2.isDone()){
            System.out.println("wait....")
        }
        System.out.println(futureTask2.get());//111
//implements Runnable===============
        Thread thread = new Thread(new MyRunnable());
        //Thread thread = new Thread(() -> {System.out.println("start new thread!"); });//Java8引入的lambda写法
        thread.start();// 启动新线程,直接调用Thread实例的run()方法是无效的,线程开启不一定立即执行,由CPU调度决定


//        Thread.setPriority(int n) // 1~10, 默认值5
        try {
            Thread.sleep(20);
//            sleep() 可能会抛出 InterruptedException,因为异常不能跨线程传播回 main() 中,因此必须在本地进行处理。线程中抛出的其它异常也同样需要在本地进行处理。
        } catch (InterruptedException e) {
        }
        System.out.println("main end...");
    }


}
线程的状态
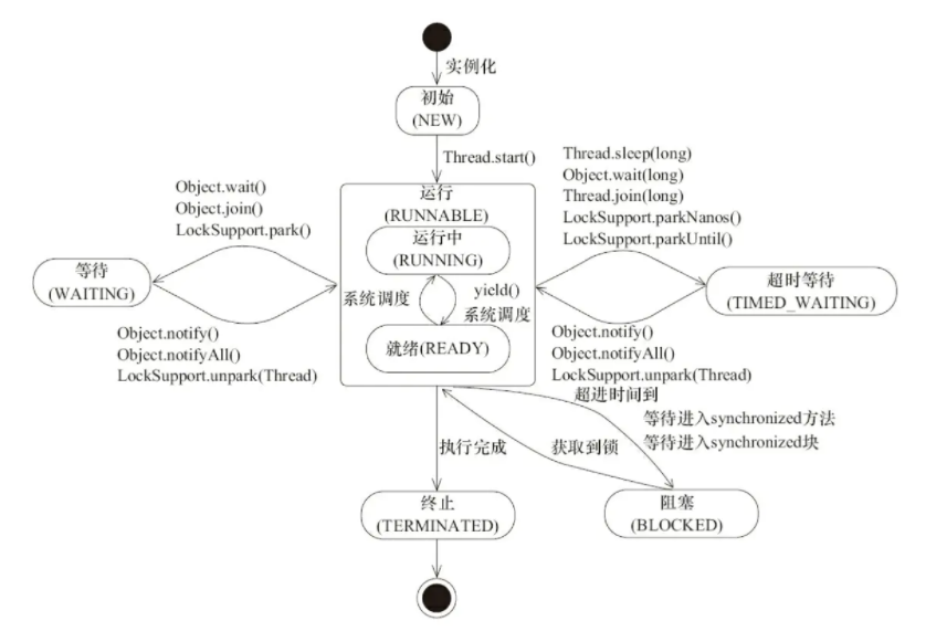
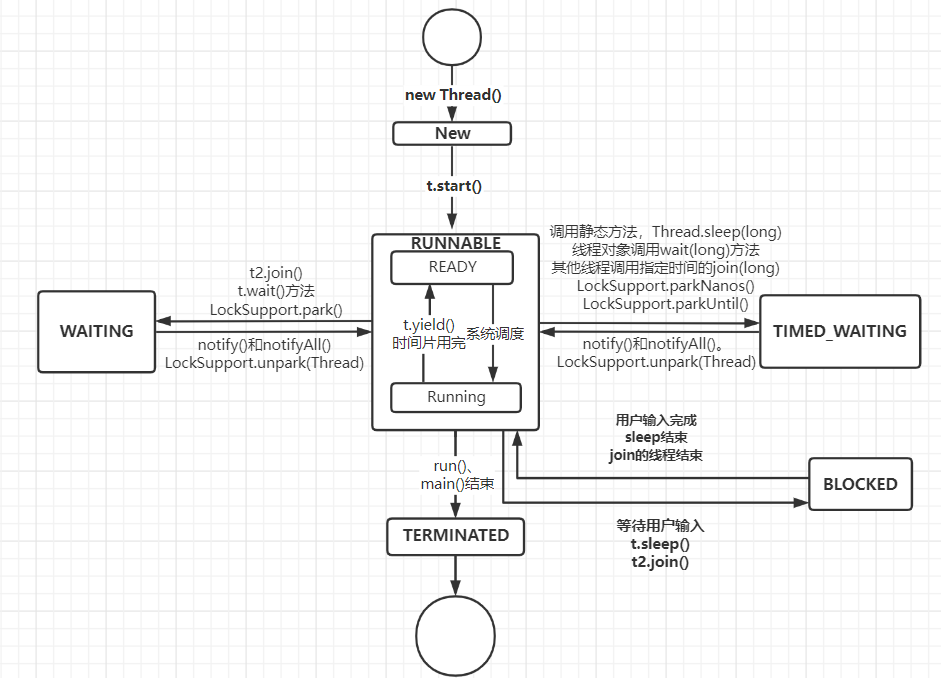
- 在Java程序中,一个线程对象只能调用一次start()方法启动新线程,并在新线程中执行run()方法。一旦run()方法执行完毕,线程就结束了。因此,Java线程的状态有以下几种:
New:新创建的线程,尚未执行;
Runnable:运行中的线程,正在执行run()方法的Java代码;
Blocked:运行中的线程,因为某些操作被阻塞而挂起;
Waiting(不见不散):运行中的线程,因为某些操作在等待中;
Timed Waiting(过时不候):运行中的线程,因为执行sleep()方法正在计时等待;
Terminated:线程已终止,因为run()方法执行完毕。
- 线程终止的原因有:
线程正常终止:run()方法执行到return语句返回;
线程意外终止:run()方法因为未捕获的异常导致线程终止;
对某个线程的Thread实例调用stop()方法强制终止(强烈不推荐使用)。
- 通过对另一个线程对象调用join()方法可以等待其执行结束;
可以指定等待时间,超过等待时间线程仍然没有结束就不再等待;
对已经运行结束的线程调用join()方法会立刻返回。
中断线程
- 对目标线程调用interrupt()方法可以请求中断一个线程,目标线程通过检测isInterrupted()标志获取自身是否已中断。如果目标线程处于等待状态,该线程会捕获到InterruptedException;
目标线程检测到isInterrupted()为true或者捕获了InterruptedException都应该立刻结束自身线程;
通过标志位判断需要正确使用volatile关键字;
volatile关键字解决了共享变量在线程间的可见性问题。
- 对目标线程调用interrupt()方法可以请求中断一个线程,目标线程通过检测isInterrupted()标志获取自身是否已中断。如果目标线程处于等待状态,该线程会捕获到InterruptedException;
线程属性
线程优先级
- setPriority
守护线程
守护线程是指为其他线程服务的线程。在JVM中,所有非守护线程都执行完毕后,无论有没有守护线程,虚拟机都会自动退出。因此,JVM退出时,不必关心守护线程是否已结束。如何创建守护线程呢?方法和普通线程一样,只是在调用start()方法前,调用setDaemon(true)把该线程标记为守护线程:
守护线程不能持有任何需要关闭的资源,例如打开文件等,因为虚拟机退出时,守护线程没有任何机会来关闭文件,这会导致数据丢失。
应用:JVM垃圾回收、事件监听、心跳监测
        Thread t = new MyThread();
        //调用start()方法前,调用setDaemon(true)把该线程标记为守护线程
        t.setDaemon(true);
        //守护线程不能持有任何需要关闭的资源,例如打开文件等,因为虚拟机退出时,守护线程没有任何机会来关闭文件,这会导致数据丢失。
        t.start();
      		//判断是否为守护线程
        System.out.println(t.isDaemon());
线程组
处理未捕获异常处理器
多线程编程步骤
- 创建资源类,在资源类创建属性和操作方法
- 在资源类中添加操作方法【判断、干活、通知】
- 创建多个线程,调用资源类的操作方法
synchronized
synchronized是Java中的关键字,是一种同步锁。它修饰的对象有以下几种:
- 修饰一个代码块,被修饰的代码块称为同步语句块,其作用的范围是大括号{}括起来的代码,作用的对象是调用这个代码块的对象;
- 修饰一个方法,被修饰的方法称为同步方法,其作用的范围是整个方法,作用的对象是调用这个方法的对象;虽然可以使用synchronized来定义方法,但synchronized并不属于方法定义的一部分,因此,synchronized关键字不能被继承。如果在父类中的某个方法使用了synchronized关键字,而在子类中覆盖了这个方法,在子类中的这个方法默认情况下并不是同步的,而必须显式地在子类的这个方法中加上synchronized关键字才可以。当然,还可以在子类方法中调用父类中相应的方法,这样虽然子类中的方法不是同步的,但子类调用了父类的同步方法,因此,子类的方法也就相当于同步了。
- 修饰一个静态的方法,其作用的范围是整个静态方法,作用的对象是这个类的所有对象;
- 修饰一个类,其作用的范围是synchronized后面括号括起来的部分,作用主的对象是这个类的所有对象。
一个对象里面如果有多个synchronized方法,某一个时刻内,只要一个线程去调用其中的一个synchronized方法了,其它的线程都只能等待,换句话说,某一个时刻内,只能有唯一一个线程去访问这些synchronized方法,锁的是当前对象this,被锁定后,其它的线程都不能进入到当前对象的其它的synchronized方法,加个普通方法后发现和同步锁无关,换成两个对象后,不是同一把锁了,情况立刻变化。
synchronized实现同步的基础:Java中的每一个对象都可以作为锁。
具体表现为以下3种形式。
对于普通同步方法,锁是当前实例对象。
对于静态同步方法,锁是当前类的Class对象。
对于同步方法块,锁是Synchonized括号里配置的对象
当一个线程试图访问同步代码块时,它首先必须得到锁,退出或抛出异常时必须释放锁。也就是说如果一个实例对象的非静态同步方法获取锁后,该实例对象的其他非静态同步方法必须等待获取锁的方法释放锁后才能获取锁,可是别的实例对象的非静态同步方法因为跟该实例对象的非静态同步方法用的是不同的锁,所以毋须等待该实例对象已获取锁的非静态同步方法释放锁就可以获取他们自己的锁。所有的静态同步方法用的也是同一把锁——类对象本身,这两把锁是两个不同的对象,所以静态同步方法与非静态同步方法之间是不会有竞态条件的。
但是一旦一个静态同步方法获取锁后,其他的静态同步方法都必须等待该方法释放锁后才能获取锁,而不管是同一个实例对象的静态同步方法之间,还是不同的实例对象的静态同步方法之间,只要它们同一个类的实例对象!
线程同步
- 多线程同时读写共享变量时,会造成逻辑错误,因此需要通过synchronized同步;同步的本质就是给指定对象加锁,加锁后才能继续执行后续代码;注意加锁对象必须是同一个实例;对JVM定义的单个原子操作不需要同步。
同步方法
- 用synchronized修饰方法可以把整个方法变为同步代码块,synchronized方法加锁对象是this;
通过合理的设计和数据封装可以让一个类变为“线程安全”;
一个类没有特殊说明,默认不是thread-safe;
多线程能否安全访问某个非线程安全的实例,需要具体问题具体分析。
死锁
- Java的synchronized锁是隐式【自动上锁解锁】的可重入锁(递归锁),Lock是显式的可重入锁;死锁产生的条件是多线程各自持有不同的锁,并互相试图获取对方已持有的锁,导致无限等待;避免死锁的方法是多线程获取锁的顺序要一致。
package com.atguigu.sync;

import java.util.concurrent.TimeUnit;

/**
 * 演示死锁
 */
public class DeadLock {

    //创建两个对象
    static Object a = new Object();
    static Object b = new Object();

    public static void main(String[] args) {
        new Thread(()->{
            synchronized (a) {
                System.out.println(Thread.currentThread().getName()+" 持有锁a,试图获取锁b");
                try {
                    TimeUnit.SECONDS.sleep(1);
                } catch (InterruptedException e) {
                    e.printStackTrace();
                }
                synchronized (b) {
                    System.out.println(Thread.currentThread().getName()+" 获取锁b");
                }
            }
        },"A").start();

        new Thread(()->{
            synchronized (b) {
                System.out.println(Thread.currentThread().getName()+" 持有锁b,试图获取锁a");
                try {
                    TimeUnit.SECONDS.sleep(1);
                } catch (InterruptedException e) {
                    e.printStackTrace();
                }
                synchronized (a) {
                    System.out.println(Thread.currentThread().getName()+" 获取锁a");
                }
            }
        },"B").start();
    }
}
验证是否为死锁
配置JDK环境变量
项目中打开终端
输入jps -l 查看当前类的进程号
jstack -进程号可查看是否有死锁及相关信息
使用wait和notify
wait和notify用于多线程协调运行:
在synchronized内部可以调用wait()使线程进入等待状态;
必须在已获得的锁对象上调用wait()方法;
在synchronized内部可以调用notify()或notifyAll()唤醒其他等待线程;
必须在已获得的锁对象上调用notify()或notifyAll()方法;
已唤醒的线程还需要重新获得锁后才能继续执行。虚假唤醒
wait()在哪里睡就在那里醒使用时应使用while而不是if
if(num!=1){
    this.wait();  //notifyAll()唤醒之后会直接从this.wait()语句开始执行,跳过了if判断
}
while(num!=1){
    this.wait();
}
使用ReentrantLock
- ReentrantLock可以替代synchronized进行同步;
ReentrantLock获取锁更安全;
必须先获取到锁,再进入try {...}代码块,最后使用finally保证释放锁;
可以使用tryLock()尝试获取锁。
设置为ReentrantLock(true)使其成为公平锁
   Lock lock = new ReentrantLock();

        Thread t1 = new Thread() {
            @Override
            public void run() {
                try {
                    log("线程启动");
                    log("试图占有对象:lock");
				//lock同步
                    lock.lock();

                    log("占有对象:lock");
                    log("进行5秒的业务操作");
                    Thread.sleep(5000);

                } catch (InterruptedException e) {
                    e.printStackTrace();
                } finally {
                    log("释放对象:lock");
                    //手动释放
                    lock.unlock();
                }
                log("线程结束");
            }
        };
        t1.setName("t1");
        t1.start();
使用Condition
- Condition可以替代wait和notify;
Condition对象必须从Lock对象获取。
private Lock lock=new ReentrantLock();
private Condition condition=lock.newCondition();
锁
一种设计思想、不同环境使用不同的锁以达到资源最优利用。

乐观锁 VS 悲观锁
悲观锁先加锁再操作资源,乐观锁直接操作资源。
为何乐观锁能够做到不锁定同步资源也可以正确的实现线程同步呢?我们通过介绍乐观锁的主要实现方式 “CAS” 的技术原理来为大家解惑。
CAS全称 Compare And Swap(比较与交换),是一种无锁算法。在不使用锁(没有线程被阻塞)的情况下实现多线程之间的变量同步。java.util.concurrent包中的原子类就是通过CAS来实现了乐观锁。
CAS算法涉及到三个操作数:
- 需要读写的内存值 V。
- 进行比较的值 A。
- 要写入的新值 B。
当且仅当 V 的值等于 A 时,CAS通过原子方式用新值B来更新V的值(“比较+更新”整体是一个原子操作),否则不会执行任何操作。一般情况下,“更新”是一个不断重试的操作。
CAS问题:
ABA问题
。CAS需要在操作值的时候检查内存值是否发生变化,没有发生变化才会更新内存值。但是如果内存值原来是A,后来变成了B,然后又变成了A,那么CAS进行检查时会发现值没有发生变化,但是实际上是有变化的。ABA问题的解决思路就是在变量前面添加版本号,每次变量更新的时候都把版本号加一,这样变化过程就从“A-B-A”变成了“1A-2B-3A”。
- JDK从1.5开始提供了AtomicStampedReference类来解决ABA问题,具体操作封装在compareAndSet()中。compareAndSet()首先检查当前引用和当前标志与预期引用和预期标志是否相等,如果都相等,则以原子方式将引用值和标志的值设置为给定的更新值。
循环时间长开销大。CAS操作如果长时间不成功,会导致其一直自旋,给CPU带来非常大的开销。
只能保证一个共享变量的原子操作
对一个共享变量执行操作时,CAS能够保证原子操作,但是对多个共享变量操作时,CAS是无法保证操作的原子性的。
Java从1.5开始JDK提供了AtomicReference类来保证引用对象之间的原子性,可以把多个变量放在一个对象里来进行CAS操作。
自旋锁 VS 适应性自旋锁
自旋锁不放弃CPU时间片,自旋等待锁释放,如果自旋超过了限定次数(默认是10次,可以使用-XX:PreBlockSpin来更改)没有成功获得锁,就应当挂起线程。
适应性自旋锁的自适应意味着自旋的时间(次数)不再固定,而是由前一次在同一个锁上的自旋时间及锁的拥有者的状态来决定。如果在同一个锁对象上,自旋等待刚刚成功获得过锁,并且持有锁的线程正在运行中,那么虚拟机就会认为这次自旋也是很有可能再次成功,进而它将允许自旋等待持续相对更长的时间。如果对于某个锁,自旋很少成功获得过,那在以后尝试获取这个锁时将可能省略掉自旋过程,直接阻塞线程,避免浪费处理器资源。在自旋锁中 另有三种常见的锁形式:TicketLock、CLHlock和MCSlock
无锁 VS 偏向锁 VS 轻量级锁 VS 重量级锁
无锁,没有对资源进行锁定,所有的线程都能访问并修改同一个资源,但同时只有一个线程能修改成功。
偏向锁,一段代码一直被一个线程访问,那么该线程会自动获取锁,降低获取锁的代价。
偏向锁时,被另外的线程所访问,偏向锁就会升级为轻量级锁,其他线程会通过自旋的形式尝试获取锁,不会阻塞,从而提高性能。
若当前只有一个等待线程,则该线程通过自旋进行等待。但是当自旋超过一定的次数,或者一个线程在持有锁,一个在自旋,又有第三个来访时(或轻量级锁时有第三者),轻量级锁升级为重量级锁。
公平锁 VS 非公平锁
公平锁通过申请锁的顺序来获取锁
非公平锁直接获取锁,获取不到会到等待队列末尾等待,节约唤起线程的开销,提高吞吐率,但是部分线程可能会被饿死,或等待时间很长。
可重入锁 VS 非可重入锁
可重入锁(递归锁),是指在同一个线程在外层方法获取锁的时候,再进入该线程的内层方法会自动获取锁(前提锁对象得是同一个对象或者class),不会因为之前已经获取过还没释放而阻塞。
非可重入锁,反之同线程在外层获取锁时在进入内层需要先释放锁,重复调用同步数据时可能会导致死锁。
独享锁 VS 共享锁
独享锁(排他锁),该锁一次只能被一个线程拥有,加锁后不能再加其他锁,线程拥有后可读与改。
共享锁,该锁能被多个线程所拥有的,拥有后只能读不可改,其他线程可以加共享锁不能加独享锁(排它锁)。
读锁写锁
ReentrantReadWriteLock 里的两把锁 ReadLock 和 WriteLock,读锁是共享锁,写锁是独享锁,都会发生死锁。
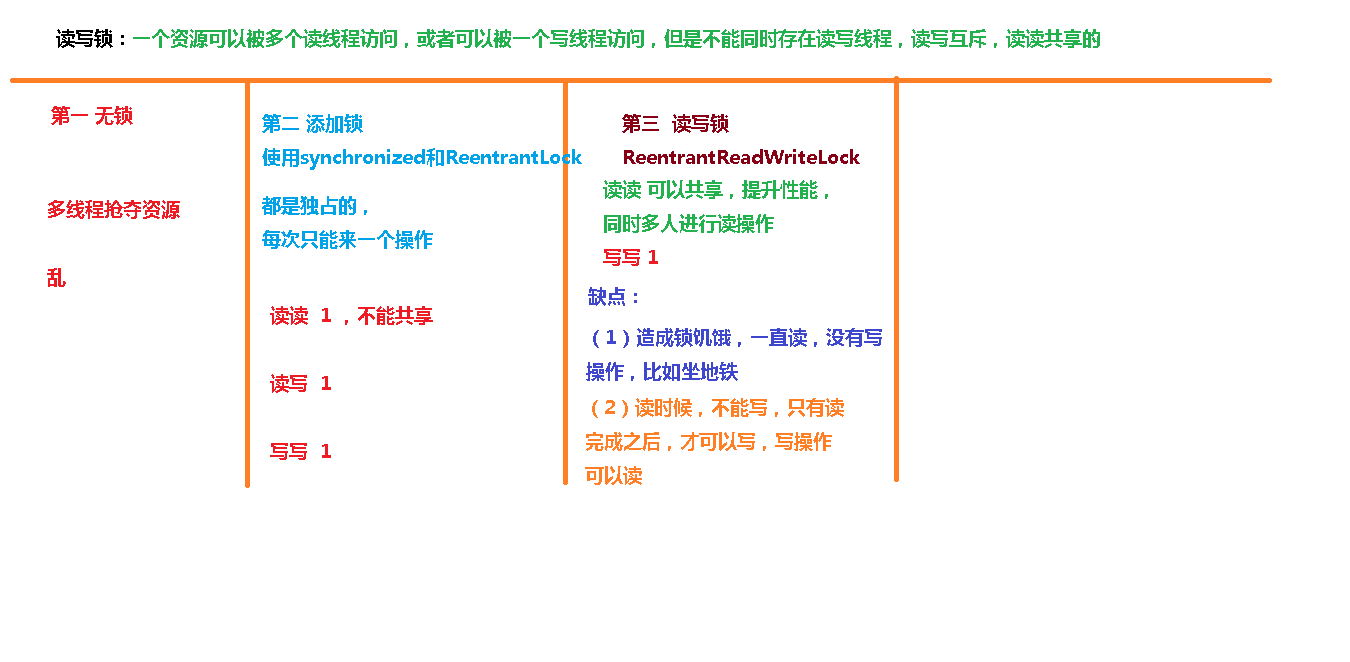
现实中有这样一种场景:对共享资源有读和写的操作,且写操作没有读操作那么频繁。在没有写操作的时候,多个线程同时读一个资源没有任何问题,所以应该允许多个线程同时读取共享资源;但是如果一个线程想去写这些共享资源,就不应该允许其他线程对该资源进行读和写的操作了。
针对这种场景,JAVA的并发包提供了读写锁ReentrantReadWriteLock,它表示两个锁,一个是读操作相关的锁,称为共享锁;一个是写相关的锁,称为排他锁
- 线程进入读锁的前提条件:
• 没有其他线程的写锁
• 没有写请求, 或者有写请求,但调用线程和持有锁的线程是同一个(可重入锁)。 - 线程进入写锁的前提条件:
• 没有其他线程的读锁
• 没有其他线程的写锁
而读写锁有以下三个重要的特性:
(1)公平选择性:支持非公平(默认)和公平的锁获取方式,吞吐量还是非公平优于公平。
(2)重进入:读锁和写锁都支持线程重进入。
(3)锁降级:遵循获取写锁、获取读锁再释放写锁的次序,写锁能够降级成为读锁。

表锁行锁
表锁整张表,而行锁锁单条数据且可能发生死锁。
使用ReadWriteLock
- 使用ReadWriteLock可以提高读取效率:
ReadWriteLock只允许一个线程写入;
ReadWriteLock允许多个线程在没有写入时同时读取;
ReadWriteLock适合读多写少的场景。
package com.atguigu.readwrite;

import java.util.HashMap;
import java.util.Map;
import java.util.concurrent.TimeUnit;
import java.util.concurrent.locks.Lock;
import java.util.concurrent.locks.ReadWriteLock;
import java.util.concurrent.locks.ReentrantReadWriteLock;

//资源类
class MyCache {
    //创建map集合
    private volatile Map\<String,Object> map = new HashMap\<>();

    //创建读写锁对象
    private ReadWriteLock rwLock = new ReentrantReadWriteLock();

    //放数据
    public void put(String key,Object value) {
        //添加写锁
        rwLock.writeLock().lock();

        try {
            System.out.println(Thread.currentThread().getName()+" 正在写操作"+key);
            //暂停一会
            TimeUnit.MICROSECONDS.sleep(300);
            //放数据
            map.put(key,value);
            System.out.println(Thread.currentThread().getName()+" 写完了"+key);
        } catch (InterruptedException e) {
            e.printStackTrace();
        } finally {
            //释放写锁
            rwLock.writeLock().unlock();
        }
    }

    //取数据
    public Object get(String key) {
        //添加读锁
        rwLock.readLock().lock();
        Object result = null;
        try {
            System.out.println(Thread.currentThread().getName()+" 正在读取操作"+key);
            //暂停一会
            TimeUnit.MICROSECONDS.sleep(300);
            result = map.get(key);
            System.out.println(Thread.currentThread().getName()+" 取完了"+key);
        } catch (InterruptedException e) {
            e.printStackTrace();
        } finally {
            //释放读锁
            rwLock.readLock().unlock();
        }
        return result;
    }
}

public class ReadWriteLockDemo {
    public static void main(String[] args) throws InterruptedException {
        MyCache myCache = new MyCache();
        //创建线程放数据
        for (int i = 1; i \<=5; i++) {
            final int num = i;
            new Thread(()->{
                myCache.put(num+"",num+"");
            },String.valueOf(i)).start();
        }

        TimeUnit.MICROSECONDS.sleep(300);

        //创建线程取数据
        for (int i = 1; i \<=5; i++) {
            final int num = i;
            new Thread(()->{
                myCache.get(num+"");
            },String.valueOf(i)).start();
        }
    }
}
使用StampedLock
- StampedLock提供了乐观读锁,可取代ReadWriteLock以进一步提升并发性能;StampedLock是不可重入锁。
使用Concurrent集合
- 使用java.util.concurrent包提供的线程安全的并发集合可以大大简化多线程编程:
多线程同时读写并发集合是安全的;
尽量使用Java标准库提供的并发集合,避免自己编写同步代码。
使用Atomic
- 使用java.util.concurrent.atomic提供的原子操作可以简化多线程编程:
原子操作实现了无锁的线程安全;
适用于计数器,累加器等。
- 增加值并返回新值:int addAndGet(int delta)
加1后返回新值:int incrementAndGet()
获取当前值:int get()
用CAS方式设置:int compareAndSet(int expect, int update)
使用 Future
- 对线程池提交一个Callable任务,可以获得一个Future对象;
可以用Future在将来某个时刻获取结果。
使用 CompletableFuture
- CompletableFuture可以指定异步处理流程:
thenAccept()处理正常结果;
exceptional()处理异常结果;
thenApplyAsync()用于串行化另一个CompletableFuture;
anyOf()和allOf()用于并行化多个CompletableFuture。
使用 ForkJoin
- Fork/Join是一种基于“分治”的算法:通过分解任务,并行执行,最后合并结果得到最终结果。
ForkJoinPool线程池可以把一个大任务分拆成小任务并行执行,任务类必须继承自RecursiveTask或RecursiveAction。
使用Fork/Join模式可以进行并行计算以提高效率。
使用 ThreadLocal
- ThreadLocal表示线程的“局部变量”,它确保每个线程的ThreadLocal变量都是各自独立的;
ThreadLocal适合在一个线程的处理流程中保持上下文(避免了同一参数在所有方法中传递);
使用ThreadLocal要用try ... finally结构,并在finally中清除。
集合线程安全
public static void main(String[] args) {
        //创建ArrayList集合
//        List\<String> list = new ArrayList\<>();
        // Vector解决
//        List\<String> list = new Vector\<>();

        //Collections解决
//        List\<String> list = Collections.synchronizedList(new ArrayList\<>());

        // CopyOnWriteArrayList写时复制技术解决
//        List\<String> list = new CopyOnWriteArrayList\<>();
//        for (int i = 0; i \<30; i++) {
//            new Thread(()->{
//                //向集合添加内容
//                list.add(UUID.randomUUID().toString().substring(0,8));
//                //从集合获取内容
//                System.out.println(list);
//            },String.valueOf(i)).start();
//        }

        //演示Hashset
//        Set\<String> set = new HashSet\<>();

//        Set\<String> set = new CopyOnWriteArraySet\<>();
//        for (int i = 0; i \<30; i++) {
//            new Thread(()->{
//                //向集合添加内容
//                set.add(UUID.randomUUID().toString().substring(0,8));
//                //从集合获取内容
//                System.out.println(set);
//            },String.valueOf(i)).start();
//        }

        //演示HashMap
//        Map\<String,String> map = new HashMap\<>();

        Map\<String,String> map = new ConcurrentHashMap\<>();
        for (int i = 0; i \<30; i++) {
            String key = String.valueOf(i);
            new Thread(()->{
                //向集合添加内容
                map.put(key,UUID.randomUUID().toString().substring(0,8));
                //从集合获取内容
                System.out.println(map);
            },String.valueOf(i)).start();
        }
    }
JUC三大辅助类
JUC中提供了三种常用的辅助类,通过这些辅助类可以很好的解决线程数量过多时Lock锁的频繁操作。这三种辅助类为:
• CountDownLatch: 减少计数
• CyclicBarrier: 循环栅栏
• Semaphore: 信号灯
CountDownLatch:减少计数
CountDownLatch类可以设置一个计数器,然后通过countDown方法来进行减1的操作,使用await方法等待计数器不大于0,然后继续执行await方法之后的语句。
• CountDownLatch主要有两个方法,当一个或多个线程调用await方法时,这些线程会阻塞
• 其它线程调用countDown方法会将计数器减1(调用countDown方法的线程不会阻塞)
• 当计数器的值变为0时,因await方法阻塞的线程会被唤醒,继续执行
package com.atguigu.juc;

import java.util.concurrent.CountDownLatch;

//演示 CountDownLatch
public class CountDownLatchDemo {
    //6个同学陆续离开教室之后,班长锁门
    public static void main(String[] args) throws InterruptedException {
//创建CountDownLatch对象,设置初始值
    CountDownLatch countDownLatch = new CountDownLatch(6);

    //6个同学陆续离开教室之后
    for (int i = 1; i \<=6; i++) {
        new Thread(()->{
            System.out.println(Thread.currentThread().getName()+" 号同学离开了教室");

            //计数  -1
            countDownLatch.countDown();

        },String.valueOf(i)).start();
    }

    //等待
    countDownLatch.await();

    System.out.println(Thread.currentThread().getName()+" 班长锁门走人了");
}
}
CyclicBarrier: 循环栅栏
CyclicBarrier看英文单词可以看出大概就是循环阻塞的意思,在使用中CyclicBarrier的构造方法第一个参数是目标障碍数,每次执行CyclicBarrier一次障碍数会加一,如果达到了目标障碍数,才会执行cyclicBarrier.await()之后的语句。可以将CyclicBarrier理解为加1操作
package com.atguigu.juc;

import java.util.concurrent.BrokenBarrierException;
import java.util.concurrent.CyclicBarrier;

//集齐7颗龙珠就可以召唤神龙
public class CyclicBarrierDemo {
//创建固定值
private static final int NUMBER = 7;

public static void main(String[] args) {
    //创建CyclicBarrier
    CyclicBarrier cyclicBarrier =
            new CyclicBarrier(NUMBER,()->{
                System.out.println("*****集齐7颗龙珠就可以召唤神龙");
            });

    //集齐七颗龙珠过程
    for (int i = 1; i \<=7; i++) {
        new Thread(()->{
            try {
                System.out.println(Thread.currentThread().getName()+" 星龙被收集到了");
                //等待
                cyclicBarrier.await();
            } catch (Exception e) {
                e.printStackTrace();
            }
        },String.valueOf(i)).start();
    }
}
}
Semaphore: 信号灯
Semaphore的构造方法中传入的第一个参数是最大信号量(可以看成最大线程池),每个信号量初始化为一个最多只能分发一个许可证。使用acquire方法获得许可证,release方法释放许可。场景: 抢车位, 6部汽车3个停车位
package com.atguigu.juc;

import java.util.Random;
import java.util.concurrent.Semaphore;
import java.util.concurrent.TimeUnit;

//6辆汽车,停3个车位
public class SemaphoreDemo {
    public static void main(String[] args) {
        //创建Semaphore,设置许可数量
        Semaphore semaphore = new Semaphore(3);

        //模拟6辆汽车
        for (int i = 1; i \<=6; i++) {
            new Thread(()->{
                try {
                    //抢占
                    semaphore.acquire();

                    System.out.println(Thread.currentThread().getName()+" 抢到了车位");

                    //设置随机停车时间
                    TimeUnit.SECONDS.sleep(new Random().nextInt(5));

                    System.out.println(Thread.currentThread().getName()+" ------离开了车位");
                } catch (InterruptedException e) {
                    e.printStackTrace();
                } finally {
                    //释放
                    semaphore.release();
                }
            },String.valueOf(i)).start();
        }
    }
}
阻塞队列
BlockingQueue
Concurrent包中,BlockingQueue很好的解决了多线程中,如何高效安全“传输”数据的问题。通过这些高效并且线程安全的队列类,为我们快速搭建高质量的多线程程序带来极大的便利。本文详细介绍了BlockingQueue家庭中的所有成员,包括他们各自的功能以及常见使用场景。
阻塞队列,顾名思义,首先它是一个队列, 通过一个共享的队列,可以使得数据由队列的一端输入,从另外一端输出;
当队列是空的,从队列中获取元素的操作将会被阻塞
当队列是满的,从队列中添加元素的操作将会被阻塞
试图从空的队列中获取元素的线程将会被阻塞,直到其他线程往空的队列插入新的元素
试图向已满的队列中添加新元素的线程将会被阻塞,直到其他线程从队列中移除一个或多个元素或者完全清空,使队列变得空闲起来并后续新增
常用的队列主要有以下两种:
• 先进先出(FIFO):先插入的队列的元素也最先出队列,类似于排队的功能。从某种程度上来说这种队列也体现了一种公平性
• 后进先出(LIFO):后插入队列的元素最先出队列,这种队列优先处理最近发生的事件(栈)
在多线程领域:所谓阻塞,在某些情况下会挂起线程(即阻塞),一旦条件满足,被挂起的线程又会自动被唤起
为什么需要BlockingQueue
好处是我们不需要关心什么时候需要阻塞线程,什么时候需要唤醒线程,因为这一切BlockingQueue都给你一手包办了
在concurrent包发布以前,在多线程环境下,我们必须去自己控制这些细节,尤其还要兼顾效率和线程安全,而这会给我们的程序带来不小的复杂度。
多线程环境中,通过队列可以很容易实现数据共享,比如经典的“生产者”和“消费者”模型中,通过队列可以很便利地实现两者之间的数据共享。假设我们有若干生产者线程,另外又有若干个消费者线程。如果生产者线程需要把准备好的数据共享给消费者线程,利用队列的方式来传递数据,就可以很方便地解决他们之间的数据共享问题。但如果生产者和消费者在某个时间段内,万一发生数据处理速度不匹配的情况呢?理想情况下,如果生产者产出数据的速度大于消费者消费的速度,并且当生产出来的数据累积到一定程度的时候,那么生产者必须暂停等待一下(阻塞生产者线程),以便等待消费者线程把累积的数据处理完毕,反之亦然。
• 当队列中没有数据的情况下,消费者端的所有线程都会被自动阻塞(挂起),直到有数据放入队列
• 当队列中填满数据的情况下,生产者端的所有线程都会被自动阻塞(挂起),直到队列中有空的位置,线程被自动唤醒
BlockingQueue核心方法

1.放入数据
• offer(anObject):表示如果可能的话,将anObject加到BlockingQueue里,即如果BlockingQueue可以容纳,则返回true,否则返回false.(本方法不阻塞当前执行方法的线程)
• offer(E o, long timeout, TimeUnit unit):可以设定等待的时间,如果在指定的时间内,还不能往队列中加入BlockingQueue,则返回失败
• put(anObject):把anObject加到BlockingQueue里,如果BlockQueue没有空间,则调用此方法的线程被阻断直到BlockingQueue里面有空间再继续.
2.获取数据
• poll(time): 取走BlockingQueue里排在首位的对象,若不能立即取出,则可以等time参数规定的时间,取不到时返回null
• poll(long timeout, TimeUnit unit):从BlockingQueue取出一个队首的对象,如果在指定时间内,队列一旦有数据可取,则立即返回队列中的数据。否则知道时间超时还没有数据可取,返回失败。
• take(): 取走BlockingQueue里排在首位的对象,若BlockingQueue为空,阻断进入等待状态直到BlockingQueue有新的数据被加入;
• drainTo(): 一次性从BlockingQueue获取所有可用的数据对象(还可以指定获取数据的个数),通过该方法,可以提升获取数据效率;不需要多次分批加锁或释放锁。
package com.atguigu.queue;

import java.util.concurrent.ArrayBlockingQueue;
import java.util.concurrent.BlockingQueue;
import java.util.concurrent.Executors;
import java.util.concurrent.TimeUnit;

//阻塞队列
public class BlockingQueueDemo {

    public static void main(String[] args) throws InterruptedException {
        //创建阻塞队列
        BlockingQueue\<String> blockingQueue = new ArrayBlockingQueue\<>(3);

        //第一组
//        System.out.println(blockingQueue.add("a"));
////        System.out.println(blockingQueue.add("b"));
////        System.out.println(blockingQueue.add("c"));
////        //System.out.println(blockingQueue.element());
////
////        //System.out.println(blockingQueue.add("w"));
////        System.out.println(blockingQueue.remove());
////        System.out.println(blockingQueue.remove());
////        System.out.println(blockingQueue.remove());
////        System.out.println(blockingQueue.remove());

        //第二组
//        System.out.println(blockingQueue.offer("a"));
//        System.out.println(blockingQueue.offer("b"));
//        System.out.println(blockingQueue.offer("c"));
//        System.out.println(blockingQueue.offer("www"));
//
//        System.out.println(blockingQueue.poll());
//        System.out.println(blockingQueue.poll());
//        System.out.println(blockingQueue.poll());
//        System.out.println(blockingQueue.poll());

        //第三组  put 没空间阻塞  take 没数据阻塞
//        blockingQueue.put("a");
//        blockingQueue.put("b");
//        blockingQueue.put("c");
//        //blockingQueue.put("w");
//
//        System.out.println(blockingQueue.take());
//        System.out.println(blockingQueue.take());
//        System.out.println(blockingQueue.take());
//        System.out.println(blockingQueue.take());

        //第四组
        System.out.println(blockingQueue.offer("a"));
        System.out.println(blockingQueue.offer("b"));
        System.out.println(blockingQueue.offer("c"));
        System.out.println(blockingQueue.offer("w",3L, TimeUnit.SECONDS));
    }
}
ArrayBlockingQueue(常用)
基于数组的阻塞队列实现,在ArrayBlockingQueue内部,维护了一个定长数组,以便缓存队列中的数据对象,这是一个常用的阻塞队列,除了一个定长数组外,ArrayBlockingQueue内部还保存着两个整形变量,分别标识着队列的头部和尾部在数组中的位置。
ArrayBlockingQueue在生产者放入数据和消费者获取数据,都是共用同一个锁对象,由此也意味着两者无法真正并行运行,这点尤其不同于LinkedBlockingQueue;按照实现原理来分析,ArrayBlockingQueue完全可以采用分离锁,从而实现生产者和消费者操作的完全并行运行。Doug Lea之所以没这样去做,也许是因为ArrayBlockingQueue的数据写入和获取操作已经足够轻巧,以至于引入独立的锁机制,除了给代码带来额外的复杂性外,其在性能上完全占不到任何便宜。 ArrayBlockingQueue和LinkedBlockingQueue间还有一个明显的不同之处在于,前者在插入或删除元素时不会产生或销毁任何额外的对象实例,而后者则会生成一个额外的Node对象。这在长时间内需要高效并发地处理大批量数据的系统中,其对于GC的影响还是存在一定的区别。而在创建ArrayBlockingQueue时,我们还可以控制对象的内部锁是否采用公平锁,默认采用非公平锁。
一句话总结: 由数组结构组成的有界阻塞队列。
LinkedBlockingQueue(常用)
基于链表的阻塞队列,同ArrayListBlockingQueue类似,其内部也维持着一个数据缓冲队列(该队列由一个链表构成),当生产者往队列中放入一个数据时,队列会从生产者手中获取数据,并缓存在队列内部,而生产者立即返回;只有当队列缓冲区达到最大值缓存容量时(LinkedBlockingQueue可以通过构造函数指定该值),才会阻塞生产者队列,直到消费者从队列中消费掉一份
数据,生产者线程会被唤醒,反之对于消费者这端的处理也基于同样的原理。而LinkedBlockingQueue之所以能够高效的处理并发数据,还因为其对于生产者端和消费者端分别采用了独立的锁来控制数据同步,这也意味着在高并发的情况下生产者和消费者可以并行地操作队列中的数据,以此来提高整个队列的并发性能。
ArrayBlockingQueue和LinkedBlockingQueue是两个最普通也是最常用的阻塞队列,一般情况下,在处理多线程间的生产者消费者问题,使用这两个类足以。
一句话总结: 由链表结构组成的有界(但大小默认值为integer.MAX_VALUE)阻塞队列。
DelayQueue
DelayQueue中的元素只有当其指定的延迟时间到了,才能够从队列中获取到该元素。DelayQueue是一个没有大小限制的队列,因此往队列中插入数据的操作(生产者)永远不会被阻塞,而只有获取数据的操作(消费者)才会被阻塞。
一句话总结: 使用优先级队列实现的延迟无界阻塞队列。
PriorityBlockingQueue
基于优先级的阻塞队列(优先级的判断通过构造函数传入的Compator对象来决定),但需要注意的是PriorityBlockingQueue并不会阻塞数据生产者,而只会在没有可消费的数据时,阻塞数据的消费者。
因此使用的时候要特别注意,生产者生产数据的速度绝对不能快于消费者消费数据的速度,否则时间一长,会最终耗尽所有的可用堆内存空间。
在实现PriorityBlockingQueue时,内部控制线程同步的锁采用的是公平锁。
一句话总结: 支持优先级排序的无界阻塞队列。
SynchronousQueue
一种无缓冲的等待队列,类似于无中介的直接交易,有点像原始社会中的生产者和消费者,生产者拿着产品去集市销售给产品的最终消费者,而消费者必须亲自去集市找到所要商品的直接生产者,如果一方没有找到合适的目标,那么对不起,大家都在集市等待。相对于有缓冲的BlockingQueue来说,少了一个中间经销商的环节(缓冲区),如果有经销商,生产者直接把产品批发给经销商,而无需在意经销商最终会将这些产品卖给那些消费者,由于经销商可以库存一部分商品,因此相对于直接交易模式,总体来说采用中间经销商的模式会吞吐量高一些(可以批量买卖);但另一方面,又因为经销商的引入,使得产品从生产者到消费者中间增加了额外的交易环节,单个产品的及时响应性能可能会降低。
声明一个SynchronousQueue有两种不同的方式,它们之间有着不太一样的行为。
公平模式和非公平模式的区别:
• 公平模式:SynchronousQueue会采用公平锁,并配合一个FIFO队列来阻塞多余的生产者和消费者,从而体系整体的公平策略;
• 非公平模式(SynchronousQueue默认):SynchronousQueue采用非公平锁,同时配合一个LIFO队列来管理多余的生产者和消费者,而后一种模式,如果生产者和消费者的处理速度有差距,则很容易出现饥渴的情况,即可能有某些生产者或者是消费者的数据永远都得不到处理。
一句话总结: 不存储元素的阻塞队列,也即单个元素的队列。
LinkedTransferQueue
LinkedTransferQueue是一个由链表结构组成的无界阻塞TransferQueue队列。相对于其他阻塞队列,LinkedTransferQueue多了tryTransfer和transfer方法。
LinkedTransferQueue采用一种预占模式。意思就是消费者线程取元素时,如果队列不为空,则直接取走数据,若队列为空,那就生成一个节点(节点元素为null)入队,然后消费者线程被等待在这个节点上,后面生产者线程入队时发现有一个元素为null的节点,生产者线程就不入队了,直接就将元素填充到该节点,并唤醒该节点等待的线程,被唤醒的消费者线程取走元素,从调用的方法返回。
一句话总结: 由链表组成的无界阻塞队列。
LinkedBlockingDeque
LinkedBlockingDeque是一个由链表结构组成的双向阻塞队列,即可以从队列的两端插入和移除元素。
对于一些指定的操作,在插入或者获取队列元素时如果队列状态不允许该操作可能会阻塞住该线程直到队列状态变更为允许操作,这里的阻塞一般有两种情况
• 插入元素时: 如果当前队列已满将会进入阻塞状态,一直等到队列有空的位置时再讲该元素插入,该操作可以通过设置超时参数,超时后返回 false 表示操作失败,也可以不设置超时参数一直阻塞,中断后抛出InterruptedException异常
• 读取元素时: 如果当前队列为空会阻塞住直到队列不为空然后返回元素,同样可以通过设置超时参数
一句话总结: 由链表组成的双向阻塞队列
小结
- 在多线程领域:所谓阻塞,在某些情况下会挂起线程(即阻塞),一旦条件满足,被挂起的线程又会自动被唤起
- 为什么需要BlockingQueue? 在concurrent包发布以前,在多线程环境下,我们每个程序员都必须去自己控制这些细节,尤其还要兼顾效率和线程安全,而这会给我们的程序带来不小的复杂度。使用后我们不需要关心什么时候需要阻塞线程,什么时候需要唤醒线程,因为这一切BlockingQueue都给你一手包办了
线程池
线程池(Thread Pool):一种线程使用模式。线程过多会带来调度开销,进而影响缓存局部性和整体性能。而线程池维护着多个线程,等待着监督管理者分配可并发执行的任务。这避免了在处理短时间任务时创建与销毁线程的代价。线程池不仅能够保证内核的充分利用,还能防止过分调度。
例子:以前单核CPU电脑,假的多线程,像马戏团小丑玩多个球,CPU需要来回切换。 现在多核电脑,多个线程各自跑在独立的CPU上,不用切换效率高。
优势:
线程池做的工作只要是控制运行的线程数量,处理过程中将任务放入队列,然后在线程创建后启动这些任务,如果线程数量超过了最大数量,超出数量的线程排队等候,等其他线程执行完毕,再从队列中取出任务来执行。
特点:
• 降低资源消耗: 通过重复利用已创建的线程降低线程创建和销毁造成的销耗。
• 提高响应速度: 当任务到达时,任务可以不需要等待线程创建就能立即执行。
• 提高线程的可管理性: 线程是稀缺资源,如果无限制的创建,可能会导致内存占用过多而产生OOM,并且会造成cpu过度切换(cpu切换线程是有时间成本的(需要保持当前执行线程的现场,并恢复要执行线程的现场)),不仅会销耗系统资源,还会降低系统的稳定性,使用线程池可以进行统一的分配,调优和监控。方便线程并发数的管控。
• 提供更强大的功能,延时定时线程池。
• Java中的线程池是通过Executor框架实现的,该框架中用到了Executor,Executors,ExecutorService,ThreadPoolExecutor这几个类。

创建常用三种线程池的方式

package com.atguigu.pool;

import java.util.concurrent.ExecutorService;
import java.util.concurrent.Executors;

//演示线程池三种常用分类
public class ThreadPoolDemo1 {
    public static void main(String[] args) {
        //一池五线程
        ExecutorService threadPool1 = Executors.newFixedThreadPool(5); //5个窗口

        //一池一线程
        ExecutorService threadPool2 = Executors.newSingleThreadExecutor(); //一个窗口

        //一池可扩容线程
        ExecutorService threadPool3 = Executors.newCachedThreadPool();
        //10个顾客请求
        try {
            for (int i = 1; i \<=10; i++) {
                //执行
                threadPool3.execute(()->{
                    System.out.println(Thread.currentThread().getName()+" 办理业务");
                });
            }
        }catch (Exception e) {
            e.printStackTrace();
        }finally {
            //关闭
            threadPool3.shutdown();
        }

    }

}
常用参数 (重点)
当提交任务数大于 corePoolSize 的时候,会优先将任务放到 workQueue 阻塞队列中。当阻塞队列饱和后,会扩充线程池中线程数,直到达到 maximumPoolSize 最大线程数配置。此时,再多余的任务,则会触发线程池的拒绝策略了。
即,当提交的任务数大于(workQueue.size() + maximumPoolSize ),就会触发线程池的拒绝策略。
public ThreadPoolExecutor(int corePoolSize, int maximumPoolSize, long keepAliveTime, TimeUnit unit, BlockingQueue\<Runnable> workQueue) {
    this(corePoolSize, maximumPoolSize, keepAliveTime, unit, workQueue,
         Executors.defaultThreadFactory(), defaultHandler);
}
1、corePoolSize(线程池基本大小):当向线程池提交一个任务时,若线程池已创建的线程数小于corePoolSize,即便此时存在空闲线程,也会通过创建一个新线程来执行该任务,直到已创建的线程数大于或等于corePoolSize时,(除了利用提交新任务来创建和启动线程(按需构造),也可以通过 prestartCoreThread() 或 prestartAllCoreThreads() 方法来提前启动线程池中的基本线程。)
2、maximumPoolSize(线程池最大大小):线程池所允许的最大线程个数。当队列满了,且已创建的线程数小于maximumPoolSize,则线程池会创建新的线程来执行任务。另外,对于无界队列,可忽略该参数。
3、keepAliveTime(线程存活保持时间)(秒)当线程池中线程数大于核心线程数时,线程的空闲时间如果超过线程存活时间,那么这个线程就会被销毁,直到线程池中的线程数小于等于核心线程数。
4、workQueue(任务队列):用于传输和保存等待执行任务的阻塞队列。
5、threadFactory(线程工厂):用于创建新线程。threadFactory创建的线程也是采用new Thread()方式,threadFactory创建的线程名都具有统一的风格:pool-m-thread-n(m为线程池的编号,n为线程池内的线程编号)。
6、handler(线程饱和策略):当线程池和队列都满了,再加入线程会执行此策略。
7、unit 存活的时间单位
ThreadPoolExecutor threadPool = new ThreadPoolExecutor(corePoolSize:10, maximumPoolSize:15, keepAliveTime:6060, TimeUnit.SECONDS, new LinkedBlockingQueue\<Runnable>());即初始化10个,最大15个,存活6060,单位为秒,有哪些待执行任务。
拒绝策略(重点)
CallerRunsPolicy: 当触发拒绝策略,只要线程池没有关闭的话,则使用调用线程直接运行任务。一般并发比较小,性能要求不高,不允许失败。但是,由于调用者自己运行任务,如果任务提交速度过快,可能导致程序阻塞,性能效率上必然的损失较大
AbortPolicy: 丢弃任务,并抛出拒绝执行 RejectedExecutionException 异常信息。线程池默认的拒绝策略。必须处理好抛出的异常,否则会打断当前的执行流程,影响后续的任务执行。
DiscardPolicy: 直接丢弃,其他啥都没有
DiscardOldestPolicy: 当触发拒绝策略,只要线程池没有关闭的话,丢弃阻塞队列 workQueue 中最老的一个任务,并将新任务加入
线程池的种类与创建
线程池总对比
1、newCachedThreadPool:用来创建一个可以无限扩大的线程池,适用于负载较轻的场景,执行短期异步任务。(可以使得任务快速得到执行,因为任务时间执行短,可以很快结束,也不会造成cpu过度切换)
2、newFixedThreadPool:创建一个固定大小的线程池,因为采用无界的阻塞队列,所以实际线程数量永远不会变化,适用于负载较重的场景,对当前线程数量进行限制。(保证线程数可控,不会造成线程过多,导致系统负载更为严重)
3、newSingleThreadExecutor:创建一个单线程的线程池,适用于需要保证顺序执行各个任务。
4、newScheduledThreadPool:适用于执行延时或者周期性任务。
newCachedThreadPool(常用)
作用:创建一个可缓存线程池,如果线程池长度超过处理需要,可灵活回收空闲线程,若无可回收,则新建线程.
特点:
• 线程池中数量没有固定,可达到最大值(Interger. MAX_VALUE)
• 线程池中的线程可进行缓存重复利用和回收(回收默认时间为1分钟)
• 当线程池中,没有可用线程,会重新创建一个线程
创建方式:
/** * 可缓存线程池 * @return */
public static ExecutorService newCachedThreadPool(){
    /** * corePoolSize线程池的核心线程数
    * maximumPoolSize能容纳的最大线程数
    * keepAliveTime空闲线程存活时间
    * unit 存活的时间单位
    * workQueue 存放提交但未执行任务的队列
    * threadFactory 创建线程的工厂类:可以省略
    * handler 等待队列满后的拒绝策略:可以省略 */
    return new ThreadPoolExecutor(0, Integer.MAX_VALUE, 60L, TimeUnit.SECONDS, new SynchronousQueue\<>(),
                                  Executors.defaultThreadFactory(), new ThreadPoolExecutor.AbortPolicy()); }
newFixedThreadPool(常用)
作用:创建一个可重用固定线程数的线程池,以共享的无界队列方式来运行这些线程。在任意点,在大多数线程会处于处理任务的活动状态。如果在所有线程处于活动状态时提交附加任务,则在有可用线程之前,附加任务将在队列中等待。如果在关闭前的执行期间由于失败而导致任何线程终止,那么一个新线程将代替它执行后续的任务(如果需要)。在某个线程被显式地关闭之前,池中的线程将一直存在。场景: 适用于可以预测线程数量的业务中,或者服务器负载较重,对线程数有严格限制的场景
特征:
• 线程池中的线程处于一定的量,可以很好的控制线程的并发量
• 线程可以重复被使用,在显示关闭之前,都将一直存在
• 超出一定量的线程被提交时候需在队列中等待
创建方式:
/** * 固定长度线程池 * @return */
public static ExecutorService newFixedThreadPool(){
    /** * corePoolSize线程池的核心线程数
    * maximumPoolSize能容纳的最大线程数
    * keepAliveTime空闲线程存活时间
    * unit 存活的时间单位
    * workQueue 存放提交但未执行任务的队列
    * threadFactory 创建线程的工厂类:可以省略
    * handler 等待队列满后的拒绝策略:可以省略 */
    return new ThreadPoolExecutor(10, 10, 0L, TimeUnit.SECONDS, new LinkedBlockingQueue\<>(),
                                  Executors.defaultThreadFactory(), new ThreadPoolExecutor.AbortPolicy()); }
newSingleThreadExecutor(常用)
作用:创建一个使用单个 worker 线程的 Executor,以无界队列方式来运行该线程。(注意,如果因为在关闭前的执行期间出现失败而终止了此单个线程,那么如果需要,一个新线程将代替它执行后续的任务)。可保证顺序地执行各个任务,并且在任意给定的时间不会有多个线程是活动的。与其他等效的newFixedThreadPool不同,可保证无需重新配置此方法所返回的执行程序即可使用其他的线程。场景: 适用于需要保证顺序执行各个任务,并且在任意时间点,不会同时有多个线程的场景。
特征: 线程池中最多执行1个线程,之后提交的线程活动将会排在队列中以此执行
创建方式:
/** * 单一线程池 * @return */
/** * corePoolSize线程池的核心线程数
* maximumPoolSize能容纳的最大线程数
* keepAliveTime空闲线程存活时间
* unit 存活的时间单位
* workQueue 存放提交但未执行任务的队列
* threadFactory 创建线程的工厂类:可以省略
* handler 等待队列满后的拒绝策略:可以省略 */
public static ExecutorService newSingleThreadExecutor(){
    return new ThreadPoolExecutor(1, 1, 0L, TimeUnit.SECONDS, new LinkedBlockingQueue\<>(),
                                  Executors.defaultThreadFactory(), new ThreadPoolExecutor.AbortPolicy()); }
newScheduleThreadPool(了解)
作用: 线程池支持定时以及周期性执行任务,创建一个corePoolSize为传入参数,最大线程数为整形的最大数的线程池。场景: 适用于需要多个后台线程执行周期任务的场景。
特征:
(1)线程池中具有指定数量的线程,即便是空线程也将保留 (2)可定时或者延迟执行线程活动
创建方式:
public static ScheduledExecutorService newScheduledThreadPool(int corePoolSize, ThreadFactory threadFactory) {
    return new ScheduledThreadPoolExecutor(corePoolSize, threadFactory); }
newWorkStealingPool
jdk1.8提供的线程池,底层使用的是ForkJoinPool实现,创建一个拥有多个任务队列的线程池,可以减少连接数,创建当前可用cpu核数的线程来并行执行任务。场景: 适用于大耗时,可并行执行的场景
创建方式:
public static ExecutorService newWorkStealingPool(int parallelism) {
    /**
    * parallelism:并行级别,通常默认为JVM可用的处理器个数
    * factory:用于创建ForkJoinPool中使用的线程。
    * handler:用于处理工作线程未处理的异常,默认为null
    * asyncMode:用于控制WorkQueue的工作模式:队列---反队列
*/
    return new ForkJoinPool(parallelism, ForkJoinPool.defaultForkJoinWorkerThreadFactory, null, true); }
底层原理

- 在创建了线程池后,线程池中的线程数为零
- 当调用execute()方法添加一个请求任务时,线程池会做出如下判断:
- 2.1 如果正在运行的线程数量小于corePoolSize,那么马上创建线程运行这个任务;
- 2.2 如果正在运行的线程数量大于或等于corePoolSize,那么将这个任务放入队列;
- 2.3 如果这个时候队列满了且正在运行的线程数量还小于maximumPoolSize,那么还是要创建非核心线程立刻运行这个任务;
- 2.4 如果队列满了且正在运行的线程数量大于或等于maximumPoolSize,那么线程池会启动饱和拒绝策略来执行。
- 当一个线程完成任务时,它会从队列中取下一个任务来执行
- 当一个线程无事可做超过一定的时间(keepAliveTime)时,线程会判断:
- 4.1 如果当前运行的线程数大于corePoolSize,那么这个线程就被停掉。
- 4.2 所以线程池的所有任务完成后,它最终会收缩到corePoolSize的大小。
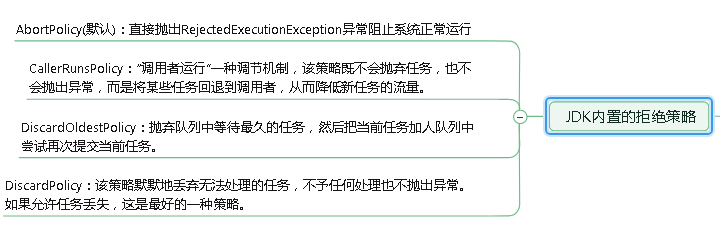
注意事项(重要)
- 项目中创建多线程时,使用常见的三种线程池创建方式,单一、可变、定长都有一定问题,原因是FixedThreadPool和SingleThreadExecutor底层都是用LinkedBlockingQueue实现的,这个队列最大长度为Integer.MAX_VALUE,容易导致OOM。所以实际生产一般自己通过ThreadPoolExecutor的7个参数,自定义线程池
- 创建线程池推荐适用ThreadPoolExecutor及其7个参数手动创建
corePoolSize线程池的核心线程数
maximumPoolSize能容纳的最大线程数
keepAliveTime空闲线程存活时间
unit 存活的时间单位
workQueue 存放提交但未执行任务的队列
threadFactory 创建线程的工厂类
handler 等待队列满后的拒绝策略
手动创建示例
package com.atguigu.pool;

import java.util.concurrent.*;

//自定义手动线程池创建
public class ThreadPoolDemo2 {
    public static void main(String[] args) {
        ExecutorService threadPool = new ThreadPoolExecutor(
                2,
                5,
                2L,
                TimeUnit.SECONDS,
                new ArrayBlockingQueue\<>(3),
                Executors.defaultThreadFactory(),
                new ThreadPoolExecutor.AbortPolicy()
        );

        //10个顾客请求
        try {
            for (int i = 1; i \<=10; i++) {
                //执行
                threadPool.execute(()->{
                    System.out.println(Thread.currentThread().getName()+" 办理业务");
                });
            }
        }catch (Exception e) {
            e.printStackTrace();
        }finally {
            //关闭
            threadPool.shutdown();
        }
    }
}- 为什么不允许适用不允许Executors.的方式手动创建线程池,如下图

    /**使用Executors创建线程池,建议手动创建线程池
     * 线程池不允许使用Executors去创建,而是通过ThreadPoolExecutor的方式,这样的处理方式让写的同学更加明确线程池的运行规则,规避资源耗尽的风险。 说明:Executors返回的线程池对象的弊端如下:
     * 1)FixedThreadPool和SingleThreadPool:
     * 允许的请求队列长度为Integer.MAX_VALUE,可能会堆积大量的请求,从而导致OOM。
     * 2)CachedThreadPool:
     * 允许的创建线程数量为Integer.MAX_VALUE,可能会创建大量的线程,从而导致OOM。*/

Positive example 1:
    //org.apache.commons.lang3.concurrent.BasicThreadFactory
    ScheduledExecutorService executorService = new ScheduledThreadPoolExecutor(1,
        new BasicThreadFactory.Builder().namingPattern("example-schedule-pool-%d").daemon(true).build());


Positive example 2:
    ThreadFactory namedThreadFactory = new ThreadFactoryBuilder()
        .setNameFormat("demo-pool-%d").build();

    //Common Thread Pool
    ExecutorService pool = new ThreadPoolExecutor(5, 200,
        0L, TimeUnit.MILLISECONDS,
        new LinkedBlockingQueue\<Runnable>(1024), namedThreadFactory, new ThreadPoolExecutor.AbortPolicy());

    pool.execute(()-> System.out.println(Thread.currentThread().getName()));
    pool.shutdown();//gracefully shutdown


Positive example 3:
    \<bean id="userThreadPool"
        class="org.springframework.scheduling.concurrent.ThreadPoolTaskExecutor">
        \<property name="corePoolSize" value="10" />
        \<property name="maxPoolSize" value="100" />
        \<property name="queueCapacity" value="2000" />

    \<property name="threadFactory" value= threadFactory />
        \<property name="rejectedExecutionHandler">
            \<ref local="rejectedExecutionHandler" />
        \</property>
    \</bean>
    //in code
    userThreadPool.execute(thread);
线程池流程

线程池流程
1、判断核心线程池是否已满,没满则创建一个新的工作线程来执行任务。已满则。
2、判断任务队列是否已满,没满则将新提交的任务添加在工作队列,已满则。
3、判断整个线程池是否已满,没满则创建一个新的工作线程来执行任务,已满则执行饱和策略。
(1、判断线程池中当前线程数是否大于核心线程数,如果小于,在创建一个新的线程来执行任务,如果大于则
2、判断任务队列是否已满,没满则将新提交的任务添加在工作队列,已满则。
3、判断线程池中当前线程数是否大于最大线程数,如果小于,则创建一个新的线程来执行任务,如果大于,则执行饱和策略。)
线程池为什么需要使用(阻塞)队列?
回到了非线程池缺点中的第3点:
1、因为线程若是无限制的创建,可能会导致内存占用过多而产生OOM,并且会造成cpu过度切换。
另外回到了非线程池缺点中的第1点:
2、创建线程的消耗较高。
或者下面这个网上并不高明的回答:
2、线程池创建线程需要获取mainlock这个全局锁,影响并发效率,阻塞队列可以很好的缓冲。
线程池为什么要使用阻塞队列而不使用非阻塞队列?
阻塞队列可以保证任务队列中没有任务时阻塞获取任务的线程,使得线程进入wait状态,释放cpu资源。
当队列中有任务时才唤醒对应线程从队列中取出消息进行执行。
使得在线程不至于一直占用cpu资源。
(线程执行完任务后通过循环再次从任务队列中取出任务进行执行,代码片段如下
while (task != null || (task = getTask()) != null) {})。
不用阻塞队列也是可以的,不过实现起来比较麻烦而已,有好用的为啥不用呢?
如何配置线程池
CPU密集型任务
尽量使用较小的线程池,一般为CPU核心数+1。 因为CPU密集型任务使得CPU使用率很高,若开过多的线程数,会造成CPU过度切换。
IO密集型任务
可以使用稍大的线程池,一般为2*CPU核心数。 IO密集型任务CPU使用率并不高,因此可以让CPU在等待IO的时候有其他线程去处理别的任务,充分利用CPU时间。
混合型任务
可以将任务分成IO密集型和CPU密集型任务,然后分别用不同的线程池去处理。 只要分完之后两个任务的执行时间相差不大,那么就会比串行执行来的高效。
因为如果划分之后两个任务执行时间有数据级的差距,那么拆分没有意义。
因为先执行完的任务就要等后执行完的任务,最终的时间仍然取决于后执行完的任务,而且还要加上任务拆分与合并的开销,得不偿失。
execute()和submit()方法
1、execute(),执行一个任务,没有返回值。
2、submit(),提交一个线程任务,有返回值。
submit(Callable<T> task)能获取到它的返回值,通过future.get()获取(阻塞直到任务执行完)。一般使用FutureTask+Callable配合使用(IntentService中有体现)。
submit(Runnable task, T result)能通过传入的载体result间接获得线程的返回值。
submit(Runnable task)则是没有返回值的,就算获取它的返回值也是null。
Future.get方法会使取结果的线程进入阻塞状态,知道线程执行完成之后,唤醒取结果的线程,然后返回结果。
Fork/Join
Fork/Join框架简介
Fork/Join它可以将一个大的任务拆分成多个子任务进行并行处理,最后将子任务结果合并成最后的计算结果,并进行输出。Fork/Join框架要完成两件事情: Fork:把一个复杂任务进行分拆,大事化小 Join:把分拆任务的结果进行合并
- 任务分割:首先Fork/Join框架需要把大的任务分割成足够小的子任务,如果子任务比较大的话还要对子任务进行继续分割
- 执行任务并合并结果:分割的子任务分别放到双端队列里,然后几个启动线程分别从双端队列里获取任务执行。子任务执行完的结果都放在另外一个队列里,启动一个线程从队列里取数据,然后合并这些数据。
在Java的Fork/Join框架中,使用两个类完成上述操作
• ForkJoinTask:我们要使用Fork/Join框架,首先需要创建一个ForkJoin任务。该类提供了在任务中执行fork和join的机制。通常情况下我们不需要直接集成ForkJoinTask类,只需要继承它的子类,Fork/Join框架提供了两个子类:
a.RecursiveAction:用于没有返回结果的任务
b.RecursiveTask:用于有返回结果的任务
• ForkJoinPool:ForkJoinTask需要通过ForkJoinPool来执行
• RecursiveTask: 继承后可以实现递归(自己调自己)调用的任务
Fork/Join框架的实现原理
ForkJoinPool由ForkJoinTask数组和ForkJoinWorkerThread数组组成,ForkJoinTask数组负责将存放以及将程序提交给ForkJoinPool,而ForkJoinWorkerThread负责执行这些任务。
Fork方法


Fork方法的实现原理: 当我们调用ForkJoinTask的fork方法时,程序会把任务放在ForkJoinWorkerThread的pushTask的workQueue中,异步地执行这个任务,然后立即返回结果
public final ForkJoinTask\<V> fork() {
    Thread t;
    if ((t = Thread.currentThread()) instanceof ForkJoinWorkerThread) ((ForkJoinWorkerThread)t).workQueue.push(this);
    else ForkJoinPool.common.externalPush(this);
    return this;
}
pushTask方法把当前任务存放在ForkJoinTask数组队列里。然后再调用ForkJoinPool的signalWork()方法唤醒或创建一个工作线程来执行任务。代码如下:
final void push(ForkJoinTask\<?> task) {
    ForkJoinTask\<?>[] a;
    ForkJoinPool p;
    int b = base, s = top, n;
    if ((a = array) != null) {
        // ignore if queue removed int m = a.length - 1;
        // fenced write for task visibility U.putOrderedObject(a, ((m & s) \<\< ASHIFT) + ABASE, task);
        U.putOrderedInt(this, QTOP, s + 1);
        if ((n = s - b) \<= 1) { if ((p = pool) != null) p.signalWork(p.workQueues, this);//执行
                              } else if (n >= m) growArray();
    }
}
join方法
Join方法的主要作用是阻塞当前线程并等待获取结果。让我们一起看看ForkJoinTask的join方法的实现,代码如下:
public final V join() {
    int s;
    if ((s = doJoin() & DONE_MASK) != NORMAL)
        reportException(s);
    return getRawResult();
}
它首先调用doJoin方法,通过doJoin()方法得到当前任务的状态来判断返回什么结果,任务状态有4种:
已完成(NORMAL)、被取消(CANCELLED)、信号(SIGNAL)和出现异常(EXCEPTIONAL)
• 如果任务状态是已完成,则直接返回任务结果。
• 如果任务状态是被取消,则直接抛出CancellationException
• 如果任务状态是抛出异常,则直接抛出对应的异常
让我们分析一下doJoin方法的实现
private int doJoin() {
    int s;
    Thread t;
    ForkJoinWorkerThread wt;
    ForkJoinPool.WorkQueue w;
    return (s = status) \< 0 ? s :
    ((t = Thread.currentThread()) instanceof ForkJoinWorkerThread) ? (w = (wt = (ForkJoinWorkerThread)t).workQueue). tryUnpush(this) && (s = doExec()) \< 0 ? s : wt.pool.awaitJoin(w, this, 0L) : externalAwaitDone();
}
final int doExec() {
    int s;
    boolean completed; if ((s = status) >= 0) { try { completed = exec();
                                                    } catch (Throwable rex) { return setExceptionalCompletion(rex);
                                                                            }
                                               if (completed) s = setCompletion(NORMAL);
                                              } return s;
}
在doJoin()方法流程如下:
首先通过查看任务的状态,看任务是否已经执行完成,如果执行完成,则直接返回任务状态;
如果没有执行完,则从任务数组里取出任务并执行。
如果任务顺利执行完成,则设置任务状态为NORMAL,如果出现异常,则记录异常,并将任务状态设置为EXCEPTIONAL。
Fork/Join框架的异常处理
ForkJoinTask在执行的时候可能会抛出异常,但是我们没办法在主线程里直接捕获异常,所以ForkJoinTask提供了isCompletedAbnormally()方法来检查任务是否已经抛出异常或已经被取消了,并且可以通过ForkJoinTask的getException方法获取异常。
getException方法返回Throwable对象,如果任务被取消了则返回CancellationException。如果任务没有完成或者没有抛出异常则返回null。
入门案例
场景: 生成一个计算任务,计算1+2+3.........+1000,每100个数切分一个子任务
  package com.atguigu.forkjoin;

  import java.util.concurrent.*;

  class MyTask extends RecursiveTask\<Integer> {

      //拆分差值不能超过10,计算10以内运算
      private static final Integer VALUE = 10;
      private int begin ;//拆分开始值
      private int end;//拆分结束值
      private int result ; //返回结果

      //创建有参数构造
      public MyTask(int begin,int end) {
          this.begin = begin;
          this.end = end;
      }

      //拆分和合并过程
      @Override
      protected Integer compute() {
          //判断相加两个数值是否大于10
          if((end-begin)\<=VALUE) {
              //相加操作
              for (int i = begin; i \<=end; i++) {
                  result = result+i;
              }
          } else {//进一步拆分
              //获取中间值
              int middle = (begin+end)/2;
              //拆分左边
              MyTask task01 = new MyTask(begin,middle);
              //拆分右边
              MyTask task02 = new MyTask(middle+1,end);
              //调用方法拆分
              task01.fork();
              task02.fork();
              //合并结果
              result = task01.join()+task02.join();
          }
          return result;
      }
  }

  public class ForkJoinDemo {
      public static void main(String[] args) throws ExecutionException, InterruptedException {
          //创建MyTask对象
          MyTask myTask = new MyTask(0,100);
          //创建分支合并池对象
          ForkJoinPool forkJoinPool = new ForkJoinPool();
          ForkJoinTask\<Integer> forkJoinTask = forkJoinPool.submit(myTask);
          //获取最终合并之后结果
          Integer result = forkJoinTask.get();
          System.out.println(result);
          //关闭池对象
          forkJoinPool.shutdown();
      }
  }
CompletableFuture
CompletableFuture简介
同步【不在等待】、异步【不在先做其他的】
CompletableFuture在Java里面被用于异步编程,异步通常意味着非阻塞,可以使得我们的任务单独运行在与主线程分离的其他线程中,并且通过回调可以在主线程中得到异步任务的执行状态,是否完成,和是否异常等信息。
CompletableFuture实现了Future, CompletionStage接口,实现了Future接口就可以兼容现在有线程池框架,而CompletionStage接口才是异步编程的接口抽象,里面定义多种异步方法,通过这两者集合,从而打造出了强大的CompletableFuture类。
Future与CompletableFuture
Futrue在Java里面,通常用来表示一个异步任务的引用,比如我们将任务提交到线程池里面,然后我们会得到一个Futrue,在Future里面有isDone方法来 判断任务是否处理结束,还有get方法可以一直阻塞直到任务结束然后获取结果,但整体来说这种方式,还是同步的,因为需要客户端不断阻塞等待或者不断轮询才能知道任务是否完成。
Future的主要缺点如下:
(1)不支持手动完成
我提交了一个任务,但是执行太慢了,我通过其他路径已经获取到了任务结果,现在没法把这个任务结果通知到正在执行的线程,所以必须主动取消或者一直等待它执行完成
(2)不支持进一步的非阻塞调用
通过Future的get方法会一直阻塞到任务完成,但是想在获取任务之后执行额外的任务,因为Future不支持回调函数,所以无法实现这个功能
(3)不支持链式调用
对于Future的执行结果,我们想继续传到下一个Future处理使用,从而形成一个链式的pipline调用,这在Future中是没法实现的。
(4)不支持多个Future合并
比如我们有10个Future并行执行,我们想在所有的Future运行完毕之后,执行某些函数,是没法通过Future实现的。
(5)不支持异常处理
Future的API没有任何的异常处理的api,所以在异步运行时,如果出了问题是不好定位的。
CompletableFuture入门
使用CompletableFuture
场景:主线程里面创建一个CompletableFuture,然后主线程调用get方法会阻塞,最后我们在一个子线程中使其终止。
/** * 主线程里面创建一个CompletableFuture,然后主线程调用get方法会阻塞,最后我们在一个子线程中使其终止 * @param args */
public static void main(String[] args) throws Exception{
    CompletableFuture\<String> future = new CompletableFuture\<>();
    new Thread(() -> {
        try{ System.out.println(Thread.currentThread().getName() + "子线程开始干活");
            //子线程睡5秒
            Thread.sleep(5000);
            //在子线程中完成主线程
            future.complete("success");
           }catch (Exception e){ e.printStackTrace();
                               } }, "A").start();
    //主线程调用get方法阻塞
    System.out.println("主线程调用get方法获取结果为: " + future.get());
    System.out.println("主线程完成,阻塞结束!!!!!!");
}
没有返回值的异步任务
 /** * 没有返回值的异步任务 * @param args */
 public static void main(String[] args) throws Exception{
     System.out.println("主线程开始");
     //运行一个没有返回值的异步任务
     CompletableFuture\<Void> future = CompletableFuture.runAsync(() -> { try {
         System.out.println("子线程启动干活");
        Thread.sleep(5000); System.out.println("子线程完成");
     } catch (Exception e) { e.printStackTrace();
                           }});
     //主线程阻塞
     future.get();
     System.out.println("主线程结束");
 }
有返回值的异步任务
/**
     * 没有返回值的异步任务 * @param args
     */
    public static void main(String[] args) throws Exception {
        System.out.println("主线程开始"); //运行一个有返回值的异步任务
        CompletableFuture\<String> future = CompletableFuture.supplyAsync(() -> {
            try {
                System.out.println("子线程开始任务");
                Thread.sleep(5000);
            } catch (Exception e) {
                e.printStackTrace();
            }
            return "子线程完成了!";
        }); //主线程阻塞
        String s = future.get();
        System.out.println("主线程结束, 子线程的结果为:" + s);
    }
线程依赖
当一个线程依赖另一个线程时,可以使用 thenApply 方法来把这两个线程串行化。
 private static Integer num = 10;

    /**
     * 先对一个数加10,然后取平方 * @param args
     */
    public static void main(String[] args) throws Exception {
        System.out.println("主线程开始");
        CompletableFuture\<Integer> future = CompletableFuture.supplyAsync(() -> {
            try {
                System.out.println("加10任务开始");
                num += 10;
            } catch (Exception e) {
                e.printStackTrace();
            }
            return num;
        }).thenApply(integer -> {
            return num * num;
        });
        Integer integer = future.get();
        System.out.println("主线程结束, 子线程的结果为:" + integer);
    }
消费处理结果
thenAccept 消费处理结果, 接收任务的处理结果,并消费处理,无返回结果。
 public static void main(String[] args) throws Exception {
        System.out.println("主线程开始");
        CompletableFuture.supplyAsync(() -> {
            try {
                System.out.println("加10任务开始");
                num += 10;
            } catch (Exception e) {
                e.printStackTrace();
            }
            return num;
        }).thenApply(integer -> {
            return num * num;
        }).thenAccept(new Consumer\<Integer>() {
            @Override
            public void accept(Integer integer) {
                System.out.println("子线程全部处理完成,最后调用了accept,结果为:" + integer);
            }
        });
    }
异常处理
exceptionally异常处理,出现异常时触发
public static void main(String[] args) throws Exception {
        System.out.println("主线程开始");
        CompletableFuture\<Integer> future = CompletableFuture.supplyAsync(() -> {
            int i = 1 / 0;
            System.out.println("加10任务开始");
            num += 10;
            return num;
        }).exceptionally(ex -> {
            System.out.println(ex.getMessage());
            return -1;
        });
        System.out.println(future.get());
    }
handle类似于thenAccept/thenRun方法,是最后一步的处理调用,但是同时可以处理异常
public static void main(String[] args) throws Exception {
        System.out.println("主线程开始");
        CompletableFuture\<Integer> future = CompletableFuture.supplyAsync(() -> {
            System.out.println("加10任务开始");
            num += 10;
            return num;
        }).handle((i, ex) -> {
            System.out.println("进入handle方法");
            if (ex != null) {
                System.out.println("发生了异常,内容为:" + ex.getMessage());
                return -1;
            } else {
                System.out.println("正常完成,内容为: " + i);
                return i;
            }
        });
        System.out.println(future.get());
    }
结果合并
thenCompose合并两个有依赖关系的CompletableFutures的执行结果
    public static void main(String[] args) throws Exception {
        System.out.println("主线程开始"); //第一步加10
        CompletableFuture\<Integer> future = CompletableFuture.supplyAsync(() -> {
            System.out.println("加10任务开始");
            num += 10;
            return num;
        }); //合并
        CompletableFuture\<Integer> future1 = future.thenCompose(i -> //再来一个CompletableFuture
                CompletableFuture.supplyAsync(() -> {
                    return i + 1;
                }));
        System.out.println(future.get());
        System.out.println(future1.get());
    }
thenCombine合并两个没有依赖关系的CompletableFutures任务
public static void main(String[] args) throws Exception {
        System.out.println("主线程开始");
        CompletableFuture\<Integer> job1 = CompletableFuture.supplyAsync(() -> {
            System.out.println("加10任务开始");
            num += 10;
            return num;
        });
        CompletableFuture\<Integer> job2 = CompletableFuture.supplyAsync(() -> {
            System.out.println("乘以10任务开始");
            num = num * 10;
            return num;
        }); //合并两个结果
        CompletableFuture\<Object> future = job1.thenCombine(job2, new BiFunction\<Integer, Integer, List\<Integer>>() {
            @Override
            public List\<Integer> apply(Integer a, Integer b) {
                List\<Integer> list = new ArrayList\<>();
                list.add(a);
                list.add(b);
                return list;
            }
        });
        System.out.println("合并结果为:" + future.get());
    }
合并多个任务的结果allOf与anyOf
allOf: 一系列独立的future任务,等其所有的任务执行完后做一些事情
 /**
     * 先对一个数加10,然后取平方 * @param args
     */
    public static void main(String[] args) throws Exception {
        System.out.println("主线程开始");
        List\<CompletableFuture> list = new ArrayList\<>();
        CompletableFuture\<Integer> job1 = CompletableFuture.supplyAsync(() -> {
            System.out.println("加10任务开始");
            num += 10;
            return num;
        });
        list.add(job1);
        CompletableFuture\<Integer> job2 = CompletableFuture.supplyAsync(() -> {
            System.out.println("乘以10任务开始");
            num = num * 10;
            return num;
        });
        list.add(job2);
        CompletableFuture\<Integer> job3 = CompletableFuture.supplyAsync(() -> {
            System.out.println("减以10任务开始");
            num = num * 10;
            return num;
        });
        list.add(job3);
        CompletableFuture\<Integer> job4 = CompletableFuture.supplyAsync(() -> {
            System.out.println("除以10任务开始");
            num = num * 10;
            return num;
        });
        list.add(job4); //多任务合并
        List\<Integer> collect = list.stream().map(CompletableFuture\<Integer>::join).collect(Collectors.toList());
        System.out.println(collect);
    }
anyOf: 只要在多个future里面有一个返回,整个任务就可以结束,而不需要等到每一个future结束
 /**
     * 先对一个数加10,然后取平方 * @param args
     */
    public static void main(String[] args) throws Exception {
        System.out.println("主线程开始");
        CompletableFuture\<Integer>[] futures = new CompletableFuture[4];
        CompletableFuture\<Integer> job1 = CompletableFuture.supplyAsync(() -> {
            try {
                Thread.sleep(5000);
                System.out.println("加10任务开始");
                num += 10;
                return num;
            } catch (Exception e) {
                return 0;
            }
        });
        futures[0] = job1;
        CompletableFuture\<Integer> job2 = CompletableFuture.supplyAsync(() -> {
            try {
                Thread.sleep(2000);
                System.out.println("乘以10任务开始");
                num = num * 10;
                return num;
            } catch (Exception e) {
                return 1;
            }
        });
        futures[1] = job2;
        CompletableFuture\<Integer> job3 = CompletableFuture.supplyAsync(() -> {
            try {
                Thread.sleep(3000);
                System.out.println("减以10任务开始");
                num = num * 10;
                return num;
            } catch (Exception e) {
                return 2;
            }
        });
        futures[2] = job3;
        CompletableFuture\<Integer> job4 = CompletableFuture.supplyAsync(() -> {
            try {
                Thread.sleep(4000);
                System.out.println("除以10任务开始");
                num = num * 10;
                return num;
            } catch (Exception e) {
                return 3;
            }
        });
        futures[3] = job4;
        CompletableFuture\<Object> future = CompletableFuture.anyOf(futures);
        System.out.println(future.get());
    }
反射
获取类的字节码
package pers.lxl.mylearnproject.javase.reflection;

import java.lang.reflect.Field;
import java.util.Arrays;

/**
 * 不知对象情况调用对象方法等,通过Class实例获取class信息的方法称为反射(Reflection)
 *
 * @author lxl
 */
public class ReClass {


    public static void main(String[] args) {
/** 1.获取一个class的Class实例的三个方法:
 方法一:class的静态变量.class:
 Class cls = String.class;
 方法二:实例变量.getClass():
 String s = "Hello";
 Class cls1 = s.getClass();
 方法三:静态方法Class.forName(class的完整类名):
 只会让静态代码块执行
 Class cls2 = Class.forName("java.lang.String");
 用instanceof不但匹配指定类型,还匹配指定类型的子类。而用==判断class实例可以精确地判断数据类型,但不能作子类型比较*/
        printClassInfo("".getClass());
        printClassInfo(Runnable.class);
        printClassInfo(java.time.Month.class);
        printClassInfo(String[].class);
        printClassInfo(int.class);
//        ReflectLearn reflectLearn=new ReflectLearn();
        printClassInfo(ReflectLearn.class);
    }

    static void printClassInfo(Class cls) {

//            先获取类之后才能获取类信息

//        获取类信息
        System.out.println("[" + cls.getSimpleName() + "]  begin ==================================");
        System.out.println("Class name: " + cls.getName());
        System.out.println("Simple name: " + cls.getSimpleName());
        if (cls.getPackage() != null) {
            System.out.println("Package name: " + cls.getPackage().getName());
        }
        System.out.println("is interface: " + cls.isInterface());
        System.out.println("is enum: " + cls.isEnum());
        System.out.println("is array: " + cls.isArray());
        System.out.println("is primitive: " + cls.isPrimitive());


//        方法信息
//        .newInstance() 无参构造,不存在抛出异常java.lang.InstantiationException
        try {
            System.out.println("无参构造:   "+cls.newInstance());
        } catch (InstantiationException e) {
            System.out.println("没有无参构造造成InstantiationException");
        } catch (IllegalAccessException e) {
            System.out.println("没有无参构造造成IllegalAccessException");
        }
        System.out.println("所有实例方法:   "+cls.getDeclaredMethods());
//        System.out.println("根据名字获取方法:   "+ Arrays.toString(cls.getDeclaredMethods("methodShow")));
        System.out.println("所有构造方法:   "+ Arrays.toString(cls.getDeclaredConstructors()));


//        属性信息
        System.out.println("public Fields: " + Arrays.toString(cls.getFields()));
        System.out.println("Fields public Name: " + cls.getName());
        System.out.println("All Fields: " + Arrays.toString(cls.getDeclaredFields()));
        try {
            System.out.println("Get Fields By Name: " + Arrays.toString(new Field[]{cls.getDeclaredField("publicFiled")}));
        } catch (NoSuchFieldException e) {
            System.out.println("没有这样一个属性报NoSuchFieldException");
        }


        System.out.println("[" + cls.getSimpleName() + "]  end ==================================" + "\n");
    }

}

class ReflectLearn {
    public String publicFiled;
    private String privateFiled;


    public int methodShow(){
        return 1;
    }
}
IO
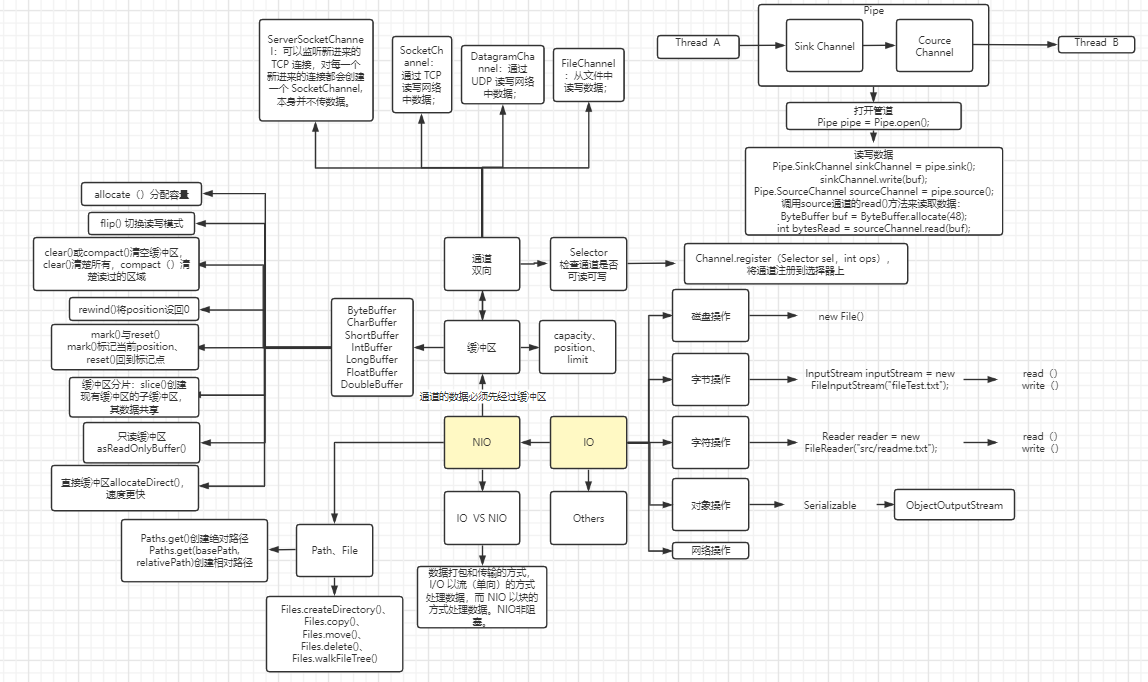
磁盘操作
File对象
import java.io.File;
import java.io.FilenameFilter;
import java.io.IOException;
import java.nio.file.Path;
import java.nio.file.Paths;
/**磁盘操作**/
public class FileObject {
    public static void main(String[] args) throws IOException {
//        即使传入的文件或目录不存在,代码也不会出错,因为构造一个File对象,并不会导致任何磁盘操作,调用方法时才会磁盘操作
        //绝对路径是以根目录开头的完整路径Java字符串中以//代表/
//        File表示文件或目录
        //\u202A系统复制产生
        File file = new File("C:\\Users\\Administrator\\Desktop\\lixianglun\\fileTest.txt");
        //相对路径(可以用.表示当前目录,..表示上级目录)绝对路径去掉当前目录
        File afile = new File("..\\fileTest.txt");
        File catalog=new File("C:\\Users\\Administrator\\Desktop");
        System.out.println(file);
        //返回构造方法传入的路径
        System.out.println(file.getPath());
        //返回绝对路径
        System.out.println(file.getAbsolutePath());
        //返回的是规范路径。
        System.out.println(afile.getCanonicalPath());
        //根据当前平台打印"\"或"/"
        System.out.println(File.separator);
        System.out.println(file.isFile());
        //判断当前文件,目录是否存在
        System.out.println(file.isDirectory());
        System.out.println(file.canRead());
        System.out.println(file.canWrite());
        System.out.println(file.canExecute());
        System.out.println(afile.length());
        //add、delete
//        if (file.createNewFile()) {
//            // 文件创建成功:
//            // TOD O:TODO提交代码会提醒
//            if (file.delete()) {
//                // 删除文件成功:
//            }
//        }
//        递归列出目录下的所有文件
//        public static void listAllFiles(File dir) {
//    if (dir == null || !dir.exists()) {
//        return;
//    }
//    if (dir.isFile()) {
//        System.out.println(dir.getName());
//        return;
//    }
//    for (File file : dir.listFiles()) {
//        listAllFiles(file);
//    }
//}
//有些时候,程序需要读写一些临时文件,File对象提供了createTempFile()来创建一个临时文件,以及deleteOnExit()在JVM退出时自动删除该文件。
        System.out.println(catalog.list());
        //目录下的文件和子目录名
        System.out.println(catalog.listFiles());
        //listFiles()提供了一系列重载方法,可以过滤不想要的文件和目录
        // 仅列出.exe文件
        File[] fs2 = catalog.listFiles(new FilenameFilter() {
            @Override
            public boolean accept(File dir, String name) {
                return name.endsWith(".exe"); // 返回true表示接受该文件
            }
        });
        printFiles(fs2);
    }
    /**boolean mkdir():创建当前File对象表示的目录;
    //boolean mkdirs():创建当前File对象表示的目录,并在必要时将不存在的父目录也创建出来;
    //boolean delete():删除当前File对象表示的目录,当前目录必须为空才能删除成功。*/
        static void printFiles(File[] files) {
            System.out.println("==========");
            if (files != null) {
                for (File f : files) {
                    System.out.println(f);
                }
            }
            System.out.println("==========");
            // 构造一个Path对象
            Path p1 = Paths.get(".", "project", "study");
            System.out.println(p1);
            // 转换为绝对路径
            Path p2 = p1.toAbsolutePath();
            System.out.println(p2);
            // 转换为规范路径
            Path p3 = p2.normalize();
            System.out.println(p3);
            // 转换为File对象
            File f = p3.toFile();
            System.out.println(f);
            // 可以直接遍历Path
            for (Path p : Paths.get("src/main").toAbsolutePath()) {
                System.out.println("  " + p);
            }
    }
}
字节操作
InputStream
import java.io.File;
import java.io.FileInputStream;
import java.io.IOException;
import java.io.InputStream;

/**InputStream并不是一个接口,而是一个抽象类,它是所有输入流的超类。这个抽象类定义的一个最重要的方法就是int read(),签名如下:
public abstract int read() throws IOException;
这个方法会读取输入流的下一个字节,并返回字节表示的int值(0~255)。如果已读到末尾,返回-1表示不能继续读取了。
 * @author lxl*/
public class InputStreamL {
    public static void main(String[] args) throws IOException {
        //inputStream字节输入流,抽象类,只提供方法声明,不提供具体实现
        // 创建一个FileInputStream对象:
        InputStream inputStream = new FileInputStream("fileTest.txt");
        for (; ; ) {//死循环,比while(true)更好,因为编译后指令更少,而且没有判断跳转,更加简洁
            // 反复调用read()方法,直到返回-1
            int n = inputStream.read();
            if (n == -1) {
                break;
            }
            // 打印byte的值
            System.out.println(n);
        }
        inputStream.close(); // 关闭流释放对应的底层资源,便让操作系统把资源释放掉,否则,应用程序占用的资源会越来越多,不但白白占用内存,还会影响其他应用程序的运行。
//        利用缓冲区一次读取多个字节
        try (InputStream input = new FileInputStream("fileTest.txt")) {
            // 定义1000个字节大小的缓冲区:
            byte[] buffer = new byte[1000];
            int n;
            // 读取到缓冲区,read()方法是阻塞的(Blocking),必须等待read()方法返回才能执行下一行代码
            while ((n = input.read(buffer)) != -1) {
                System.out.println("read " + n + " bytes.");
            }
        }


        try {
            //准备文件lol.txt其中的内容是AB,对应的ASCII分别是65 66
            File f =new File("fileTest.txt");
            //创建基于文件的输入流
            FileInputStream fis =new FileInputStream(f);
            //创建字节数组,其长度就是文件的长度
            byte[] all =new byte[(int) f.length()];
            //以字节流的形式读取文件所有内容
            fis.read(all);
            for (byte b : all) {
                //打印出来是65 66
                System.out.println(b);
            }

            //每次使用完流,都应该进行关闭
            fis.close();

        } catch (IOException e) {
            // TODO Auto-generated catch block
            e.printStackTrace();
        }

    }
}
/*装饰者模式
Java I/O 使用了装饰者模式来实现。以 InputStream 为例,

InputStream 是抽象组件;
FileInputStream 是 InputStream 的子类,属于具体组件,提供了字节流的输入操作;
FilterInputStream 属于抽象装饰者,装饰者用于装饰组件,为组件提供额外的功能。例如 BufferedInputStream 为 FileInputStream 提供缓存的功能。

实例化一个具有缓存功能的字节流对象时,只需要在 FileInputStream 对象上再套一层 BufferedInputStream 对象即可。

FileInputStream fileInputStream = new FileInputStream(filePath);
BufferedInputStream bufferedInputStream = new BufferedInputStream(fileInputStream);

DataInputStream 装饰者提供了对更多数据类型进行输入的操作,比如 int、double 等基本类型。*/
OutputStream
import java.io.*;

/**为什么要有flush()?因为向磁盘、网络写入数据的时候,出于效率的考虑,
操作系统并不是输出一个字节就立刻写入到文件或者发送到网络,
而是把输出的字节先放到内存的一个缓冲区里(本质上就是一个byte[]数组),
等到缓冲区写满了,再一次性写入文件或者网络。对于很多IO设备来说,
一次写一个字节和一次写1000个字节,花费的时间几乎是完全一样的,
所以OutputStream有个flush()方法,能强制把缓冲区内容输出。
通常情况下,我们不需要调用这个flush()方法,因为缓冲区写满了OutputStream会自动调用它
并且,在调用close()方法关闭OutputStream之前,也会自动调用flush()方法。
特别情况,缓冲区过大,需马上发送的时候手动flush
 * @author lxl*/
public class OutputStreamL {
    /**实现文件复制*/
    public static void copyFile(String src, String dist) throws IOException {
        FileInputStream in = new FileInputStream(src);
        FileOutputStream out = new FileOutputStream(dist);

        byte[] buffer = new byte[20 * 1024];
        int cnt;

        // read() 最多读取 buffer.length 个字节
        // 返回的是实际读取的个数
        // 返回 -1 的时候表示读到 eof,即文件尾
        while ((cnt = in.read(buffer, 0, buffer.length)) != -1) {
            out.write(buffer, 0, cnt);
        }

        in.close();
    }
    public static void main(String[] args) throws IOException {
        //文件存在则覆盖,不存在创建
        try(OutputStream output = new FileOutputStream("F:\\PROJECT\\IDEA\\mylearnproject\\src\\main\\resources\\fileTest.txt")){
            byte[] data = {34, 35};
        // H
        output.write(72);
        // e
        output.write(101);
        // l
        output.write(108);
        // l
        output.write(108);
        // o
        output.write(data);
//        output.write(111); // o
        // 一次性写入若干字节
        output.write("Hello瓦达无多".getBytes("UTF-8"));
            // }
        output.close();//try之后编译器在此自动为我们写入finally并调用close()
    }
}}
字符操作
Reader
InputStream是一个字节流,即以byte为单位读取,而Reader是一个字符流,即以char为单位读取
InputStream Reader
字节流,以byte为单位 字符流,以char为单位
读取字节(-1,0~255):int read() 读取字符(-1,0~65535):int read()
读到字节数组:int read(byte[] b) 读到字符数组:int read(char[] c)java.io.Reader是所有字符输入流的超类,它最主要的方法是:
public int read() throws IOException;
这个方法读取字符流的下一个字符,并返回字符表示的int,范围是0~65535。如果已读到末尾,返回-1。FileReader打开文件并获取Reader
- // 创建一个FileReader对象:
Reader reader = new FileReader("src/readme.txt"); // 字符编码是???
for (;😉 {
int n = reader.read(); // 反复调用read()方法,直到返回-1
if (n == -1) {
break;
}
System.out.println((char)n); // 打印char
}
reader.close(); // 关闭流
- // 创建一个FileReader对象:
避免乱码问题,我们需要在创建FileReader时指定编码:
	Reader reader = new FileReader("src/readme.txt", StandardCharsets.UTF_8);
	- try (resource)来保证Reader在无论有没有IO错误的时候都能够正确地关闭
	- Reader还提供了一次性读取若干字符并填充到char[]数组的方法:

public int read(char[] c) throws IOException
它返回实际读入的字符个数,最大不超过char[]数组的长度。返回-1表示流结束。
	- CharArrayReader把一个char[]数组变成一个Reader
	- try (Reader reader = new CharArrayReader("Hello".toCharArray())) {}

- StringReader
- InputStreamReader

	- 除了特殊的CharArrayReader和StringReader,普通的Reader实际上是基于InputStream构造的,因为Reader需要从InputStream中读入字节流(byte),然后,根据编码设置,再转换为char就可以实现字符流。如果我们查看FileReader的源码,它在内部实际上持有一个FileInputStream。
	既然Reader本质上是一个基于InputStream的byte到char的转换器,那么,如果我们已经有一个InputStream,想把它转换为Reader,是完全可行的。InputStreamReader就是这样一个转换器,它可以把任何InputStream转换为Reader。
		- // 持有InputStream:
		InputStream input = new FileInputStream("src/readme.txt");
// 变换为Reader:
Reader reader = new InputStreamReader(input, "UTF-8");
			- try (Reader reader = new InputStreamReader(new FileInputStream("src/readme.txt"), "UTF-8")) {
// TODO:
}
Writer
- Writer就是带编码转换器的OutputStream,它把char转换为byte并输出
- OutputStream Writer
字节流,以byte为单位 字符流,以char为单位
写入字节(0~255):void write(int b) 写入字符(0~65535):void write(int c)
写入字节数组:void write(byte[] b) 写入字符数组:void write(char[] c)
无对应方法 写入String:void write(String s) - Writer是所有字符输出流的超类,它提供的方法主要有:
写入一个字符(0~65535):void write(int c);
写入字符数组的所有字符:void write(char[] c);
写入String表示的所有字符:void write(String s)。
- FileWriter
	- try (Writer writer = new FileWriter("readme.txt", StandardCharsets.UTF_8)) {
writer.write('H'); // 写入单个字符
writer.write("Hello".toCharArray()); // 写入char[]
writer.write("Hello"); // 写入String
}
- CharArrayWriter
- StringWriter
- OutputStreamWriter
String 的编码方式
- String 可以看成一个字符序列,可以指定一个编码方式将它编码为字节序列,也可以指定一个编码方式将一个字节序列解码为 String。
String str1 = "中文"; d
byte[] bytes = str1.getBytes("UTF-8");
String str2 = new String(bytes, "UTF-8");
System.out.println(str2);
在调用无参数 getBytes() 方法时,默认的编码方式不是 UTF-16be。双字节编码的好处是可以使用一个 char 存储中文和英文,而将 String 转为 bytes[] 字节数组就不再需要这个好处,因此也就不再需要双字节编码。getBytes() 的默认编码方式与平台有关,一般为 UTF-8。
byte[] bytes = str1.getBytes();
对象操作
- 序列化是指把一个Java对象变成二进制内容,本质上就是一个byte[]数组,序列化后可以把byte[]保存到文件中,或者把byte[]通过网络传输到远程,这样,就相当于把Java对象存储到文件或者通过网络传输出去了

  - 一个Java对象要能序列化,必须实现一个特殊的java.io.Serializable接口
  - 把一个Java对象变为byte[]数组,需要使用ObjectOutputStream。它负责把一个Java对象写入一个字节流
  - public class Main {
    public static void main(String[] args) throws IOException {
      ByteArrayOutputStream buffer = new ByteArrayOutputStream();
      try (ObjectOutputStream output = new ObjectOutputStream(buffer)) {
          // 写入int:
          output.writeInt(12345);
          // 写入String:
          output.writeUTF("Hello");
          // 写入Object:
          output.writeObject(Double.valueOf(123.456));
      }
      System.out.println(Arrays.toString(buffer.toByteArray()));
    }
    }

- 反序列化,即把一个二进制内容(也就是byte[]数组)变回Java对象。有了反序列化,保存到文件中的byte[]数组又可以“变回”Java对象,或者从网络上读取byte[]并把它“变回”Java对象。

  - ObjectInputStream负责从一个字节流读取Java对象
  - try (ObjectInputStream input = new ObjectInputStream(...)) {
    int n = input.readInt();
    String s = input.readUTF();
    Double d = (Double) input.readObject();
    }

    - readObject()可能抛出的异常有:

ClassNotFoundException:没有找到对应的Class;
InvalidClassException:Class不匹配。
- 安全性

	- Java的序列化机制仅适用于Java,如果需要与其它语言交换数据,必须使用通用的序列化方法,例如JSON。
网络操作
NIO
流与块
- I/O 与 NIO 最重要的区别是数据打包和传输的方式,I/O 以流的方式处理数据,而 NIO 以块的方式处理数据。
面向流的 I/O 一次处理一个字节数据:一个输入流产生一个字节数据,一个输出流消费一个字节数据。为流式数据创建过滤器非常容易,链接几个过滤器,以便每个过滤器只负责复杂处理机制的一部分。不利的一面是,面向流的 I/O 通常相当慢。
面向块的 I/O 一次处理一个数据块,按块处理数据比按流处理数据要快得多。但是面向块的 I/O 缺少一些面向流的 I/O 所具有的优雅性和简单性。
I/O 包和 NIO 已经很好地集成了,java.io.* 已经以 NIO 为基础重新实现了,所以现在它可以利用 NIO 的一些特性。例如,java.io.* 包中的一些类包含以块的形式读写数据的方法,这使得即使在面向流的系统中,处理速度也会更快。
通道与缓冲区
通道
通道 Channel 是对原 I/O 包中的流的模拟,可以通过它读取和写入数据。
通道与流的不同之处在于,流只能在一个方向上移动(一个流必须是 InputStream 或者 OutputStream 的子类),而通道是双向的,可以用于读、写或者同时用于读写。
通道包括以下类型:
FileChannel:从文件中读写数据;
DatagramChannel:通过 UDP 读写网络中数据;
SocketChannel:通过 TCP 读写网络中数据;
ServerSocketChannel:可以监听新进来的 TCP 连接,对每一个新进来的连接都会创建一个 SocketChannel,本身并不传数据。
FileChannel
package pers.lxl.mylearnproject.javase.io.nio.channel;

import java.io.IOException;
import java.io.RandomAccessFile;
import java.nio.ByteBuffer;
import java.nio.channels.FileChannel;

public class FileChannelDemo {
    public static void main(String[] args) throws IOException {
        // 读
//        需要通过使用一个InputStream、OutputStream或RandomAccessFile来获取一个FileChannel实例
        RandomAccessFile aFile = new RandomAccessFile("src/main/resources/fileTest.txt", "rw");
        FileChannel inChannel = aFile.getChannel();
        ByteBuffer buf = ByteBuffer.allocate(48);
//        获取当前通道位置
        long pos = inChannel.position();
//        设置当前通道位置
        inChannel.position(pos + 6);
//        返回通道当前大小
        System.out.println("此时通道大小:"+inChannel.size());
//        截取(删除)文件7字节后部分
        inChannel.truncate(7);
        int bytesRead = inChannel.read(buf);
        while (bytesRead != -1) {
            System.out.println("读取: " + bytesRead);
            buf.flip();
            while (buf.hasRemaining()) {
                System.out.print((char) buf.get());
            }
            buf.clear();
            bytesRead = inChannel.read(buf);
        }
        //强制将通道里的剩余数据写到磁盘中
        inChannel.force(true);
        aFile.close();
        System.out.println("操作结束");

        //覆盖起始位置开始的对应位置 写
        RandomAccessFile aFile1 = new RandomAccessFile("src/main/resources/fileTest.txt", "rw");
        String newData = "New String to write to file..." + System.currentTimeMillis();
        ByteBuffer buf1 = ByteBuffer.allocate(48);
        FileChannel inChannel1 = aFile1.getChannel();
        buf1.clear();
        buf1.put(newData.getBytes());
        buf1.flip();
        while (buf1.hasRemaining()) {
            inChannel1.write(buf1);
        }
        inChannel1.close();


        RandomAccessFile aaFile = new RandomAccessFile("src/main/resources/fileTest.txt", "rw");
        FileChannel fromChannel = aaFile.getChannel();
        RandomAccessFile bbFile = new RandomAccessFile("src/main/resources/transferFrom.txt", "rw");
        FileChannel toChannel = bbFile.getChannel();
        long position = 0;
        long count = fromChannel.size();
        //        fromChannel to toChannel
        toChannel.transferFrom(fromChannel, position, count);
        //        fromChannel to toChannel
        fromChannel.transferTo(position, count, toChannel);
        aaFile.close();
        bbFile.close();
        System.out.println("通道传输over!");
    }
}
ServerSocketChannel
(1)新的socket通道类可以运行非阻塞模式并且是可选择的,可以激活大程序(如网络服务器和中间件组件)巨大的可伸缩性和灵活性。本节中我们会看到,再也没有为每个socket连接使用一个线程的必要了,也避免了管理大量线程所需的上下文交换开销。借助新的NIO类,一个或几个线程就可以管理成百上千的活动socket连接了并且只有很少甚至可能没有性能损失。所有的socket通道类(DatagramChannel、SocketChannel和ServerSocketChannel)都继承了位于java.nio.channels.spi包中的AbstractSelectableChannel。这意味着我们可以用一个Selector对象来执行socket通道的就绪选择(readiness selection)。
(2)请注意DatagramChannel和SocketChannel实现定义读和写功能的接口而ServerSocketChannel不实现。ServerSocketChannel负责监听传入的连接和创建新的SocketChannel对象,它本身从不传输数据。
(3)在我们具体讨论每一种socket通道前,您应该了解socket和socket通道之间的关系。通道是一个连接I/O服务导管并提供与该服务交互的方法。就某个socket而言,它不会再次实现与之对应的socket通道类中的socket协议API,而java.net中已经存在的socket通道都可以被大多数协议操作重复使用。
全部socket通道类(DatagramChannel、SocketChannel和ServerSocketChannel)在被实例化时都会创建一个对等socket对象。这些是我们所熟悉的来自java.net的类(Socket、ServerSocket和DatagramSocket),它们已经被更新以识别通道。对等socket可以通过调用socket( )方法从一个通道上获取。此外,这三个java.net类现在都有getChannel( )方法。
(4)要把一个socket通道置于非阻塞模式,我们要依靠所有socket通道类的公有超级类:SelectableChannel。就绪选择(readiness selection)是一种可以用来查询通道的机制,该查询可以判断通道是否准备好执行一个目标操作,如读或写。非阻塞I/O和可选择性是紧密相连的,那也正是管理阻塞模式的API代码要在SelectableChannel超级类中定义的原因。
设置或重新设置一个通道的阻塞模式是很简单的,只要调用configureBlocking( )方法即可,传递参数值为true则设为阻塞模式,参数值为false值设为非阻塞模式。可以通过调用isBlocking( )方法来判断某个socket通道当前处于哪种模式。
非阻塞socket通常被认为是服务端使用的,因为它们使同时管理很多socket通道变得更容易。但是,在客户端使用一个或几个非阻塞模式的socket通道也是有益处的,例如,借助非阻塞socket通道,GUI程序可以专注于用户请求并且同时维护与一个或多个服务器的会话。在很多程序上,非阻塞模式都是有用的。 偶尔地,我们也会需要防止socket通道的阻塞模式被更改。API中有一个blockingLock( )方法,该方法会返回一个非透明的对象引用。返回的对象是通道实现修改阻塞模式时内部使用的。只有拥有此对象的锁的线程才能更改通道的阻塞模式。
ServerSocketChannel是一个基于通道的socket监听器。它同我们所熟悉的java.net.ServerSocket执行相同的任务,不过它增加了通道语义,因此能够在非阻塞模式下运行。
由于ServerSocketChannel没有bind()方法,因此有必要取出对等的socket并使用它来绑定到一个端口以开始监听连接。我们也是使用对等ServerSocket的API来根据需要设置其他的socket选项。
同java.net.ServerSocket一样,ServerSocketChannel也有accept( )方法。一旦创建了一个ServerSocketChannel并用对等socket绑定了它,然后您就可以在其中一个上调用accept()。如果您选择在ServerSocket上调用accept( )方法,那么它会同任何其他的ServerSocket表现一样的行为:总是阻塞并返回一个java.net.Socket对象。如果您选择在ServerSocketChannel上调用accept( )方法则会返回SocketChannel类型的对象,返回的对象能够在非阻塞模式下运行。
换句话说:
ServerSocketChannel的accept()方法会返回SocketChannel类型对象,SocketChannel可以在非阻塞模式下运行。其它Socket的accept()方法会阻塞返回一个Socket对象。如果ServerSocketChannel以非阻塞模式被调用,当没有传入连接在等待时,ServerSocketChannel.accept( )会立即返回null。正是这种检查连接而不阻塞的能力实现了可伸缩性并降低了复杂性。可选择性也因此得到实现。我们可以使用一个选择器实例来注册ServerSocketChannel对象以实现新连接到达时自动通知的功能。
import java.net.InetSocketAddress;
import java.nio.ByteBuffer;
import java.nio.channels.ServerSocketChannel;
import java.nio.channels.SocketChannel;
//http://localhost:1234/
public class ServerSocketChannelDemo {

    public static final String GREETING = "Hello java nio.\r\n";

    public static void main(String[] argv) throws Exception {
        int port = 1234; // default
        if (argv.length > 0) {
            port = Integer.parseInt(argv[0]);
        }
        ByteBuffer buffer = ByteBuffer.wrap(GREETING.getBytes());
//        打开
        ServerSocketChannel ssc = ServerSocketChannel.open();
        ssc.socket().bind(new InetSocketAddress(port));
        ssc.configureBlocking(false);
        while (true) {
            System.out.println("Waiting for connections");
//            监听新的链接,阻塞会在此阻塞住进程非阻塞会返回null
            SocketChannel sc = ssc.accept();
            if (sc == null) {
                System.out.println("null");
                Thread.sleep(2000);
            } else {
                System.out.println("Incoming connection from: " + sc.socket().getRemoteSocketAddress());
//                指针指向0
                buffer.rewind();
                sc.write(buffer);
//                关闭
                sc.close();
            }
        }
    }
}
SocketChannel
Java NIO中的SocketChannel是一个连接到TCP网络套接字的通道。 A selectable channel for stream-oriented connecting sockets. 以上是Java docs中对于SocketChannel的描述:SocketChannel是一种面向流连接sockets套接字的可选择通道。从这里可以看出:
• SocketChannel是用来连接Socket套接字
•SocketChannel主要用途用来处理网络I/O的通道
• SocketChannel是基于TCP连接传输
• SocketChannel实现了可选择通道,可以被多路复用的
特征:
(1)对于已经存在的socket不能创建SocketChannel
(2)SocketChannel中提供的open接口创建的Channel并没有进行网络级联,需要使用connect接口连接到指定地址
(3)未进行连接的SocketChannle执行I/O操作时,会抛出NotYetConnectedException
(4)SocketChannel支持两种I/O模式:阻塞式和非阻塞式
(5)SocketChannel支持异步关闭。如果SocketChannel在一个线程上read阻塞,另一个线程对该SocketChannel调用shutdownInput,则读阻塞的线程将返回-1表示没有读取任何数据;如果SocketChannel在一个线程上write阻塞,另一个线程对该SocketChannel调用shutdownWrite,则写阻塞的线程将抛出AsynchronousCloseException
(6)SocketChannel支持设定参数
SO_SNDBUF 套接字发送缓冲区大小
SO_RCVBUF 套接字接收缓冲区大小
SO_KEEPALIVE 保活连接
O_REUSEADDR 复用地址
SO_LINGER 有数据传输时延缓关闭Channel (只有在非阻塞模式下有用)
TCP_NODELAY 禁用Nagle算法
package pers.lxl.mylearnproject.javase.io.nio.channel;

import java.io.IOException;
import java.net.InetSocketAddress;
import java.net.StandardSocketOptions;
import java.nio.ByteBuffer;
import java.nio.channels.SocketChannel;

public class SocketChannelDemo {
    public static void main(String[] args) throws IOException {
        SocketChannel socketChannel = SocketChannel.open(new InetSocketAddress("www.baidu.com", 80));

        SocketChannel socketChanne2 = SocketChannel.open();
        socketChanne2.connect(new InetSocketAddress("www.baidu.com", 80));
//        连接校验
        socketChannel.isOpen(); // 测试SocketChannel是否为open状态
        socketChannel.isConnected(); //测试SocketChannel是否已经被连接
        socketChannel.isConnectionPending(); //测试SocketChannel是否正在进行连接
        socketChannel.finishConnect(); //校验正在进行套接字连接的SocketChannel是否已经完成连接
//        读写模式 前面提到SocketChannel支持阻塞和非阻塞两种模式:
        socketChannel.configureBlocking(false);

//        通过setOptions方法可以设置socket套接字的相关参数
        socketChannel.setOption(StandardSocketOptions.SO_KEEPALIVE, Boolean.TRUE).setOption(StandardSocketOptions.TCP_NODELAY, Boolean.TRUE);
//        可以通过getOption获取相关参数的值。如默认的接收缓冲区大小是8192byte。
        socketChannel.getOption(StandardSocketOptions.SO_KEEPALIVE);
        socketChannel.getOption(StandardSocketOptions.SO_RCVBUF);
//        读写
        ByteBuffer byteBuffer = ByteBuffer.allocate(16);
        socketChannel.read(byteBuffer);
        socketChannel.close();
        System.out.println("read over");
    }
}
DatagramChannel
正如SocketChannel对应Socket,ServerSocketChannel对应ServerSocket,每一个DatagramChannel对象也有一个关联的DatagramSocket对象。正如SocketChannel模拟连接导向的流协议(如TCP/IP),DatagramChannel则模拟包导向的无连接协议(如UDP/IP)。DatagramChannel是无连接的,每个数据报(datagram)都是一个自包含的实体,拥有它自己的目的地址及不依赖其他数据报的数据负载。与面向流的的socket不同,DatagramChannel可以发送单独的数据报给不同的目的地址。同样,DatagramChannel对象也可以接收来自任意地址的数据包。每个到达的数据报都含有关于它来自何处的信息(源地址)。
import org.junit.jupiter.api.Test;
import java.io.IOException;
import java.net.InetSocketAddress;
import java.net.SocketAddress;
import java.nio.ByteBuffer;
import java.nio.channels.DatagramChannel;
import java.nio.charset.Charset;

public class DatagramChannelDemo {
    /**
     * 发包的datagram * * @throws IOException * @throws InterruptedException
     */
    @Test
    public void sendDatagram() throws IOException, InterruptedException {
        DatagramChannel sendChannel = DatagramChannel.open();
        InetSocketAddress sendAddress = new InetSocketAddress("127.0.0.1", 9999);
        while (true) {
//            发送
            sendChannel.send(ByteBuffer.wrap("发包".getBytes("UTF-8")), sendAddress);
            System.out.println("发包端发包");
            Thread.sleep(1000);
        }
    }

    /**
     * 收包端 * * @throws IOException
     */
    @Test
    public void receive() throws IOException {
        DatagramChannel receiveChannel = DatagramChannel.open();
        //打开9999端口接收UDP数据包
        InetSocketAddress receiveAddress = new InetSocketAddress(9999);
        receiveChannel.bind(receiveAddress);
        ByteBuffer receiveBuffer = ByteBuffer.allocate(512);
        while (true) {
            receiveBuffer.clear();
//            接收
            SocketAddress sendAddress = receiveChannel.receive(receiveBuffer);
            receiveBuffer.flip();
            System.out.print(sendAddress.toString() + " ");
            System.out.println(Charset.forName("UTF-8").decode(receiveBuffer));
        }
    }

    /**
     * 只接收和发送9999的数据包 * * @throws IOException
     */
    @Test
    public void testConect1() throws IOException {
        DatagramChannel connChannel = DatagramChannel.open();
        connChannel.bind(new InetSocketAddress(9999));
        //UDP不存在真正意义上的连接,这里的连接是向特定服务地址用read和write接收发送数据包。
        connChannel.connect(new InetSocketAddress("127.0.0.1", 9999));
        connChannel.write(ByteBuffer.wrap("发包".getBytes("UTF-8")));
        ByteBuffer readBuffer = ByteBuffer.allocate(512);
        //read()和write()只有在connect()后才能使用,不然会抛NotYetConnectedException异常。用read()接收时,如果没有接收到包,会抛PortUnreachableException异常。
        while (true) {
            try {
                readBuffer.clear();
                connChannel.read(readBuffer);
                readBuffer.flip();
                System.out.println(Charset.forName("UTF-8").decode(readBuffer));
            } catch (Exception e) {
            }
        }

    }
}
Scatter/Gather
Java NIO开始支持scatter/gather,scatter/gather用于描述从Channel中读取或者写入到Channel的操作。
**分散(scatter)**从Channel中读取是指在读操作时将读取的数据写入多个buffer中。因此,Channel将从Channel中读取的数据“分散(scatter)”到多个Buffer中。
**聚集(gather)**写入Channel是指在写操作时将多个buffer的数据写入同一个Channel,因此,Channel 将多个Buffer中的数据“聚集(gather)”后发送到Channel。 scatter / gather经常用于需要将传输的数据分开处理的场合,例如传输一个由消息头和消息体组成的消息,你可能会将消息体和消息头分散到不同的buffer中,这样你可以方便的处理消息头和消息体。
Scattering Reads
Scattering Reads是指数据从一个channel读取到多个buffer中。
ByteBuffer header = ByteBuffer.allocate(128);
ByteBuffer body = ByteBuffer.allocate(1024);
ByteBuffer[] bufferArray = { header, body };
channel.read(bufferArray); 注意buffer首先被插入到数组,然后再将数组作为channel.read() 的输入参数。read()方法按照buffer在数组中的顺序将从channel中读取的数据写入到buffer,当一个buffer被写满后,channel紧接着向另一个buffer中写。 Scattering Reads在移动下一个buffer前,必须填满当前的buffer,这也意味着它不适用于动态消息(译者注:消息大小不固定)。换句话说,如果存在消息头和消息体,消息头必须完成填充(例如 128byte),Scattering Reads才能正常工作。
Gathering Writes
Gathering Writes是指数据从多个buffer写入到同一个channel。
ByteBuffer header = ByteBuffer.allocate(128);
ByteBuffer body = ByteBuffer.allocate(1024);
//write data into buffers ByteBuffer[] bufferArray = { header, body };
channel.write(bufferArray); buffers数组是write()方法的入参,write()方法会按照buffer在数组中的顺序,将数据写入到channel,注意只有position和limit之间的数据才会被写入。因此,如果一个buffer的容量为128byte,但是仅仅包含58byte的数据,那么这58byte的数据将被写入到channel中。因此与Scattering Reads相反,Gathering Writes能较好的处理动态消息。
缓冲区
发送给一个通道的所有数据都必须首先放到缓冲区中,同样地,从通道中读取的任何数据都要先读到缓冲区中。也就是说,不会直接对通道进行读写数据,而是要先经过缓冲区。
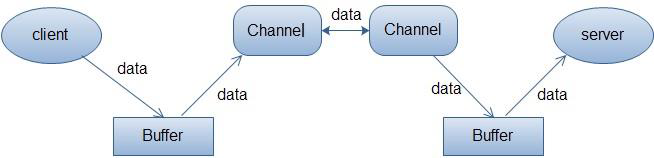
缓冲区实质上是一个数组,但它不仅仅是一个数组。缓冲区提供了对数据的结构化访问,而且还可以跟踪系统的读/写进程。
缓冲区本质上是一块可以写入数据,然后可以从中读取数据的内存。这块内存被包装成NIO Buffer对象,并提供了一组方法,用来方便的访问该块内存。缓冲区实际上是一个容器对象,更直接的说,其实就是一个数组,在NIO库中,所有数据都是用缓冲区处理的。在读取数据时,它是直接读到缓冲区中的; 在写入数据时,它也是写入到缓冲区中的;任何时候访问 NIO 中的数据,都是将它放到缓冲区中。而在面向流I/O系统中,所有数据都是直接写入或者直接将数据读取到Stream对象中。在NIO中,所有的缓冲区类型都继承于抽象类Buffer,最常用的就是ByteBuffer,对于Java中的基本类型,基本都有一个具体Buffer类型与之相对应,它们之间的继承关系如下图所示:

缓冲区包括以下类型:
ByteBuffer
CharBuffer
ShortBuffer
IntBuffer
LongBuffer
FloatBuffer
DoubleBuffer
- 缓冲区状态变量
capacity:最大容量;
position:当前已经读写的字节数;
limit:还可以读写的字节数。
Buffer的基本用法
1、使用Buffer读写数据,一般遵循以下四个步骤:
(1)写入数据到Buffer
(2)调用flip()方法
(3)从Buffer中读取数据
(4)调用clear()方法或者compact()方法
当向buffer写入数据时,buffer会记录下写了多少数据。一旦要读取数据,需要通过flip()方法将Buffer从写模式切换到读模式。在读模式下,可以读取之前写入到buffer的所有数据。一旦读完了所有的数据,就需要清空缓冲区,让它可以再次被写入。有两种方式能清空缓冲区:调用clear()或compact()方法。clear()方法会清空整个缓冲区。compact()方法只会清除已经读过的数据。任何未读的数据都被移到缓冲区的起始处,新写入的数据将放到缓冲区未读数据的后面。
Buffer与IntBuffer例子
package pers.lxl.mylearnproject.javase.io.nio.buffer;

import org.junit.jupiter.api.Test;

import java.io.IOException;
import java.io.RandomAccessFile;
import java.nio.ByteBuffer;
import java.nio.IntBuffer;
import java.nio.channels.FileChannel;

public class BufferDemo {

    //使用Buffer的例子
    @Test
    public void testConect2() throws IOException {
        RandomAccessFile aFile = new RandomAccessFile("src/main/resources/fileTest.txt", "rw");
        FileChannel inChannel = aFile.getChannel(); //create buffer with capacity of 48 bytes
        ByteBuffer buf = ByteBuffer.allocate(48);
        int bytesRead = inChannel.read(buf); //read into buffer.
        while (bytesRead != -1) {
            buf.flip();
            //make buffer ready for read
            while (buf.hasRemaining()) {
                System.out.print((char) buf.get());
                // read 1 byte at a time
            }
            buf.clear();
            //make buffer ready for writing
            bytesRead = inChannel.read(buf);
        }
    }

    //使用IntBuffer的例子
    @Test
    public void testConect3() throws IOException {
        // 分配新的int缓冲区,参数为缓冲区容量
        // 新缓冲区的当前位置将为零,其界限(限制位置)将为其容量。
        // 它将具有一个底层实现数组,其数组偏移量将为零。
        IntBuffer buffer = IntBuffer.allocate(8);
        for (int i = 0; i \< buffer.capacity(); ++i) {
            int j = 2 * (i + 1);
            // 将给定整数写入此缓冲区的当前位置,当前位置递增
            buffer.put(j);
        }
        // 重设此缓冲区,将限制设置为当前位置,然后将当前位置设置为0
        buffer.flip();
        // 查看在当前位置和限制位置之间是否有元素
        while (buffer.hasRemaining()) {
            // 读取此缓冲区当前位置的整数,然后当前位置递增
            int j = buffer.get();
            System.out.print(j + " ");
        }
    }
}
Buffer的capacity、position和limit
为了理解Buffer的工作原理,需要熟悉它的三个属性: Capacity 、 Position 、 limit position和limit的含义取决于Buffer处在读模式还是写模式。不管Buffer处在什么模式,capacity的含义总是一样的。 这里有一个关于capacity,position和limit在读写模式中的说明

(1)capacity
作为一个内存块,Buffer有一个固定的大小值,也叫“capacity”.你只能往里写capacity个byte、long,char等类型。一旦Buffer满了,需要将其清空(通过读数据或者清除数据)才能继续写数据往里写数据。
(2)position
1)写数据到Buffer中时,position表示写入数据的当前位置,position的初始值为0。当一个byte、long等数据写到Buffer后, position会向下移动到下一个可插入数据的Buffer单元。position最大可为capacity – 1(因为position的初始值为0).
2)读数据到Buffer中时,position表示读入数据的当前位置,如position=2时表示已开始读入了3个byte,或从第3个byte开始读取。通过ByteBuffer.flip()切换到读模式时position会被重置为0,当Buffer从position读入数据后,position会下移到下一个可读入的数据Buffer单元。
(3)limit
1)写数据时,limit表示可对Buffer最多写入多少个数据。写模式下,limit等于Buffer的capacity。
2)读数据时,limit表示Buffer里有多少可读数据(not null的数据),因此能读到之前写入的所有数据(limit被设置成已写数据的数量,这个值在写模式下就是position)。
Buffer的类型
Java NIO 有以下Buffer类型
ByteBuffer
MappedByteBuffer
CharBuffer
DoubleBuffer
FloatBuffer
IntBuffer
LongBuffer
ShortBuffer
这些Buffer类型代表了不同的数据类型。换句话说,就是可以通过char,short,int,long,float 或 double类型来操作缓冲区中的字节。
Buffer分配和写数据
Buffer分配
要想获得一个Buffer对象首先要进行分配。 每一个Buffer类都有一个allocate方法。
下面是一个分配48字节capacity的ByteBuffer的例子。
ByteBuffer buf = ByteBuffer.allocate(48);
这是分配一个可存储1024个字符的CharBuffer:
CharBuffer buf = CharBuffer.allocate(1024);
向Buffer中写数据
写数据到Buffer有两种方式:
(1)从Channel写到Buffer。
(2)通过Buffer的put()方法写到Buffer里。
从Channel写到Buffer的例子
int bytesRead = inChannel.read(buf); //read into buffer.
通过put方法写Buffer的例子:
buf.put(127);
put方法有很多版本,允许你以不同的方式把数据写入到Buffer中。例如, 写到一个指定的位置,或者把一个字节数组写入到Buffer
flip()方法
flip方法将Buffer从写模式切换到读模式。调用flip()方法会将position设回0,并将limit设置成之前position的值。换句话说,position现在用于标记读的位置,limit表示之前写进了多少个byte、char等 (现在能读取多少个byte、char等)。
从Buffer中读取数据
从Buffer中读取数据有两种方式:
(1)从Buffer读取数据到Channel。
(2)使用get()方法从Buffer中读取数据。
从Buffer读取数据到Channel的例子:
//read from buffer into channel.
int bytesWritten = inChannel.write(buf);
使用get()方法从Buffer中读取数据的例子
byte aByte = buf.get();
get方法有很多版本,允许你以不同的方式从Buffer中读取数据。例如,从指定position读取,或者从Buffer中读取数据到字节数组。
Buffer几个方法
rewind()方法方法
Buffer.rewind()将position设回0,所以你可以重读Buffer中的所有数据。limit保持不变,仍然表示能从Buffer中读取多少个元素(byte、char等)。
clear()与compact()方法方法
一旦读完Buffer中的数据,需要让Buffer准备好再次被写入。可以通过clear()或compact()方法来完成。
如果调用的是**clear()方法,position将被设回0,limit被设置成 capacity的值。换句话说,Buffer 被清空了。Buffer中的数据并未清除,只是这些标记告诉我们可以从哪里开始往Buffer里写数据。
如果Buffer中有一些未读的数据,调用clear()方法,数据将“被遗忘”,意味着不再有任何标记会告诉你哪些数据被读过,哪些还没有。
如果Buffer中仍有未读的数据,且后续还需要这些数据,但是此时想要先先写些数据,那么使用compact()**方法。
compact()方法将所有未读的数据拷贝到Buffer起始处。然后将position设到最后一个未读元素正后面。limit属性依然像clear()方法一样,设置成capacity。现在Buffer准备好写数据了,但是不会覆盖未读的数据。
mark()与reset()方法方法
通过调用Buffer.mark()方法,可以标记Buffer中的一个特定position。之后可以通过调用Buffer.reset()方法恢复到这个position。例如:
buffer.mark();
//call buffer.get() a couple of times, e.g. during parsing.
buffer.reset(); //set position back to mark.
缓冲区操作
缓冲区分片
在NIO中,除了可以分配或者包装一个缓冲区对象外,还可以根据现有的缓冲区对象来创建一个子缓冲区,即在现有缓冲区上切出一片来作为一个新的缓冲区,但现有的缓冲区与创建的子缓冲区在底层数组层面上是数据共享的,也就是说,子缓冲区相当于是现有缓冲区的一个视图窗口。调用**slice()**方法可以创建一个子缓冲区。
    @Test
    public void testConect2() throws IOException {
        ByteBuffer buffer = ByteBuffer.allocate(10);
        // 缓冲区中的数据0-9
        for (int i = 0; i \< buffer.capacity(); ++i) {
            buffer.put((byte) i);
        }
        // 创建子缓冲区
        buffer.position(3);
        buffer.limit(7);
        ByteBuffer slice = buffer.slice();
        // 改变子缓冲区的内容
        for (int i = 0; i \< slice.capacity(); ++i) {
            byte b = slice.get(i);
            b *= 10;
            slice.put(i, b);
        }
        buffer.position(0);
        buffer.limit(buffer.capacity());
        while (buffer.remaining() > 0) {
            System.out.println(buffer.get());
        }
    }
只读缓冲区
只读缓冲区非常简单,可读禁写。可以通过调用缓冲区的asReadOnlyBuffer()方法,将任何常规缓冲区转 换为只读缓冲区,这个方法返回一个与原缓冲区完全相同的缓冲区,并与原缓冲区共享数据,只不过它是只读的。原变只读变,如果原缓冲区的内容发生了变化,只读缓冲区的内容也随之发生变化:
   @Test
    public void testConect4() throws IOException {
        ByteBuffer buffer = ByteBuffer.allocate(10);
        // 缓冲区中的数据0-9
        for (int i = 0; i \< buffer.capacity(); ++i) {
            buffer.put((byte) i);
        }
        // 创建只读缓冲区
        ByteBuffer readonly = buffer.asReadOnlyBuffer();
        // 改变原缓冲区的内容
        for (int i = 0; i \< buffer.capacity(); ++i) {
            byte b = buffer.get(i);
            b *= 10;
            buffer.put(i, b);
        }
        readonly.position(0);
        readonly.limit(buffer.capacity());
        // 只读缓冲区的内容也随之改变
        while (readonly.remaining() > 0) {
            System.out.println(readonly.get());
        }
} 如果尝试修改只读缓冲区的内容,则会报ReadOnlyBufferException异常。只读缓冲区对于保护数据很有用。在将缓冲区传递给某个 对象的方法时,无法知道这个方法是否会修改缓冲区中的数据。创建一个只读的缓冲区可以保证该缓冲区不会被修改。只可以把常规缓冲区转换为只读缓冲区,而不能将只读的缓冲区转换为可写的缓冲区。
直接缓冲区
直接缓冲区是为加快I/O速度,使用一种特殊方式为其分配内存的缓冲区,JDK文档中的描述为:给定一个直接字节缓冲区,Java虚拟机将尽最大努力直接对它执行本机I/O操作。也就是说,它会在每一次调用底层操作系统的本机I/O操作之前(或之后),尝试避免将缓冲区的内容拷贝到一个中间缓冲区中 或者从一个中间缓冲区中拷贝数据。要分配直接缓冲区,需要调用allocateDirect()方法,而不是allocate()方法,使用方式与普通缓冲区并无区别。 拷贝文件示例:
    @Test
    public void testConect5() throws IOException {
        String infile = "d:\\atguigu\\01.txt";
        FileInputStream fin = new FileInputStream(infile);
        FileChannel fcin = fin.getChannel();
        String outfile = String.format("d:\\atguigu\\02.txt");
        FileOutputStream fout = new FileOutputStream(outfile);
        FileChannel fcout = fout.getChannel();
// 使用allocateDirect,而不是allocate
        ByteBuffer buffer = ByteBuffer.allocateDirect(1024);
        while (true) {
            buffer.clear();
            int r = fcin.read(buffer);
            if (r == -1) {
                break;
            }
            buffer.flip();
            fcout.write(buffer);
        }
    }
内存映射文件I/O
内存映射文件I/O是一种读和写文件数据的方法,它可以比常规的基于流或者基于通道的I/O快的多。内存映射文件I/O是通过使文件中的数据出现为 内存数组的内容来完成的,这其初听起来似乎不过就是将整个文件读到内存中,但是事实上并不是这样。一般来说,只有文件中实际读取或者写入的部分才会映射到内存中。示例代码:
static private final int start = 0;
    static private final int size = 1024;

    static public void main(String args[]) throws Exception {
        RandomAccessFile raf = new RandomAccessFile("d:\\atguigu\\01.txt", "rw");
        FileChannel fc = raf.getChannel();
        MappedByteBuffer mbb = fc.map(FileChannel.MapMode.READ_WRITE, start, size);
        mbb.put(0, (byte) 97);
        mbb.put(1023, (byte) 122);
        raf.close();
    }
选择器
Selector简介
1、 Selector和 Channel关系
Selector 一般称 为选择器 ,也可以翻译为 多路复用器 。它是Java NIO核心组件中的一个,**用于检查一个或多个NIO Channel(通道)的状态是否处于可读、可写。**如此可以实现单线程管理多个channels,也就是可以管理多个网络链接。即使用Selector的好处在于: 使用更少的线程来就可以来处理通道了, 相比使用多个线程,避免了线程上下文切换带来的开销。NIO 实现了 IO 多路复用中的 Reactor 模型,一个线程 Thread 使用一个选择器 Selector 通过轮询的方式去监听多个通道 Channel 上的事件,从而让一个线程就可以处理多个事件。通过配置监听的通道 Channel 为非阻塞,那么当 Channel 上的 IO 事件还未到达时,就不会进入阻塞状态一直等待,而是继续轮询其它 Channel,找到 IO 事件已经到达的 Channel 执行。因为创建和切换线程的开销很大,因此使用一个线程来处理多个事件而不是一个线程处理一个事件,对于 IO 密集型的应用具有很好地性能。

2、 可选择通道 (SelectableChannel)
(1)不是所有的Channel都可以被Selector 复用的。比方说,FileChannel就不能被选择器复用。判断一个Channel 能被Selector 复用,有一个前提:判断他是否继承了一个抽象类SelectableChannel。如果继承了SelectableChannel,则可以被复用,否则不能。
(2)SelectableChannel类提供了实现通道的可选择性所需要的公共方法。它是所有支持就绪检查的通道类的父类。所有socket通道,都继承了SelectableChannel类都是可选择的,包括从管道(Pipe)对象的中获得的通道。而FileChannel类,没有继承SelectableChannel,因此是不是可选通道。
(3)一个通道可以被注册到多个选择器上,但对每个选择器而言只能被注册一次,即通道与选择器一对多。通道和选择器之间的关系,使用注册的方式完成。SelectableChannel可以被注册到Selector对象上,在注册的时候,需要指定通道的哪些操作,是Selector感兴趣的。

3、Channel注册到注册到Selector
(1)使用Channel.register(Selector sel,int ops)方法,将一个通道注册到一个选择器时。第一个参数,指定通道要注册的选择器。第二个参数指定选择器需要查询的通道操作。
(2)可以供选择器查询的通道操作四类:
可读 : SelectionKey.OP_READ
可写 : SelectionKey.OP_WRITE
连接 : SelectionKey.OP_CONNECT
接收 : SelectionKey.OP_ACCEPT
Selector对通道的多操作类型用“位或”操作符实现:
比如:int key = SelectionKey.OP_READ | SelectionKey.OP_WRITE ;
(3)选择器查询的不是通道的操作,而是通道的某个操作的一种就绪状态。什么是操作的就绪状态?一旦通道具备完成某个操作的条件,表示该通道的某个操作已经就绪,就可以被Selector查询到,程序可以对通道进行对应的操作。比方说,某个SocketChannel通道可以连接到一个服务器,则处于“连接就绪”(OP_CONNECT)。再比方说,一个ServerSocketChannel服务器通道准备好接收新进入的连接,则处于“接收就绪”(OP_ACCEPT)状态。还比方说,一个有数据可读的通道,可以说是“读就绪”(OP_READ)。一个等待写数据的通道可以说是“写就绪”(OP_WRITE)。
4、选择键(SelectionKey)
(1)Channel注册到后,并且一旦通道处于某种就绪的状态,就可以被选择器查询到。这个工作,使用选择器Selector的select()方法完成。select方法的作用,对感兴趣的通道操作,进行就绪状态的查询。
(2)Selector可以不断的查询Channel中发生的操作的就绪状态。并且挑选感兴趣的操作就绪状态。一旦通道有操作的就绪状态达成,并且是Selector感兴趣的操作,就会被Selector选中,放入选择键集合中。
(3)一个选择键,首先是包含了注册在Selector的通道操作的类型,比方说SelectionKey.OP_READ。也包含了特定的通道与特定的选择器之间的注册关系。
开发应用程序是,选择键是编程的关键。NIO的编程,就是根据对应的选择键,进行不同的业务逻辑处理。
(4)选择键的概念,和事件的概念比较相似。一个选择键类似监听器模式里边的一个事件。由于Selector不是事件触发的模式,而是主动去查询的模式,所以不叫事件Event,而是叫SelectionKey选择键。
- NIO 常常被叫做非阻塞 IO,主要是因为 NIO 在网络通信中的非阻塞特性被广泛使用。
Selector的使用方法
1.Selector 的创建
通过调用Selector.open()方法创建一个Selector对象,如下:
// 1、获取Selector选择器 Selector selector = Selector.open();
2.注册 Channel 到 Selector
要实现Selector管理Channel,需要将channel注册到相应的Selector上
// 1、获取Selector选择器 Selector selector = Selector.open();
// 2、获取通道 ServerSocketChannel serverSocketChannel = ServerSocketChannel.open();
// 3.设置为非阻塞 serverSocketChannel.configureBlocking(false);
// 4、绑定连接 serverSocketChannel.bind(new InetSocketAddress(9999));
// 5、将通道注册到选择器上,并制定监听事件为:“接收”事件 serverSocketChannel.register(selector,SelectionKey.OP_ACCEPT);
上面通过调用通道的register()方法会将它注册到一个选择器上。
首先需要注意的是:
(1)与Selector一起使用时,Channel必须处于非阻塞模式下,否则将抛出异常IllegalBlockingModeException。这意味着,FileChannel不能与Selector一起使用,因为FileChannel不能切换到非阻塞模式,而套接字相关的所有的通道都可以。
(2)一个通道,并没有一定要支持所有的四种操作。比如服务器通道ServerSocketChannel支持Accept 接受操作,而SocketChannel客户端通道则不支持。可以通过通道上的validOps()方法,来获取特定通道下所有支持的操作集合。
3.轮询查询就绪操作轮询查询就绪操作
(1)通过Selector的select()方法,可以查询出已经就绪的通道操作,这些就绪的状态集合,包存在一个元素是SelectionKey对象的Set集合中。
(2)下面是Selector几个重载的查询select()方法:
select():阻塞到至少有一个通道在你注册的事件上就绪了。
select(long timeout):和select()一样,但最长阻塞事件为timeout毫秒。
selectNow():非阻塞,只要有通道就绪就立刻返回。
select()方法返回的int值,表示有多少通道已经就绪,更准确的说,是自前一次select方法以来到这一次select方法之间的时间段上,有多少通道变成就绪状态。
例如:首次调用select()方法,如果有一个通道变成就绪状态,返回了1,若再次调用select()方法,如果另一个通道就绪了,它会再次返回1。如果对第一个就绪的channel没有做任何操作,现在就有两个就绪的通道,但在每次select()方法调用之间,只有一个通道就绪了。
一旦调用select()方法,并且返回值不为0时,在Selector中有一个selectedKeys()方法,用来访问已选择键集合,迭代集合的每一个选择键元素,根据就绪操作的类型,完成对应的操作:Set selectedKeys = selector.selectedKeys(); Iterator keyIterator = selectedKeys.iterator(); while(keyIterator.hasNext()) { SelectionKey key = keyIterator.next(); if(key.isAcceptable()) { // a connection was accepted by a ServerSocketChannel. } else if (key.isConnectable()) { // a connection was established with a remote server. } else if (key.isReadable()) { // a channel is ready for reading } else if (key.isWritable()) { // a channel is ready for writing } keyIterator.remove(); }
4.停止选择的方法停止选择的方法
选择器执行选择的过程,系统底层会依次询问每个通道是否已经就绪,这个过程可能会造成调用线程进入阻塞状态,那么我们有以下三种方式可以唤醒在select()方法中阻塞的线程。
wakeup()方法 :通过调用Selector对象的wakeup()方法让处在阻塞状态的select()方法立刻返回
该方法使得选择器上的第一个还没有返回的选择操作立即返回。如果当前没有进行中的选择操作,那么下一次对select()方法的一次调用将立即返回。
close()方法 :通过close()方法关闭Selector,
该方法使得任何一个在选择操作中阻塞的线程都被唤醒(类似wakeup()),同时使得注册到该Selector的所有Channel被注销,所有的键将被取消,但是Channel本身并不会关闭。
示例代码
import org.junit.jupiter.api.Test;
import java.io.IOException;
import java.net.InetSocketAddress;
import java.nio.ByteBuffer;
import java.nio.channels.SelectionKey;
import java.nio.channels.Selector;
import java.nio.channels.ServerSocketChannel;
import java.nio.channels.SocketChannel;
import java.nio.charset.StandardCharsets;
import java.util.Date;
import java.util.Iterator;
import java.util.Scanner;
import java.util.Set;

public class SelectorDemo {
    //服务端
    @Test
    public void ServerDemo() throws Exception {
//      1.获取服务端通道
        ServerSocketChannel ssc = ServerSocketChannel.open();
//        2.绑定端口号
        ssc.socket().bind(new InetSocketAddress("127.0.0.1", 8000));
//        3.切换非阻塞模式
        ssc.configureBlocking(false);
//        4.创建选择器
        Selector selector = Selector.open();
//        5.注册channel,并且指定感兴趣的事件是 Accept
        ssc.register(selector, SelectionKey.OP_ACCEPT);
//        6.创建buffer
        ByteBuffer readBuff = ByteBuffer.allocate(1024);
        ByteBuffer writeBuff = ByteBuffer.allocate(128);
        writeBuff.put("received".getBytes());
        writeBuff.flip();
        while (true) {
//            7.检测通道就绪状态
            int nReady = selector.select();
//            8.遍历选择器,获取就绪通道集合
            Set\<SelectionKey> keys = selector.selectedKeys();
            Iterator\<SelectionKey> it = keys.iterator();
            while (it.hasNext()) {
                SelectionKey key = it.next();
                it.remove();
//                判断状态
                if (key.isAcceptable()) {
//              创建新的连接,并且把连接注册到selector上,进行监听,声明这个channel只对读操作感兴趣。
                    SocketChannel socketChannel = ssc.accept();
//                    切换到非阻塞
                    socketChannel.configureBlocking(false);
//                    注册
                    socketChannel.register(selector, SelectionKey.OP_READ);
                } else if (key.isReadable()) {
//                    获取通道
                    SocketChannel socketChannel = (SocketChannel) key.channel();
                    readBuff.clear();
                    socketChannel.read(readBuff);
                    readBuff.flip();
                    System.out.println("received : " + new String(readBuff.array()));
                    key.interestOps(SelectionKey.OP_WRITE);
                } else if (key.isWritable()) {
                    writeBuff.rewind();
                    SocketChannel socketChannel = (SocketChannel) key.channel();
                    socketChannel.write(writeBuff);
                    key.interestOps(SelectionKey.OP_READ);
                }
            }
        }

    }

    //客户端代码
    @Test
    public void ClientDemo() throws Exception {
//            1.获取通道,绑定主机与端口号
        SocketChannel socketChannel = SocketChannel.open();
        socketChannel.connect(new InetSocketAddress("127.0.0.1", 8000));
//            2.切换到非阻塞模式
        socketChannel.configureBlocking(false);
//            3.创建buffer
        ByteBuffer writeBuffer = ByteBuffer.allocate(32);
        ByteBuffer readBuffer = ByteBuffer.allocate(32);
//            4.写入buffer数据
        Scanner scanner = new Scanner(System.in);
        while (scanner.hasNext()) {
            String str = scanner.next();


//            writeBuffer.put("hello".getBytes());
            writeBuffer.put((new Date().toString() + "---->" + str).getBytes());
//            5.模式切换
            writeBuffer.flip();
            while (true) {
                // 将position设回0
                writeBuffer.rewind();
//                6.写入通道
                socketChannel.write(writeBuffer);
//                7.关闭
                readBuffer.clear();
                socketChannel.read(readBuffer);
            }
        }
    }
//              输入方式 客户端
    public static void main(String[] args) throws Exception {
        //            1.获取通道,绑定主机与端口号
        SocketChannel socketChannel = SocketChannel.open();
        socketChannel.connect(new InetSocketAddress("127.0.0.1", 8000));
//            2.切换到非阻塞模式
        socketChannel.configureBlocking(false);
//            3.创建buffer  超过会报错Exception in thread "main" java.nio.BufferOverflowException
        ByteBuffer writeBuffer = ByteBuffer.allocate(1024);
        ByteBuffer readBuffer = ByteBuffer.allocate(1024);
//            4.写入buffer数据
        Scanner scanner = new Scanner(System.in);
        while (scanner.hasNext()) {
            String str = scanner.next();


//            writeBuffer.put("hello".getBytes());
            writeBuffer.put((new Date().toString() + "---->" + str).getBytes());
//            5.模式切换
            writeBuffer.flip();
            while (true) {
                // 将position设回0
                writeBuffer.rewind();
//                6.写入通道
                socketChannel.write(writeBuffer);
//                7.关闭
                readBuffer.clear();
                socketChannel.read(readBuffer);
            }
        }
    }
}
NIO编程步骤总结
第一步:创建Selector选择器
第二步:创建ServerSocketChannel通道,并绑定监听端口
第三步:设置Channel通道是非阻塞模式
第四步:把Channel注册到Socketor选择器上,监听连接事件
第五步:调用Selector的select方法(循环调用),监测通道的就绪状况
第六步:调用selectKeys方法获取就绪channel集合
第七步:遍历就绪channel集合,判断就绪事件类型,实现具体的业务操作
第八步:根据业务,决定是否需要再次注册监听事件,重复执行第三步操作
- 创建选择器
Selector selector = Selector.open();
- 将通道注册到选择器上
ServerSocketChannel ssChannel = ServerSocketChannel.open();
ssChannel.configureBlocking(false);
ssChannel.register(selector, SelectionKey.OP_ACCEPT);
通道必须配置为非阻塞模式,否则使用选择器就没有任何意义了,因为如果通道在某个事件上被阻塞,那么服务器就不能响应其它事件,必须等待这个事件处理完毕才能去处理其它事件,显然这和选择器的作用背道而驰。
在将通道注册到选择器上时,还需要指定要注册的具体事件,主要有以下几类:
SelectionKey.OP_CONNECT
SelectionKey.OP_ACCEPT
SelectionKey.OP_READ
SelectionKey.OP_WRITE
它们在 SelectionKey 的定义如下:
public static final int OP_READ = 1 << 0;
public static final int OP_WRITE = 1 << 2;
public static final int OP_CONNECT = 1 << 3;
public static final int OP_ACCEPT = 1 << 4;
可以看出每个事件可以被当成一个位域,从而组成事件集整数。例如:
int interestSet = SelectionKey.OP_READ | SelectionKey.OP_WRITE;
监听事件
int num = selector.select();
使用 select() 来监听到达的事件,它会一直阻塞直到有至少一个事件到达。获取到达的事件
Set<SelectionKey> keys = selector.selectedKeys();
Iterator<SelectionKey> keyIterator = keys.iterator();
while (keyIterator.hasNext()) {
SelectionKey key = keyIterator.next();
if (key.isAcceptable()) {
// ...
} else if (key.isReadable()) {
// ...
}
keyIterator.remove();
}事件循环
因为一次 select() 调用不能处理完所有的事件,并且服务器端有可能需要一直监听事件,因此服务器端处理事件的代码一般会放在一个死循环内。
while (true) {
int num = selector.select();
Set<SelectionKey> keys = selector.selectedKeys();
Iterator<SelectionKey> keyIterator = keys.iterator();
while (keyIterator.hasNext()) {
SelectionKey key = keyIterator.next();
if (key.isAcceptable()) {
// ...
} else if (key.isReadable()) {
// ...
}
keyIterator.remove();
}
}
Pipe
Java NIO 管道是2个线程之间的单向数据连接。Pipe有一个source通道和一个sink通道。数据会被写到sink通道,从source通道读取。
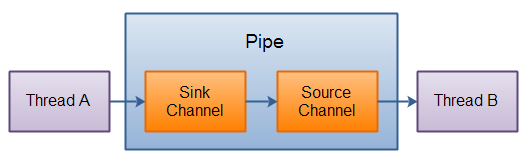
1、创建管道
通过Pipe.open()方法打开管道。 Pipe pipe = Pipe.open();
2、写入管道
要向管道写数据,需要访问sink通道。: Pipe.SinkChannel sinkChannel = pipe.sink();
通过调用SinkChannel的write()方法,将数据写入SinkChannel: String newData = "New String to write to file..." + System.currentTimeMillis(); ByteBuffer buf = ByteBuffer.allocate(48); buf.clear(); buf.put(newData.getBytes()); buf.flip(); while(buf.hasRemaining())
3、从管道读取数据
访问source通道
Pipe.SourceChannel sourceChannel = pipe.source();
调用source通道的read()方法来读取数据:
ByteBuffer buf = ByteBuffer.allocate(48);
int bytesRead = sourceChannel.read(buf);
read()方法返回的int值会告诉我们多少字节被读进了缓冲区。
4、代码示例
package pers.lxl.mylearnproject.javase.io.nio.pipe;

import org.junit.jupiter.api.Test;

import java.io.IOException;
import java.nio.ByteBuffer;
import java.nio.channels.Pipe;

public class PipeDemo {

//        1.获取管道
//        2获取sink通道
//        3.创建缓冲区
//        4.写入数据
//        5.获取source通道
//        6.创建source通道
//        7.创建缓冲区,读取数据
//        8.关闭通道
    /**/
    @Test
    public void testPipe() throws IOException {
        // 1、获取通道
        Pipe pipe = Pipe.open();
        // 2、获取sink管道,用来传送数据
        Pipe.SinkChannel sinkChannel = pipe.sink();
        // 3、申请一定大小的缓冲区
        ByteBuffer byteBuffer = ByteBuffer.allocate(1024);
        byteBuffer.put("atguigu".getBytes());
        byteBuffer.flip();
        // 4、sink发送数据
        sinkChannel.write(byteBuffer);
        // 5、创建接收pipe数据的source管道
        Pipe.SourceChannel sourceChannel = pipe.source();
        // 6、接收数据,并保存到缓冲区中
        ByteBuffer byteBuffer2 = ByteBuffer.allocate(1024);
        int length = sourceChannel.read(byteBuffer2);
        System.out.println(new String(byteBuffer2.array(), 0, length));
        sourceChannel.close();
        sinkChannel.close();
    }
}
FileLock
1、 FileLock 简介
文件锁在OS中很常见,如果多个程序同时访问、修改同一个文件,很容易因为文件数据不同步而出现问题。给文件加一个锁,同一时间,只能有一个程序修改此文件,或者程序都只能读此文件,这就解决了同步问题。
文件锁是进程级别的,不是线程级别的。文件锁可以解决多个进程并发访问、修改同一个文件的问题,但不能解决多线程并发访问、修改同一文件的问题。使用文件锁时,同一进程内的多个线程,可以同时访问、修改此文件。
文件锁是当前程序所属的JVM实例持有的,一旦获取到文件锁(对文件加锁),要调用release(),或者关闭对应的FileChannel对象,或者当前JVM退出,才会释放这个锁。
一旦某个进程(比如说JVM实例)对某个文件加锁,则在释放这个锁之前,此进程不能再对此文件加锁,就是说JVM实例在同一文件上的文件锁是不重叠的(进程级别不能重复在同一文件上获取锁)。
2、文件锁分类:文件锁分类:
排它锁:又叫独占锁。对文件加排它锁后,该进程可以对此文件进行读写,该进程独占此文件,其他进程不能读写此文件,直到该进程释放文件锁。
共享锁:某个进程对文件加共享锁,其他进程也可以访问此文件,但这些进程都只能读此文件,不能写。线程是安全的。只要还有一个进程持有共享锁,此文件就只能读,不能写。
3、使用示例
//创建FileChannel对象,文件锁只能通过FileChannel对象来使用 FileChannel fileChannel=new FileOutputStream("./1.txt").getChannel();
//对文件加锁 FileLock lock=fileChannel.lock();
//对此文件进行一些读写操作。 //.......
//释放锁 lock.release();
文件锁要通过FileChannel对象使用。
4、获取文件锁方法、获取文件锁方法
有4种获取文件锁的方法:
lock() //对整个文件加锁,默认为排它锁。
lock(long position, long size, booean shared) //自定义加锁方式。前2个参数指定要加锁的部分(可以只对此文件的部分内容加锁),第三个参数值指定是否是共享锁。
tryLock() //对整个文件加锁,默认为排它锁。
tryLock(long position, long size, booean shared) //自定义加锁方式。
如果指定为共享锁,则其它进程可读此文件,所有进程均不能写此文件,如果某进程试图对此文件进行写操作,会抛出异常。
5、locklock与tryLocktryLock的区别
lock是阻塞式的,如果未获取到文件锁,会一直阻塞当前线程,直到获取文件锁
tryLock和lock的作用相同,只不过tryLock是非阻塞式的,tryLock是尝试获取文件锁,获取成功就返回锁对象,否则返回null,不会阻塞当前线程。
6、FileLock两个方法:
boolean isShared() //此文件锁是否是共享锁
boolean isValid() //此文件锁是否还有效
在某些OS上,对某个文件加锁后,不能对此文件使用通道映射。
7、完整例子
import java.io.BufferedReader;
import java.io.FileReader;
import java.io.IOException;
import java.nio.ByteBuffer;
import java.nio.channels.FileChannel;
import java.nio.channels.FileLock;
import java.nio.file.Path;
import java.nio.file.Paths;
import java.nio.file.StandardOpenOption;

public class FileLockDemo {
    public static void main(String[] args) throws IOException {
        String input = "atguigu";
        System.out.println("输入 :" + input);
        ByteBuffer buf = ByteBuffer.wrap(input.getBytes());
        String fp = "D:\\atguigu\\01.txt";
        Path pt = Paths.get(fp);
        FileChannel channel = FileChannel.open(pt, StandardOpenOption.WRITE, StandardOpenOption.APPEND);
        channel.position(channel.size() - 1);

        // position of a cursor at the end of file
        // 获得锁方法一:lock(),阻塞方法,当文件锁不可用时,当前进程会被挂起
//            lock = channel.lock();
        // 无参lock()为独占锁
//            lock = channel.lock(0L, Long.MAX_VALUE, true);
        //有参lock()为共享锁,有写操作会报异常
        // 获得锁方法二:trylock(),非阻塞的方法,当文件锁不可用时,tryLock()会得到null值
        FileLock lock = channel.tryLock(0, Long.MAX_VALUE, false);
        System.out.println("共享锁shared: " + lock.isShared());
        channel.write(buf);
        channel.close();
        // Releases the Lock
        System.out.println("写操作完成.");
        //读取数据
        readPrint(fp);
    }

    public static void readPrint(String path) throws IOException {
        FileReader filereader = new FileReader(path);
        BufferedReader bufferedreader = new BufferedReader(filereader);
        String tr = bufferedreader.readLine();
        System.out.println("读取内容: ");
        while (tr != null) {
            System.out.println(" " + tr);
            tr = bufferedreader.readLine();
        }
        filereader.close();
        bufferedreader.close();
    }
}
Path
1、 Path 简介
Java Path接口是Java NIO更新的一部分,同Java NIO一起已经包括在Java6和Java7中。Java Path接口是在Java7中添加到Java NIO的。Path接口位于java.nio.file包中,所以Path接口的完全限定名称为java.nio.file.Path。
Java Path实例表示文件系统中的路径。一个路径可以指向一个文件或一个目录。路径可以是绝对路径,也可以是相对路径。绝对路径包含从文件系统的根目录到它指向的文件或目录的完整路径。相对路径包含相对于其他路径的文件或目录的路径。
在许多方面,java.nio.file.Path接口类似于java.io.File类,但是有一些差别。不过,在许多情况下,可以使用Path接口来替换File类的使用。
2、创建Path实例
使用java.nio.file.Path实例必须创建一个Path实例。可以使用Paths类(java.nio.file.Paths)中的静态方法Paths.get()来创建路径实例。
示例代码:
import java.nio.file.Path;
import java.nio.file.Paths;

public class PathDemo {
    public static void main(String[] args) {
        Path path = Paths.get("d:\\atguigu\\001.txt");
    }
}
上述代码,可以理解为,Paths.get()方法是Path实例的工厂方法。
3、创建绝对路径
(1)创建绝对路径,通过调用Paths.get()方法,给定绝对路径文件作为参数来完成。
示例代码: Path path = Paths.get("d:\atguigu\001.txt");
上述代码中,绝对路径是d:\atguigu\001.txt。在Java字符串中, \是一个转义字符,需要编写\,告诉Java编译器在字符串中写入一个\字符。
(2)如果在Linux、MacOS等操作字体上,上面的绝对路径可能如下:
Path path = Paths.get("/home/jakobjenkov/myfile.txt");
绝对路径现在为/home/jakobjenkov/myfile.txt.
(3)如果在Windows机器上使用了从/开始的路径,那么路径将被解释为相对于当前驱动器。
4、创建相对路径
Java NIO Path类也可以用于处理相对路径。您可以使用Paths.get(basePath, relativePath)方法创建一个相对路径。
示例代码: //代码1 Path projects = Paths.get("d:\atguigu", "projects"); //代码2 Path file = Paths.get("d:\atguigu", "projects\002.txt");
代码1创建了一个Java Path的实例,指向路径(目录):d:\atguigu\projects
代码2创建了一个Path的实例,指向路径(文件):d:\atguigu\projects\002.txt
5、Path.normalize()
Path接口的normalize()方法可以使路径标准化。标准化意味着它将移除所有在路径字符串的中间的.和..代码,并解析路径字符串所引用的路径。
Path.normalize()示例: String originalPath = "d:\atguigu\projects\..\yygh-project"; Path path1 = Paths.get(originalPath); System.out.println("path1 = " + path1); Path path2 = path1.normalize(); System.out.println("path2 = " + path2);
输出结果:标准化的路径不包含projects..部分
Files
Java NIO Files类(java.nio.file.Files)提供了几种操作文件系统中的文件的方法。以下内容介绍Java NIO Files最常用的一些方法。java.nio.file.Files类与java.nio.file.Path实例一起工作,因此在学习Files类之前,需要先了解Path类。
1、 Files.createDirectory()
Files.createDirectory()方法,用于根据Path实例创建一个新目录
示例: Path path = Paths.get("d:\sgg"); try { Path newDir = Files.createDirectory(path); } catch(FileAlreadyExistsException e){ // 目录已经存在 } catch (IOException e) { // 其他发生的异常 e.printStackTrace(); }
第一行创建表示要创建的目录的Path实例。在try-catch块中,用路径作为参数调用Files.createDirectory()方法。如果创建目录成功,将返回一个Path实例,该实例指向新创建的路径。
如果该目录已经存在,则是抛出一个java.nio.file.FileAlreadyExistsException。如果出现其他错误,可能会抛出IOException。例如,如果想要的新目录的父目录不存在,则可能会抛出IOException。
2、Files.copy()
(1)Files.copy()方法从一个路径拷贝一个文件到另外一个目录
示例: Path sourcePath = Paths.get("d:\atguigu\01.txt"); Path destinationPath = Paths.get("d:\atguigu\002.txt"); try { Files.copy(sourcePath, destinationPath); } catch(FileAlreadyExistsException e) { // 目录已经存在 } catch (IOException e) { // 其他发生的异常 e.printStackTrace(); }
首先,该示例创建两个Path实例。然后,这个例子调用Files.copy(),将两个Path实例作为参数传递。这可以让源路径引用的文件被复制到目标路径引用的文件中。
如果目标文件已经存在,则抛出一个java.nio.file.FileAlreadyExistsException异常。如果有其他错误,则会抛出一个IOException。例如,如果将该文件复制到不存在的目录,则会抛出IOException。
(2)覆盖已存在的文件
Files.copy()方法的第三个参数。如果目标文件已经存在,这个参数指示copy()方法覆盖现有的文件。 Files.copy(sourcePath, destinationPath, StandardCopyOption.REPLACE_EXISTING);
3、Files.move()
Files.move()用于将文件从一个路径移动到另一个路径。移动文件与重命名相同,但是移动文件既可以移动到不同的目录,也可以在相同的操作中更改它的名称。
示例: Path sourcePath = Paths.get("d:\atguigu\01.txt"); Path destinationPath = Paths.get("d:\atguigu\001.txt"); try { Files.move(sourcePath, destinationPath, StandardCopyOption.REPLACE_EXISTING); } catch (IOException e) { //移动文件失败 e.printStackTrace(); }
Files.move()的第三个参数。这个参数告诉Files.move()方法来覆盖目标路径上的任何现有文件。
4、Files.delete()
Files.delete()方法可以删除一个文件或者目录。
示例: Path path = Paths.get("d:\atguigu\001.txt"); try { Files.delete(path); } catch (IOException e) { // 删除文件失败 e.printStackTrace(); }
创建指向要删除的文件的Path。然后调用Files.delete()方法。如果Files.delete()不能删除文件(例如,文件或目录不存在),会抛出一个IOException。
5.Files.walkFileTree()
(1)Files.walkFileTree()方法包含递归遍历目录树功能,将Path实例和FileVisitor作为参数。Path实例指向要遍历的目录,FileVisitor在遍历期间被调用。
(2)FileVisitor是一个接口,必须自己实现FileVisitor接口,并将实现的实例传递给walkFileTree()方法。在目录遍历过程中,您的FileVisitor实现的每个方法都将被调用。如果不需要实现所有这些方法,那么可以扩展SimpleFileVisitor类,它包含FileVisitor接口中所有方法的默认实现。
(3)FileVisitor接口的方法中,每个都返回一个FileVisitResult枚举实例。FileVisitResult枚举包含以下四个选项:
CONTINUE 继续
TERMINATE 终止
SKIP_SIBLING 跳过同级
SKIP_SUBTREE 跳过子级
(4)查找一个名为001.txt的文件示例: Path rootPath = Paths.get("d:\atguigu"); String fileToFind = File.separator + "001.txt"; try { Files.walkFileTree(rootPath, new SimpleFileVisitor<Path>() { @Override public FileVisitResult visitFile(Path file, BasicFileAttributes attrs) throws IOException { String fileString = file.toAbsolutePath().toString(); //System.out.println("pathString = " + fileString);
if(fileString.endsWith(fileToFind)){ System.out.println("file found at path: " + file.toAbsolutePath()); return FileVisitResult.TERMINATE; } return FileVisitResult.CONTINUE; } }); } catch(IOException e){ e.printStackTrace(); }
(5)java.nio.file.Files类包含许多其他的函数,有关这些方法的更多信息,请查看java.nio.file.Files类的JavaDoc。
AsynchronousFileChannel
在Java 7中,Java NIO中添加了AsynchronousFileChannel,也就是是异步地将数据写入文件。
1、创建 AsynchronousFileChannel
通过静态方法open()创建
示例: Path path = Paths.get("d:\atguigu\01.txt"); try { AsynchronousFileChannel fileChannel = AsynchronousFileChannel.open(path, StandardOpenOption.READ); } catch (IOException e) { e.printStackTrace(); }
open()方法的第一个参数指向与AsynchronousFileChannel相关联文件的Path实例。
第二个参数是一个或多个打开选项,它告诉AsynchronousFileChannel在文件上执行什么操作。在本例中,我们使用了StandardOpenOption.READ选项,表示该文件将被打开阅读。
2、通过Future读取数据
可以通过两种方式从AsynchronousFileChannel读取数据。第一种方式是调用返回Future的read()方法
示例: Path path = Paths.get("d:\atguigu\001.txt"); AsynchronousFileChannel fileChannel = null; try { fileChannel = AsynchronousFileChannel.open(path, StandardOpenOption.READ); } catch (IOException e) { e.printStackTrace(); } ByteBuffer buffer = ByteBuffer.allocate(1024); long position = 0; Future<Integer> operation = fileChannel.read(buffer, position); while(!operation.isDone()); buffer.flip(); byte[] data = new byte[buffer.limit()]; buffer.get(data); System.out.println(new String(data)); buffer.clear();
上述代码:
(1)创建了一个AsynchronousFileChannel,
(2)创建一个ByteBuffer,它被传递给read()方法作为参数,以及一个0的位置。
(3)在调用read()之后,循环,直到返回的isDone()方法返回true。
(4)读取操作完成后,数据读取到ByteBuffer中,然后打印到System.out中。
3、通过CompletionHandler读取数据
第二种方法是调用read()方法,该方法将一个CompletionHandler作为参数 示例: Path path = Paths.get("d:\atguigu\001.txt"); AsynchronousFileChannel fileChannel = null; try { fileChannel = AsynchronousFileChannel.open(path, StandardOpenOption.READ); } catch (IOException e) { e.printStackTrace(); } ByteBuffer buffer = ByteBuffer.allocate(1024); long position = 0; fileChannel.read(buffer, position, buffer, new CompletionHandler<Integer, ByteBuffer>() { @Override public void completed(Integer result, ByteBuffer attachment) { System.out.println("result = " + result); attachment.flip(); byte[] data = new byte[attachment.limit()]; attachment.get(data);
System.out.println(new String(data)); attachment.clear(); } @Override public void failed(Throwable exc, ByteBuffer attachment) { } });
(1)读取操作完成,将调用CompletionHandler的completed()方法。
(2)对于completed()方法的参数传递一个整数,它告诉我们读取了多少字节,以及传递给read()方法的“附件”。“附件”是read()方法的第三个参数。在本代码中,它是ByteBuffer,数据也被读取。
(3)如果读取操作失败,则将调用CompletionHandler的failed()方法。
4、通过Future写数据
和读取一样,可以通过两种方式将数据写入一个AsynchronousFileChannel
示例: Path path = Paths.get("d:\atguigu\001.txt"); AsynchronousFileChannel fileChannel = null; try { fileChannel = AsynchronousFileChannel.open(path, StandardOpenOption.WRITE); } catch (IOException e) { e.printStackTrace(); } ByteBuffer buffer = ByteBuffer.allocate(1024); long position = 0; buffer.put("atguigu data".getBytes()); buffer.flip();
Future<Integer> operation = fileChannel.write(buffer, position); buffer.clear(); while(!operation.isDone()); System.out.println("Write over");
首先,AsynchronousFileChannel以写模式打开。然后创建一个ByteBuffer,并将一些数据写入其中。然后,ByteBuffer中的数据被写入到文件中。最后,示例检查返回的Future,以查看写操作完成时的情况。
注意,文件必须已经存在。如果该文件不存在,那么write()方法将抛出一个java.nio.file.NoSuchFileException。
5、通过CompletionHandler写数据
示例:
Path path = Paths.get("d:\atguigu\001.txt"); if(!Files.exists(path)){ try { Files.createFile(path); } catch (IOException e) { e.printStackTrace(); } } AsynchronousFileChannel fileChannel = null; try { fileChannel = AsynchronousFileChannel.open(path, StandardOpenOption.WRITE); } catch (IOException e) { e.printStackTrace(); } ByteBuffer buffer = ByteBuffer.allocate(1024);
long position = 0; buffer.put("atguigu data".getBytes()); buffer.flip(); fileChannel.write(buffer, position, buffer, new CompletionHandler<Integer, ByteBuffer>() { @Override public void completed(Integer result, ByteBuffer attachment) { System.out.println("bytes written: " + result); } @Override public void failed(Throwable exc, ByteBuffer attachment) { System.out.println("Write failed"); exc.printStackTrace(); } });
当写操作完成时,将会调用CompletionHandler的completed()方法。如果写失败,则会调用failed()方法。
字符集(Charset)
java中使用Charset来表示字符集编码对象
Charset常用静态方法
public static Charset forName(String charsetName)//通过编码类型获得Charset对象
public static SortedMap<String,Charset> availableCharsets()//获得系统支持的所有编码方式
public static Charset defaultCharset()//获得虚拟机默认的编码方式
public static boolean isSupported(String charsetName)//判断是否支持该编码类型
Charset常用普通方法
public final String name()//获得Charset对象的编码类型(String)
public abstract CharsetEncoder newEncoder()//获得编码器对象
public abstract CharsetDecoder newDecoder()//获得解码器对象
代码示例:
import org.junit.jupiter.api.Test;
import java.nio.ByteBuffer;
import java.nio.CharBuffer;
import java.nio.charset.CharacterCodingException;
import java.nio.charset.Charset;
import java.nio.charset.CharsetDecoder;
import java.nio.charset.CharsetEncoder;
import java.util.Map;
import java.util.Set;

public class CharsetDemo {
    @Test
    public void charSetEncoderAndDecoder() throws CharacterCodingException {
        Charset charset = Charset.forName("UTF-8");


        //1.获取编码器
        CharsetEncoder charsetEncoder = charset.newEncoder();

        // 2.获取解码器
        CharsetDecoder charsetDecoder = charset.newDecoder();

        // 3.获取需要解码编码的数据
        CharBuffer charBuffer = CharBuffer.allocate(1024);
        charBuffer.put("字符集编码解码");
        charBuffer.flip();
        //4.编码
        ByteBuffer byteBuffer = charsetEncoder.encode(charBuffer);
        System.out.println("编码后:");
        for (int i = 0; i \< byteBuffer.limit(); i++) {
            System.out.println(byteBuffer.get());
        }
        //5.解码
        byteBuffer.flip();
        CharBuffer charBuffer1 = charsetDecoder.decode(byteBuffer);
        System.out.println("解码后:");
        System.out.println(charBuffer1.toString());
        System.out.println("指定其他格式解码:");
        Charset charset1 = Charset.forName("GBK");
        byteBuffer.flip();
        CharBuffer charBuffer2 = charset1.decode(byteBuffer);
        System.out.println(charBuffer2.toString());
        //6.获取Charset所支持的字符编码
        Map\<String, Charset> map = Charset.availableCharsets();
        Set\<Map.Entry\<String, Charset>> set = map.entrySet();
        for (Map.Entry\<String, Charset> entry : set) {
            System.out.println(entry.getKey() + "=" + entry.getValue().toString());
        }
    }
}
NIO多线程聊天室例子
服务端
import java.io.IOException;
import java.net.InetSocketAddress;
import java.nio.ByteBuffer;
import java.nio.channels.*;
import java.nio.charset.Charset;
import java.util.Iterator;
import java.util.Set;

//服务器端
public class ChatServer {
    //服务器端启动的方法
    public void startServer() throws IOException {
        //1 创建Selector选择器
        Selector selector = Selector.open();
        //2 创建ServerSocketChannel通道
        ServerSocketChannel serverSocketChannel = ServerSocketChannel.open();
        //3 为channel通道绑定监听端口
        serverSocketChannel.bind(new InetSocketAddress(8000));
        //设置非阻塞模式
        serverSocketChannel.configureBlocking(false);
        //4 把channel通道注册到selector选择器上
        serverSocketChannel.register(selector, SelectionKey.OP_ACCEPT);
        System.out.println("服务器已经启动成功了");
        //5 循环,等待有新链接接入
        while (true) for (; ; ) {
            //获取channel数量
            int readChannels = selector.select();
            if (readChannels == 0) {
                continue;
            }
            //获取可用的channel
            Set\<SelectionKey> selectionKeys = selector.selectedKeys();
            //遍历集合
            Iterator\<SelectionKey> iterator = selectionKeys.iterator();
            while (iterator.hasNext()) {
                SelectionKey selectionKey = iterator.next();
                //移除set集合当前selectionKey
                iterator.remove();
                //6 根据就绪状态,调用对应方法实现具体业务操作
                //6.1 如果accept状态
                if (selectionKey.isAcceptable()) {
                    acceptOperator(serverSocketChannel, selector);
                }
                //6.2 如果可读状态
                if (selectionKey.isReadable()) {
                    readOperator(selector, selectionKey);
                }
            }
        }
    }

    //处理可读状态操作
    private void readOperator(Selector selector, SelectionKey selectionKey) throws IOException {
        //1 从SelectionKey获取到已经就绪的通道
        SocketChannel socketChannel = (SocketChannel) selectionKey.channel();
        //2 创建buffer
        ByteBuffer byteBuffer = ByteBuffer.allocate(1024);
        //3 循环读取客户端消息
        int readLength = socketChannel.read(byteBuffer);
        String message = "";
        if (readLength > 0) {
            //切换读模式
            byteBuffer.flip();

            //读取内容
            message += Charset.forName("UTF-8").decode(byteBuffer);
        }
        //4 将channel再次注册到选择器上,监听可读状态
        socketChannel.register(selector, SelectionKey.OP_READ);
        //5 把客户端发送消息,广播到其他客户端
        if (message.length() > 0) {
            //广播给其他客户端
            System.out.println(message);
            castOtherClient(message, selector, socketChannel);
        }
    }

    //广播到其他客户端
    private void castOtherClient(String message, Selector selector, SocketChannel socketChannel) throws IOException {
        //1 获取所有已经接入channel
        Set\<SelectionKey> selectionKeySet = selector.keys();
        //2 循环想所有channel广播消息
        for (SelectionKey selectionKey : selectionKeySet) {
            //获取每个channel
            Channel tarChannel = selectionKey.channel();
            //不需要给自己发送
            if (tarChannel instanceof SocketChannel && tarChannel != socketChannel) {
                ((SocketChannel) tarChannel).write(Charset.forName("UTF-8").encode(message));
            }
        }
    }

    //处理接入状态操作
    private void acceptOperator(ServerSocketChannel serverSocketChannel, Selector selector) throws IOException {
        //1 接入状态,创建socketChannel
        SocketChannel socketChannel = serverSocketChannel.accept();
        //2 把socketChannel设置非阻塞模式
        socketChannel.configureBlocking(false);
        //3 把channel注册到selector选择器上,监听可读状态
        socketChannel.register(selector, SelectionKey.OP_READ);
        //4 客户端回复信息
        socketChannel.write(Charset.forName("UTF-8").encode("欢迎进入聊天室,请注意隐私安全"));
    }

    //启动主方法
    public static void main(String[] args) {
        try {
            new ChatServer().startServer();
        } catch (IOException e) {
            e.printStackTrace();
        }
    }
}
客户端代码
import java.io.IOException;
import java.net.InetSocketAddress;
import java.nio.channels.SelectionKey;
import java.nio.channels.Selector;
import java.nio.channels.SocketChannel;
import java.nio.charset.Charset;
import java.util.Scanner;

//客户端
public class ChatClient {
    //启动客户端方法
    public void startClient(String name) throws IOException {
        //连接服务端
        SocketChannel socketChannel = SocketChannel.open(new InetSocketAddress("127.0.0.1", 8000));
        //接收服务端响应数据
        Selector selector = Selector.open();
        socketChannel.configureBlocking(false);
        socketChannel.register(selector, SelectionKey.OP_READ);
        //创建线程
        new Thread(new ClientThread(selector)).start();
        //向服务器端发送消息
        Scanner scanner = new Scanner(System.in);
        while (scanner.hasNextLine()) {
            String msg = scanner.nextLine();
            if (msg.length() > 0) {
                socketChannel.write(Charset.forName("UTF-8").encode(name + " : " + msg));
            }
        }
    }
}
import java.io.IOException;
import java.nio.ByteBuffer;
import java.nio.channels.SelectionKey;
import java.nio.channels.Selector;
import java.nio.channels.SocketChannel;
import java.nio.charset.Charset;
import java.util.Iterator;
import java.util.Set;
public class ClientThread implements Runnable {
private Selector selector;
public ClientThread(Selector selector) {
this.selector = selector;
}
@Override
public void run() {
try {
for (; ; ) {
//获取channel数量
int readChannels = selector.select();
if (readChannels == 0) {
continue;
}
//获取可用的channel
Set\<SelectionKey> selectionKeys = selector.selectedKeys();
//遍历集合
Iterator\<SelectionKey> iterator = selectionKeys.iterator();
while (iterator.hasNext()) {
SelectionKey selectionKey = iterator.next();
//移除set集合当前selectionKey
iterator.remove();
//如果可读状态
if (selectionKey.isReadable()) {
readOperator(selector, selectionKey);
}
}
}
} catch (Exception e) {
}
}
//处理可读状态操作
private void readOperator(Selector selector, SelectionKey selectionKey) throws IOException {
//1 从SelectionKey获取到已经就绪的通道
SocketChannel socketChannel = (SocketChannel) selectionKey.channel();
//2 创建buffer
ByteBuffer byteBuffer = ByteBuffer.allocate(1024);
//3 循环读取客户端消息
int readLength = socketChannel.read(byteBuffer);
String message = "";
if (readLength > 0) {
//切换读模式
byteBuffer.flip();
//读取内容
message += Charset.forName("UTF-8").decode(byteBuffer);
}
//4 将channel再次注册到选择器上,监听可读状态
socketChannel.register(selector, SelectionKey.OP_READ);
//5 把客户端发送消息,广播到其他客户端
if (message.length() > 0) {
//广播给其他客户端
System.out.println(message);
}
}
}import java.io.IOException;
public class AClient {
public static void main(String[] args) throws IOException {
new ChatClient().startClient("lxl");
}
}import java.io.IOException;
public class BClient {
public static void main(String[] args) throws IOException {
new ChatClient().startClient("xqm");
}
}others
Filter模式
- 通过一个“基础”组件再叠加各种“附加”功能组件的模式,称之为Filter模式(或者装饰器模式:Decorator)。它可以让我们通过少量的类来实现各种功能的组合
- 编写FilterInputStream
操作Zip
ZipInputStream
JarInputStream是从ZipInputStream派生
读取zip包
创建一个ZipInputStream,通常是传入一个FileInputStream作为数据源,然后,循环调用getNextEntry(),直到返回null,表示zip流结束。
一个ZipEntry表示一个压缩文件或目录,如果是压缩文件,我们就用read()方法不断读取,直到返回-1:- try (ZipInputStream zip = new ZipInputStream(new FileInputStream(...))) {
ZipEntry entry = null;
while ((entry = zip.getNextEntry()) != null) {
String name = entry.getName();
if (!entry.isDirectory()) {
int n;
while ((n = zip.read()) != -1) {
...
}
}
}
}
- try (ZipInputStream zip = new ZipInputStream(new FileInputStream(...))) {
写入zip包
可以直接写入内容到zip包。我们要先创建一个ZipOutputStream,通常是包装一个FileOutputStream,然后,每写入一个文件前,先调用putNextEntry(),然后用write()写入byte[]数据,写入完毕后调用closeEntry()结束这个文件的打包。
- try (ZipOutputStream zip = new ZipOutputStream(new FileOutputStream(...))) {
File[] files = ...
for (File file : files) {
zip.putNextEntry(new ZipEntry(file.getName()));
zip.write(getFileDataAsBytes(file));
zip.closeEntry();
}
}
- try (ZipOutputStream zip = new ZipOutputStream(new FileOutputStream(...))) {
读取classpath资源
- 把资源存储在classpath中可以避免文件路径依赖;
- Class对象的getResourceAsStream()可以从classpath中读取指定资源;
- 根据classpath读取资源时,需要检查返回的InputStream是否为null。
使用Files
- byte[] data = Files.readAllBytes(Paths.get("/path/to/file.txt"));
- // 默认使用UTF-8编码读取:
String content1 = Files.readString(Paths.get("/path/to/file.txt"));
// 可指定编码:
String content2 = Files.readString(Paths.get("/path/to/file.txt"), StandardCharsets.ISO_8859_1);
// 按行读取并返回每行内容:
List<String> lines = Files.readAllLines(Paths.get("/path/to/file.txt")); - / 写入二进制文件:
byte[] data = ...
Files.write(Paths.get("/path/to/file.txt"), data);
// 写入文本并指定编码:
Files.writeString(Paths.get("/path/to/file.txt"), "文本内容...", StandardCharsets.ISO_8859_1);
// 按行写入文本:
List<String> lines = ...
Files.write(Paths.get("/path/to/file.txt"), lines); - 此外,Files工具类还有copy()、delete()、exists()、move()等快捷方法操作文件和目录。
最后需要特别注意的是,Files提供的读写方法,受内存限制,只能读写小文件,例如配置文件等,不可一次读入几个G的大文件。读写大型文件仍然要使用文件流,每次只读写一部分文件内容。
内存映射文件
- 内存映射文件 I/O 是一种读和写文件数据的方法,它可以比常规的基于流或者基于通道的 I/O 快得多。
向内存映射文件写入可能是危险的,只是改变数组的单个元素这样的简单操作,就可能会直接修改磁盘上的文件。修改数据与将数据保存到磁盘是没有分开的。
下面代码行将文件的前 1024 个字节映射到内存中,map() 方法返回一个 MappedByteBuffer,它是 ByteBuffer 的子类。因此,可以像使用其他任何 ByteBuffer 一样使用新映射的缓冲区,操作系统会在需要时负责执行映射。
MappedByteBuffer mbb = fc.map(FileChannel.MapMode.READ_WRITE, 0, 1024);
OFFICE
PIC
CSV
HTML
压缩文件
| IO | NIO<br/> |
|---|---|
| 面向流 <br/> | 面向缓冲 |
| 阻塞IO <br/> | 非阻塞IO |
| 无 | 选择器 |
NET
OSI七层模型
TCP/IP五层模型
三次握手、四次挥手
IP
域名
端口
通信协议
一次请求的过程
JDK新版本特征
Lambda 表达式
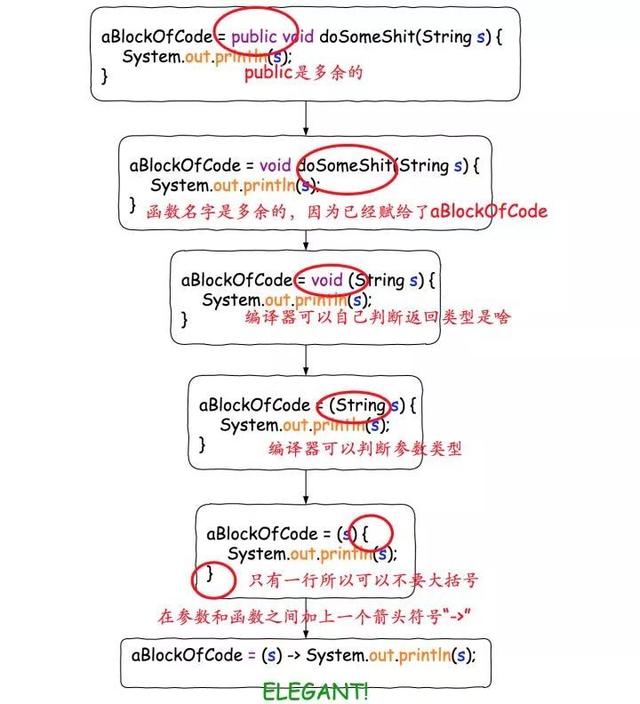
流Stream()
package pers.lxl.mylearnproject.programbase.newjdk;

import java.util.Arrays;
import java.util.IntSummaryStatistics;
import java.util.List;
import java.util.Random;
import java.util.stream.Collectors;

/**
 * JDK8 新特性stream()
 源可以是数组、文件、集合、函数
 * 以声明的方式处理数据,类似用sql从数据库查询数据的方式来提供对集合的运算和表达的高阶抽象
 * 其将要处理的数据看成一种流,流在管道中传输,其可以再管道的节点中进行筛选排序聚合等一系列操作
 * Stream(流)是一个来自数据源的元素队列并支持聚合操作
 * 元素是特定类型的对象,形成一个队列。 Java中的Stream并不会存储元素,而是按需计算。
 * 数据源 流的来源。 可以是集合,数组,I/O channel, 产生器generator 等。
 * 聚合操作 类似SQL语句一样的操作, 比如filter, map, reduce, find, match, sorted等。
 * 和以前的Collection操作不同, Stream操作还有两个基础的特征:
 * Pipelining: 中间操作都会返回流对象本身。 这样多个操作可以串联成一个管道, 如同流式风格(fluent style)。 这样做可以对操作进行优化, 比如延迟执行(laziness)和短路(short-circuiting)。
 * 内部迭代: 以前对集合遍历都是通过Iterator或者For-Each的方式, 显式的在集合外部进行迭代, 这叫做外部迭代。 Stream提供了内部迭代的方式, 通过访问者模式(Visitor)实现。
 */
public class StreamL {
    public static void main(String[] args) {


//      1.生成流
        //stream() − 为集合创建串行流。
        //parallelStream() − 为集合创建并行流。
        List\<String> strings = Arrays.asList("abc", "", "bc", "efg", "abcd", "", "jkl");
        List\<String> filtered = strings.stream().filter(string -> !string.isEmpty()).collect(Collectors.toList());
        List\<String> filteredParallelStream = strings.parallelStream().filter(string -> !string.isEmpty()).collect(Collectors.toList());
//      2.聚合操作
//      迭代数据foreach(),limit() 获取指定数量的流,sorted() 对流进行排序。
        Random random = new Random();
        random.ints().limit(10).sorted().forEach(System.out::println);
//       map() 映射每个元素到对应的结果
        List\<Integer> numbers = Arrays.asList(3, 2, 2, 3, 7, 3, 5);
//      获取对应的平方数
        List\<Integer> squaresList = numbers.stream().map( i -> i*i).distinct().collect(Collectors.toList());
//      filter() 通过设置的条件过滤出元素
//      获取空字符串的数量
        long count = strings.stream().filter(string -> string.isEmpty()).count();
//        并行(parallel)程序
//        parallelStream 是流并行处理程序的代替方法。以下实例我们使用 parallelStream 来输出空字符串的数量:
//      获取空字符串的数量

//        3.Collectors
//        Collectors 类实现归约操作,例如将流转换成集合和聚合元素。Collectors 可用于返回列表或字符串:
        System.out.println("筛选列表: " + filtered);
        String mergedString = strings.stream().filter(string -> !string.isEmpty()).collect(Collectors.joining(", "));
        System.out.println("合并字符串: " + mergedString);
//        4.统计
//        一些产生统计结果的收集器也非常有用。它们主要用于int、double、long等基本类型上,它们可以用来产生类似如下的统计结果。
        IntSummaryStatistics stats = numbers.stream().mapToInt((x) -> x).summaryStatistics();
        System.out.println("列表中最大的数 : " + stats.getMax());
        System.out.println("列表中最小的数 : " + stats.getMin());
        System.out.println("所有数之和 : " + stats.getSum());
        System.out.println("平均数 : " + stats.getAverage());

    }
}
基本类型及类型转换
基本类型及其包装类
| 数据类型 | 大小【bits】 | 默认值 | 最小值 | 最大值 | 包装类 | 对应数据库Mysql | 应用 |
|---|---|---|---|---|---|---|---|
| byte | 8 | 0 | -128 | +127 | Byte | ||
| short | 16 | 0 | -2^15 | +2^15-1 | Short | ||
| int | 32 | 0 | -2^31 | +2^31-1 | Integer | ||
| long | 64 | 0L | -2^63 | +2^63-1 | Long | ||
| float | 32 | 0.0f | IEEE754 | IEEE754 | Float | ||
| double | 64 | 0.0d | IEEE754 | IEEE754 | Double | ||
| char | 16 | 'u0000' | Unicode 0 | Unicode 2^16-1 | Character | ||
| String (or any object) | null | ||||||
| boolean | false | Boolean |
存储在哪
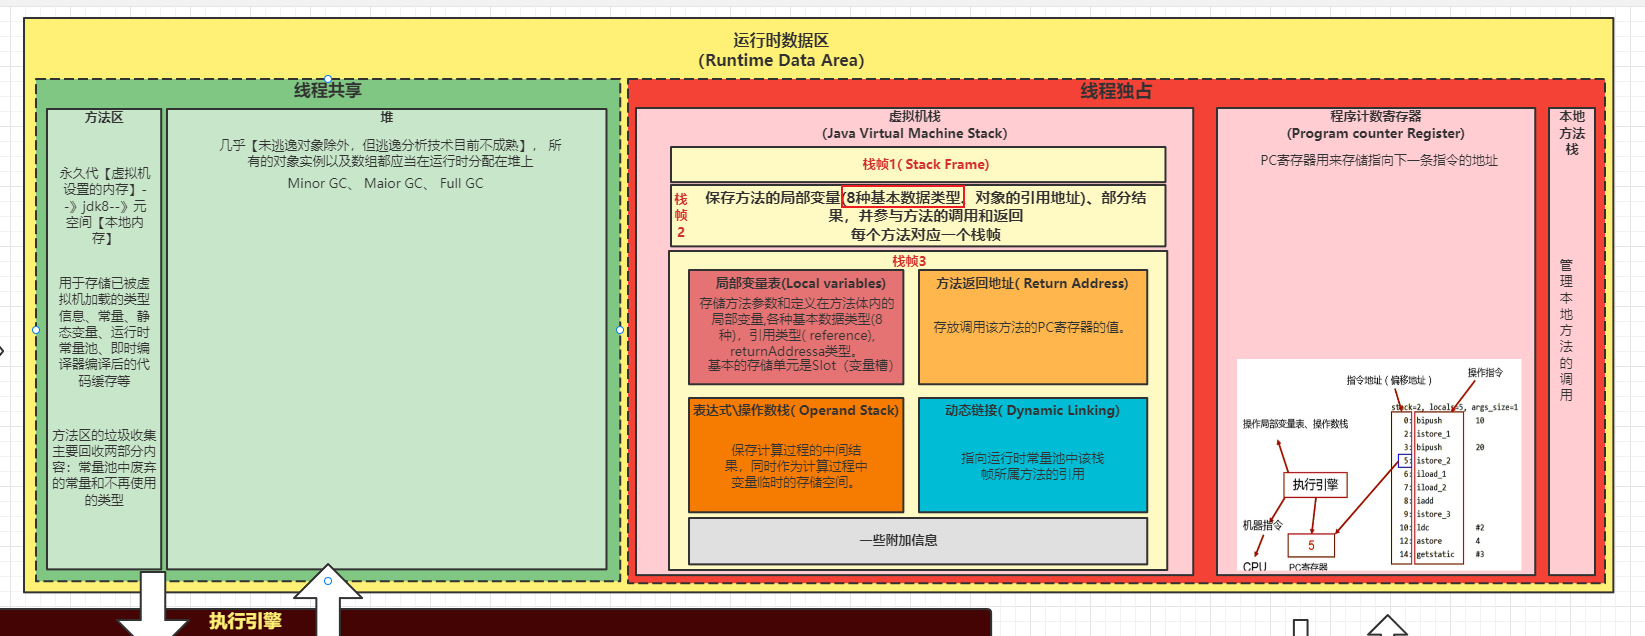
相互转换
基本类型精度比较?
char —> int —> long —> float —> double
byte —> short —> int —> long —> float —> double
转换规则
- 多种类型混合运算自动转换为容量最大的
- 小可转大,大转小需小括号强制转换,可能造成精度缺失
- char 、byte 、short 之间不可相互转换,相互计算时转换为int
- 基本数据类型转换为String:基本数据类型+"",String转换为正确的基本类型:基本数据类型对应包装类.parse...()
什么是精度缺失?
计算机二进制计算导致无限循环以致精度缺失。
如何解决精度缺失?
使用 BigDecimal+字符串、BigInteger
面向对象
JDK新特性
操作符
流程控制
初始化与清理
权限控制
复用类
多态
接口
内部类
异常
字符串
正则表达式
泛型
数组
枚举
注解
并发
图形化
其他基础
Array
[JVM与上层技术](JVM 与上层技术)
hashcode与 equals与 ==
相关概念
1.equals(Object obj)方法用来判断两个对象是否“相同”,如果“相同”则返回true,否则返回false。
hashCode()方法返回一个int数,在Object类中的默认实现是“将该对象的内部地址转换成一个整数返回”。2.若两个对象equals(Object obj)返回true,则hashCode()有必要也返回相同的int数。
3.若两个对象equals(Object obj)返回false,则hashCode()不一定返回不同的int数。
4.若两个对象hashCode()返回相同int数,则equals(Object obj)不一定返回true。
5.若两个对象hashCode()返回不同int数,则equals(Object obj)一定返回false。
6.同一对象在执行期间若已经存储在集合中,则不能修改影响hashCode值的相关信息,否则会导致内存泄露问题。
7.若重写了equals(Object obj)方法,则有必要重写hashCode()方法。
什么时候需要重写hashcode与equals?
- 对象比较
equals与==区别?
- 基本类型中,==判断值是否相等,引用类型中比较的是地址是否相等
- equals只能用于引用类型,equals具体判断要在判断对象中看equals实现,默认是判断地址,重写之后看具体实现,一般是比较对象内容。
面向对象
封装继承多态
封装
将一系列操作封装成一个功能,隐藏实现细节,施加权限控制,让用户不再操心功能实现,减少代码冗余。
继承(extends)
消除重复创建相同功能类,继承以复制基类功能属性并覆盖已进行扩展修改。
继承初始化链:
/**存在继承的情况下,初始化顺序为:
 父类(静态变量、静态语句块)
 子类(静态变量、静态语句块)
 父类(实例变量、普通语句块)
 父类(构造函数)
 子类(实例变量、普通语句块)
 子类(构造函数)*/
 静态-->实例--》普通语句块--》构造
多态
接口和实现类,相同接口有不同实现类以实现不同样式的相同功能。
final、finally、finalize
final通常含义为不可改变,无法改变由设计和效率两个方面。修饰类不可被继承(类中方法被隐式生命为final),修饰方法不可被覆盖(效果同被private修饰的方法,也被隐式final了),修饰变量不可被修改(基本变量修饰后即为常量),修饰对象只是限制了其引用地址但不会限制其对象值。finally是在try..catch语句中try执行后且未被将程序终止最后必须执行的语句块、finalize用于对象回收,属于Object的方法,调用并不一定会马上回收对象。
向上/下转型
向上即父用子,向下即子用父。
Father f1 = new Son();   // 这就叫 upcasting (向上转型)
// 现在 f1 引用指向一个Son对象

//并不是所有的对象都可以向下转型,只有当这个对象原本就是子类对象通过向上转型得到的时候才能够成功转型。
Son s1 = (Son)f1;   // 这就叫 downcasting (向下转型)
// 现在f1 还是指向 Son对象
内部类、匿名内部类
没有名字的类或接口实现所以只能使用一次,无法被其他类实例化,用来简化代码编写。
匿名类可继承、重写父类的方法
使用匿名类时,必然是在某个类中直接用匿名类创建对象,因此匿名类一定是内部类
匿名类可以访问外嵌类中的成员变量和方法,匿名类的类体中不可以声明static成员变量和static方法
由于匿名类是一个子类,但没有类名,所以在用匿名类创建对象时,要直接使用父类的构造方法
static
方便在没有创建对象的情况下来进行调用(方法/变量),静态方法中不能依赖非静态方法、属性,反之非静态成员方法中可访问静态成员变量、方法。
静态变量在内存中只有一个,非静态变量随对象创建而创建,各个变量之间互不影响。static不能用来修饰局部变量。静态代码块只有在类加载的时候创建一次,适合于只需要进行一次初始化的操作。静只静,非可静
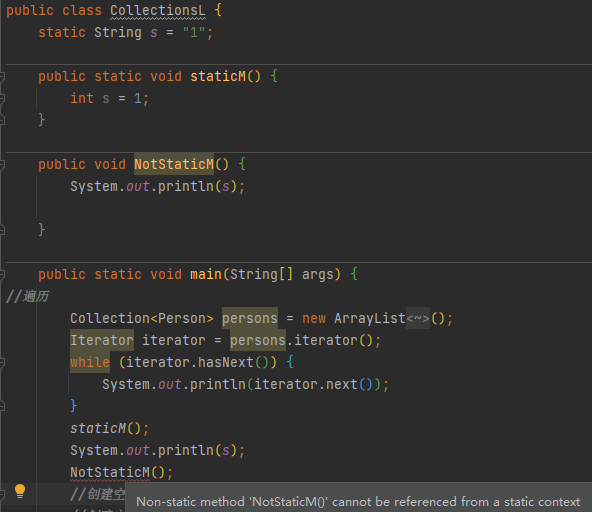
CAP、BASE理论
AQS
其他
局部变量需要显示初始化
保留字:
1)48个关键字:abstract、assert、boolean、break、byte、case、catch、char、class、continue、default、do、double、else、enum、extends、final、finally、float、for、if、implements、import、int、interface、instanceof、long、native、new、package、private、protected、public、return、short、static、strictfp、super、switch、synchronized、this、throw、throws、transient、try、void、volatile、while。
2)2个保留字(现在没用以后可能用到作为关键字):goto、const。
3)3个特殊直接量:true、false、null。
基础类库(从上到下简化了解)
【java.io java.lang java.util】
【java.lang.reflect java.net javax.net.* java.nio.* java.util.concurrent.】
【java.lang.annotation javax.annotation.* java.lang.refjava.math java.rmi.*javax.rmi. java.security. javax.security. java.sqljavax.sql. javax.transaction. *java.text javax.xml.org.w3c.dom.org.xml.sax. javax.crypto. * javax.imageio. javax.jws. * java.util.jar java.util.logging java.util.prefs java.util.regex java.util.zip】
访问权限
| private | default | protected | public | |
|---|---|---|---|---|
| 同一个类中 | √ | √ | √ | √ |
| 同一个包中 | √ | √ | √ | |
| 子类中 | √ | √ | ||
| 全局范围内 | √ |
基本数据类型
| 数据类型 | 位数 | 默认值 | 取值范围 | 举例说明 |
|---|---|---|---|---|
| byte(位) | 8 | 0 | -2^7 --- 2^7-1 | byte b = 10; |
| boolean(布尔值) | 8 | false | true、false | boolean b = true; |
| short(短整数) | 16 | 0 | -2^15 --- 2^15-1 | short s = 10; |
| char(字符) | 16 | 空 | 0 --- 2^16-1 | char c = 'c'; |
| int(整数) | 32 | 0 | -2^31 --- 2^31-1 | int i = 10; |
| float(单精度) | 32 | 0.0 | -2^31 --- 2^31-1 | float f = 10.0f; |
| long(长整数) | 64 | 0 | -2^63 --- 2^63-1 | long l = 10l; |
| double(双精度) | 64 | 0.0 | -2^63 --- 2^63-1 | double d = 10.0d; |
面向对象
封装继承多态,
自动类型转换
1.若参与运算的数据类型不同,则先转换成同一类型,然后进行运算。
2.转换按数据长度增加的方向进行,以保证精度不降低。例如int型和long型运算时,先把int量转成long型后再进行运算。
3.所有的浮点运算都是以双精度进行的,即使仅含float单精度量运算的表达式,也要先转换成double型,再作运算。
4.char型和short型参与运算时,必须先转换成int型。
5.在赋值运算中,赋值号两边的数据类型不同时,需要把右边表达式的类型将转换为左边变量的类型。如果右边表达式的数据类型长度比左边长时,将丢失一部分数据,这样会降低精度。
下图表示了类型自动转换的规则:
String、StringBuffer、StringBuilder 区别
**
 * String使用+拼接字符串,如果在循环中,在循环中,
 * 每次循环都会创建新的字符串对象,然后扔掉旧的字符串。
 * 这样,绝大部分字符串都是临时对象,不但浪费内存,还会影响GC效率
 * 为高效拼接字符串Java标准库提供了StringBuilder,它是一个可变对象,可以预分配缓冲区
 * 对于普通的字符串+操作,并不需要我们将其改写为StringBuilder,
 * 因为Java编译器在编译时就自动把多个连续的+操作编码为StringConcatFactory的操作。
 * 在运行期,StringConcatFactory会自动把字符串连接操作优化为数组复制或者StringBuilder操作
 * StringBuffer通过同步来保证多个线程操作StringBuffer也是安全的,但是同步会带来执行速度的下降
 * StringBuilder和StringBuffer接口完全相同,现在完全没有必要使用StringBuffer
 * @author lxl*/
public class StringBuilderL {

    public static void main(String[] args) {
        StringBuffer sb = new StringBuffer(1024);
        for (int i = 0; i \< 1000; i++) {
            sb.append('s');
            sb.append(i);
        }
        sb.append("good ")
                .append("LXL")
                .insert(0, "DD");//链式操作
        String s = sb.toString();
        System.out.println(s);
    }
}
JDK与JRE区别
#查看JDK路径
java -verbose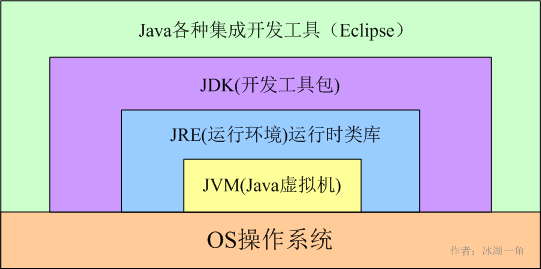
JDK
JDK(Java SE Development Kit),Java标准开发包,它提供了编译、运行Java程序所需的各种工具和资源,包括Java编译器、Java运行时环境,以及常用的Java类库等。

JRE
JRE( Java Runtime Environment) 、Java运行环境,用于解释执行Java的字节码文件。普通用户而只需要安装 JRE(Java Runtime Environment)来运行 Java 程序。而程序开发者必须安装JDK来编译、调试程序。
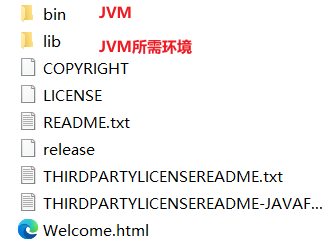
精度遗失问题
float 还是double都是浮点数,而计算机是二进制的,浮点数会失去一定的精确度,只能用来科学或工程计算,不能用来商业计算。根本原因是:十进制值通常没有完全相同的二进制表示形式;十进制数的二进制表示形式可能不精确。只能无限接近于那个值
BigDecimal
package pers.lxl.mylearnproject.javase.coreclass;
import com.sun.istack.internal.NotNull;
import java.math.BigDecimal;
import java.math.RoundingMode;
import static java.math.BigDecimal.ROUND_CEILING;
/**
 * Java在java.math包中提供的API类BigDecimal,用来对超过16位有效位的数进行精确的运算。
 * 双精度浮点型变量double可以处理16位有效数。在实际应用中,需要对更大或者更小的数进行运算和处理。
 * float和double只能用来做科学计算或者是工程计算,在商业计算中要用java.math.BigDecimal。
 * BigDecimal所创建的是对象,我们不能使用传统的+、-、*、/等算术运算符直接对其对象进行数学运算,而必须调用其相对应的方法。
 * 方法中的参数也必须是BigDecimal的对象。构造器是类的特殊方法,专门用来创建对象,特别是带有参数的对象。
 *
 * @author Administrator
 *
 * 参考:https://blog.csdn.net/qq_35868412/article/details/89029288
 */
public class BigDecimalL {
    public static void main(String[] args) {
//        精度遗失问题
//        float 还是double都是浮点数,而计算机是二进制的,浮点数会失去一定的精确度,只能用来科学或工程计算,不能用来商业计算。根本原因是:十进制值通常没有完全相同的二进制表示形式;十进制数的二进制表示形式可能不精确。只能无限接近于那个值
//        0.19999999999999998
        System.out.println(0.3 - 0.1);
//       0.020000000000000004
        System.out.println(0.2 * 0.1);
//        0.30000000000000004
        System.out.println(0.2 + 0.1);
//        2.9999999999999996
        System.out.println(0.3 / 0.1);
//金融项目中需要准确计算,不能有精度遗失问题,所以商业使用需要用BigDecimal==============================


//BigDecimal(int)       创建一个具有参数所指定整数值的对象。
//BigDecimal(double)   创建一个具有参数所指定双精度值的对象。 //不推荐使用
//BigDecimal(long)    创建一个具有参数所指定长整数值的对象。
//BigDecimal(String) 创建一个具有参数所指定以字符串表示的数值的对象。//推荐使用
//add(BigDecimal)        BigDecimal对象中的值相加,然后返回这个对象。
//subtract(BigDecimal) BigDecimal对象中的值相减,然后返回这个对象。
//multiply(BigDecimal)  BigDecimal对象中的值相乘,然后返回这个对象。
//divide(BigDecimal)     BigDecimal对象中的值相除,然后返回这个对象。
//toString()                将BigDecimal对象的数值转换成字符串。
//doubleValue()          将BigDecimal对象中的值以双精度数返回。
//floatValue()             将BigDecimal对象中的值以单精度数返回。
//longValue()             将BigDecimal对象中的值以长整数返回。
//intValue()               将BigDecimal对象中的值以整数返回。
        BigDecimal bd1 = new BigDecimal("4264.24");
        BigDecimal bd2 = new BigDecimal("2132.1200");
        BigDecimal bd3 = new BigDecimal("213200");
        BigDecimal bd6 = new BigDecimal("4.0000");
        BigDecimal bd7 = new BigDecimal("3.0");
//        加
        System.out.println("加"+bd1.add(bd3));
//        减
        System.out.println("减"+bd1.subtract(bd1));
//        乘
        System.out.println("乘"+bd6.multiply(bd7));
//        除
//        不分配保留小数点保留位数的非整除运算会导致报错java.lang.ArithmeticException:Non-terminating decimal expansion; no exact representable decimal result.
//        System.out.println(bd1.divide(bd3));
//        多传入两个参数即可避免
//       divide(BigDecimal,保留小数点后几位小数,舍入模式)

//舍入模式
//ROUND_CEILING    //向正无穷方向舍入
//ROUND_DOWN    //向零方向舍入
//ROUND_FLOOR    //向负无穷方向舍入
//ROUND_HALF_DOWN    //向(距离)最近的一边舍入,除非两边(的距离)是相等,如果是这样,向下舍入, 例如1.55 保留一位小数结果为1.5
//ROUND_HALF_EVEN    //向(距离)最近的一边舍入,除非两边(的距离)是相等,如果是这样,如果保留位数是奇数,使用ROUND_HALF_UP,如果是偶数,使用ROUND_HALF_DOWN
//ROUND_HALF_UP    //向(距离)最近的一边舍入,除非两边(的距离)是相等,如果是这样,向上舍入, 1.55保留一位小数结果为1.6,也就是我们常说的“四舍五入”
//ROUND_UNNECESSARY    //计算结果是精确的,不需要舍入模式
//ROUND_UP    //向远离0的方向舍入

        System.out.println("除"+bd6.divide(bd7,2,ROUND_CEILING));

        //scale()表示小数位数
        System.out.println(bd1.scale());
        System.out.println(bd2.scale());
        System.out.println(bd3.scale());
        //stripTrailingZeros()方法,可以将一个BigDecimal格式化为一个相等的,但去掉了末尾0的BigDecimal
        BigDecimal d1 = bd1.stripTrailingZeros();
        BigDecimal d2 = bd2.stripTrailingZeros();
        BigDecimal d3 = bd3.stripTrailingZeros();
        //scale()返回负数,例如,-2,表示这个数是个整数,并且末尾有2个0
        System.out.println(d1.scale());
        System.out.println(d2.scale());
        System.out.println(d3.scale());
        //除法时,存在无法除尽的情况,这时,就必须指定精度以及如何进行截断,还可同事求余数
        //四舍五入
        BigDecimal bd4 = bd1.setScale(4, RoundingMode.HALF_UP);
        //直接截断
        BigDecimal bd5 = bd1.setScale(4, RoundingMode.DOWN);
        //divideAndRemainder()方法时,返回的数组包含两个BigDecimal,分别是商和余数,
        // 其中商总是整数,余数不会大于除数。我们可以利用这个方法判断两个BigDecimal是否是整数倍数
        BigDecimal[] dr = bd1.divideAndRemainder(bd2);
        if (dr[1].signum() == 0) {
            System.out.println("bd1是bd2的整" + dr[0] + "倍");
        }

        //在比较两个BigDecimal的值是否相等时,要特别注意,使用equals()方法不但要求两个BigDecimal的值相等,还要求它们的scale()相等
        //必须使用compareTo()方法来比较,它根据两个值的大小分别返回负数、正数和0,分别表示小于、大于和等于


//        JDK的描述:1、参数类型为double的构造方法的结果有一定的不可预知性。有人可能认为在Java中写入newBigDecimal(0.1)所创建的BigDecimal正好等于 0.1(非标度值 1,其标度为 1),
//        但是它实际上等于0.1000000000000000055511151231257827021181583404541015625。这是因为0.1无法准确地表示为 double(或者说对于该情况,不能表示为任何有限长度的二进制小数)。
//        这样,传入到构造方法的值不会正好等于 0.1(虽然表面上等于该值)。
//        2、另一方面,String 构造方法是完全可预知的:写入 newBigDecimal("0.1") 将创建一个 BigDecimal,它正好等于预期的 0.1。因此,比较而言,通常建议优先使用String构造方法
//        当double必须用作BigDecimal的源时,请使用Double.toString(double)转成String,然后使用String构造方法,或使用BigDecimal的静态方法valueOf
    }
}
BigInteger
package pers.lxl.mylearnproject.javase.coreclass;

import java.math.BigInteger;

/**CPU原生提供的整型最大范围是64位long型整数
 * 如果我们使用的整数范围超过了long型怎么办?这个时候,就只能用软件来模拟一个大整数。
 * java.math.BigInteger就是用来表示任意大小的整数。
 * BigInteger内部用一个int[]数组来模拟一个非常大的整数:
 * @author Administrator*/
public class BigIntegerL {
    public static void main(String[] args) {
        BigInteger bi = new BigInteger("12131231231233");
        BigInteger bi1 = new BigInteger("121321211111111");
        System.out.println(bi.pow(5));
        //BigInteger做运算的时候,只能使用实例方法,和long型整数运算比,BigInteger不会有范围限制,但缺点是速度比较慢。
        BigInteger sum = bi.add(bi1);
        /*转换为byte:byteValue()
         转换为short:shortValue()
         转换为int:intValue()
         转换为long:longValue()
         转换为float:floatValue()
         转换为double:doubleValue()
         通过上述方法,可以把BigInteger转换成基本类型。
         如果BigInteger表示的范围超过了基本类型的范围,
         转换时将丢失高位信息,即结果不一定是准确的。如果需要准确地转换成基本类型,
         可以使用intValueExact()、longValueExact()等方法,在转换时如果超出范围,
         将直接抛出ArithmeticException异常
         如果BigInteger的值甚至超过了float的最大范围(3.4x1038),那么返回的float为Infinity
         其他常用方法:

        BigInteger abs()  返回大整数的绝对值
        BigInteger add(BigInteger val) 返回两个大整数的和
        BigInteger and(BigInteger val)  返回两个大整数的按位与的结果
        BigInteger andNot(BigInteger val) 返回两个大整数与非的结果
        BigInteger divide(BigInteger val)  返回两个大整数的商
        BigInteger gcd(BigInteger val)  返回大整数的最大公约数
        BigInteger max(BigInteger val) 返回两个大整数的最大者
        BigInteger min(BigInteger val) 返回两个大整数的最小者
        BigInteger mod(BigInteger val) 用当前大整数对val求模
        BigInteger multiply(BigInteger val) 返回两个大整数的积
        BigInteger negate() 返回当前大整数的相反数
        BigInteger not() 返回当前大整数的非
        BigInteger or(BigInteger val) 返回两个大整数的按位或
        BigInteger pow(int exponent) 返回当前大整数的exponent次方
        BigInteger remainder(BigInteger val) 返回当前大整数除以val的余数
        BigInteger leftShift(int n) 将当前大整数左移n位后返回
        BigInteger rightShift(int n) 将当前大整数右移n位后返回
        BigInteger subtract(BigInteger val)返回两个大整数相减的结果
        byte[] toByteArray(BigInteger val)将大整数转换成二进制反码保存在byte数组中
        String toString() 将当前大整数转换成十进制的字符串形式
        BigInteger xor(BigInteger val) 返回两个大整数的异或
         */

    }
}
注解
注解用途
1,什么是注解
注解也叫元数据,例如我们常见的@Override和@Deprecated,注解是JDK1.5版本开始引入的一个特性,用于对代码进行说明,可以对包、类、接口、字段、方法参数、局部变量等进行注解
**注解类型:**一般常用的注解可以分为三类:
- 一类是Java自带的标准注解,包括@Override(标明重写某个方法)、@Deprecated(标明某个类或方法过时)和@SuppressWarnings(标明要忽略的警告),使用这些注解后编译器就会进行检查。
- 一类为元注解,元注解是用于定义注解的注解,包括@Retention(标明注解被保留的阶段)、@Target(标明注解使用的范围)、@Inherited(标明注解可继承)、@Documented(标明是否生成javadoc文档)
- 一类为自定义注解,可以根据自己的需求定义注解
注解与xml区别:
注解:是一种分散式的元数据,与源代码紧绑定耦合。
xml:是一种集中式的元数据,与源代码无绑定
当然网上存在各种XML与注解的辩论哪个更好,这里不作评论和介绍,主要介绍一下注解的主要用途:
- 生成文档,通过代码里标识的元数据生成javadoc文档。
- 编译检查,通过代码里标识的元数据让编译器在编译期间进行检查验证。
- 编译时动态处理,编译时通过代码里标识的元数据动态处理,例如动态生成代码。
- 运行时动态处理,运行时通过代码里标识的元数据动态处理,例如使用反射注入实例
注解作用域
- @Target({ElementType.TYPE}) //Class,interface,enum
- @Target({ElementType.METHOD})
- @Target({ElementType.FIELD})
- @Target({ElementType.PARAMETER})
注解原理
实际运用示例
@Excel
参考资源:
1.https://blog.csdn.net/xushiyu1996818/article/details/91983557